MILFORD — The fourth annual Working Pike Job Fair is set Tuesday, April 16, from 10 a.m. to 3 p.m. Held at the Best Western Inn at Hunt's Landing near Matamoras, this is a chance for both potential employees and employers to meet and match.Announcing the event at the Pike County commissioners' meeting, February 20, Michael Sullivan stated a happy result since the fair was started in 2015.Dramatic change"When we started out the big issue was [...]
Source Business - poconorecord.com https://ift.tt/2SCOTfW

الخميس، 28 فبراير 2019
More than 50 Victoria’s Secret stores to close, owner L Brands says
L Brands plans to close more than 50 Victoria’s Secret stores this year as the lingerie chain continues to struggle.Executives at the Columbus, Ohio-based retailer said in a conference call Thursday morning that they expect to close as many as 53 Victoria’s Secret stores this year, well above the 30 closed last year and the 15 stores closed previous years.“Given the decline in performance at Victoria’s Secret, we have substantially pulled back on [...]
Source Business - poconorecord.com https://ift.tt/2GTgms0
Source Business - poconorecord.com https://ift.tt/2GTgms0
Chase Bank Review | One Stop Shop for Banking
Are you shopping for a new bank?
Maybe you want to have all your accounts, cards, and loans with the same financial services provider or you’re not happy with the service at your current provider.
Whatever the reason, you might want to look at what Chase Bank has to offer. One of the biggest banks in the US, Chase has a wide variety of banking and lending options to choose from.
What is Chase Bank?
 Chase is one of the largest banks in the United States and is a subsidiary of J.P. Morgan Chase, a financial behemoth with over $2.5 trillion in assets.
It offers a wide range of banking products and services, including mortgages, auto loans, investments, and a vast selection of credit cards.
When you bank with Chase Bank, you get to enjoy the following:
- Access to about 16,000 Chase Bank ATMs across the country
- Access to in-person banking at over 5,000 branches in 26 states
- The ability to handle all your financial needs at one bank
- Exceptional online and mobile banking apps and tools
The major downside of Chase Bank is that its savings interest rates are largely low and some of its fees are exorbitant and virtually unavoidable.
Chase Bank Accounts
Chase Bank offers several options for checking and savings accounts. Let’s take a detailed look at each:
Chase Bank Checking Accounts
You can choose from four different types of checking accounts, as following:
- Total Checking
- Premium Plus Checking
- Premier Platinum Checking
- Student Checking
With those four options, Chase offers clients flexibility and some rewarding benefits. Want to open an affordable account in college? Chase’s student checking is a great option.
If you want a basic checking account with a low minimum, you could benefit from Chase’s Total Checking.
If, however, you want a more robust option and can maintain a higher balance, you could reap the benefits of a product like Premiere Plus Checking or Premier Platinum Checking.
The table below represents the features of each account:
|
Account |
Minimum Initial Balance |
Monthly Fee |
Monthly Fee Waiver |
Non-Chase ATM Fee |
Daily ATM Limit |
|
Total Checking |
$25 |
$12 |
$1,500 daily balance/ $500 direct deposit |
$2.50 |
$500 |
|
Premier Plus Checking |
$25 |
$25 |
$15,000 daily balance/ Chase mortgage auto payments |
1st 4 monthly transactions free. $2.50 afterward |
|
|
Premier Platinum Checking |
$100 |
$35 |
$75,000 daily balance |
Free |
|
|
Student Checking |
$25 |
$6 |
College admission or one direct deposit |
Free |
With any Chase Bank account, you’ll receive basic service, including:
- Online and mobile banking
- Debit cards equipped with chip technology
- Online bill payment
- Round-the-clock customer service
Chase Saving Accounts
Chase Bank offers two different types of savings accounts, namely Chase Savings and Chase Premier Savings.
Much like its checking options, Chase savings accounts give you the option to choose which account is a better fit for your financial situation.
The details of both of Chase Bank’s savings accounts are captured in the table below:
|
Account |
|
Monthly Fee
|
Conditions for Monthly Fee Waiver | Withdrawal Limits |
|
Chase Savings |
$25 |
$5 |
Initial daily balance: at least $300; Connect to any Chase checking account, or at least 1 $25 recurring auto transfer monthly from any Chase checking account |
Up to 6 withdrawals/ transfers per statement period. $5 savings withdrawal limit fee if you surpass the limit. |
|
Chase Premier Savings |
$100 |
$25 |
Initial daily balance of at least $15,000, or any Chase checking account |
Up to 6 withdrawals/transfers per statement period. $5 savings withdrawal fee beyond the limit. The fee is waived if your balance is at least $15,000 at the time of withdrawal. |
Chase also offers Certificates of Deposit (CDs). In fact, you can save more funds with a long-term CD account.
Chase CD accounts earn at the highest interest rates of all the savings accounts offered by the bank.
Other than that, Chase offers some of the lowest interest rates on savings accounts in the industry.
It’s also worth noting that the bank allows you to open a savings account as a standalone account or you can link it with your checking account.
Other Chase Products
Chase Bank Loans
You can get virtually any kind of loan you want from Chase Bank, including:
- Various mortgages
- Home-equity loans
- Business loans
- Auto loans
The bank offers competitive interest rates for mortgages and auto loans, and if you link your mortgage to a Chase checking or savings account, you may qualify for fee waivers.
Chase Credit Cards
No bank in the U.S. can beat Chase Bank when it comes to credit card offers. Here are some of the credit cards you can get from Chase:
- Chase Freedom – Earn 5 percent on rotating bonus categories and 1 percent everywhere else with no annual fee.
- Chase Freedom Unlimited – Earn a limitless 1.5 percent cash back on every purchase you make with no annual fee.
- Chase Slate – Minimal interest, impressive balance transfer offer, no annual fee.
- Chase Sapphire Preferred – Earn great Ultimate Rewards points with every purchase including double points per dollar at travel companies and restaurants. The annual fee is $95.
- Chase Sapphire Reserve – Enjoy airport lounge access, triple points per dollar on restaurant purchases and travel, among other goodies. The annual fee is $45.
Should You Bank with Chase?
What We Like About Chase Bank
- A vast network of branches and ATMs – You can enjoy in-person banking at any of the 5,100 branch locations across the country. The bank also has over 16,000 ATMs. So, regardless of where you live, you don’t need to travel far to find a Chase ATM if you’re in a region they service.
- Several checking account options – Chase bank offers four checking account options, so you can choose one that best suits your needs. With any of the accounts, you can qualify for a waiver of your monthly maintenance fees if you meet certain conditions, such as upholding an average account balance or direct deposits every month.
- Credit cards for all lifestyles – Chase Bank offers 21 credit cards designed to suit the needs of a wide range of customers. If you are a frequent traveler, for example, there are several options you can choose from, and any choice will earn you travel rewards.
- On-the-go banking – Chase has mobile apps that enable you to check your account balances, pay your credit card bills, find the nearest ATM, and transfer funds. You can also deposit checks using your smartphone, thanks to the Chase QuickDeposit service.
- Different types of mortgages – Whether you want 10-year, 20-year, or 30-year fixed-rate mortgage, Chase Bank will help you. You can also get a 5/1 or 7/1 adjustable-rate mortgage. The bank also provides specialized home loans such as VA, FHA, and jumbo loans.
- Wide selection of investment products –Chase Bank has a team of experienced financial advisors who can help you create an effective investment strategy based on your future goals and tolerance to risk. The bank provides managed accounts, mutual funds, and college savings plans in partnership with J.P. Morgan.
If you want to save for retirement, you can take advantage of Chase Bank’s traditional or Roth individual retirement account (IRA). The bank also partners with a number of insurance providers to offer annuities.
What We Don’t Like About Chase Bank
Despite its great attributes, Chase Bank is not without some drawbacks, as outlined below:
- Minimal interest rates – Chase is one of the banks that offer low-interest rates on savings accounts. Its savings account APY is only 0.01 percent. You’ll find
- Limited availability – Chase Bank may be technically a national chain, but it is not available in some regions in the U.S. Hence, it’s advisable to check out the availability of its branches and ATMs before you decide to bank with Chase.
- Management fees – Some banks offer free savings and checking accounts unconditionally, but with Chase Bank, there are conditions that you must meet to avoid account management fees.
- Low mobile deposit limits – If you run a business or you’re a freelancer who normally receives payments in the form of a check and prefers the convenience that mobile deposits have to offer, Chase may not be your ideal bank. The bank’s mobile check deposit limit is only $2,000. The monthly limit is only $5,000.
In Conclusion
Chase can be an excellent bank for checking and savings. It also has a wide selection of valuable offerings and a substantial online presence with a reliable mobile app.
The major downside of Chase Bank is that it offers some of the lower interest rates on the market when it comes to savings despite being one of the largest banks in the country.
If your main concern is high interest on savings, you would be better off with another bank; however, if you’re looking for a full-service bank with physical branches, Chase is a stable and convenient option.
The post Chase Bank Review | One Stop Shop for Banking appeared first on Good Financial Cents®.
Source Good Financial Cents® https://ift.tt/2H4h3OG
10 Vital Customizations to Make in Google Analytics
Google Analytics can do just about whatever you want it to. It has a ton of depth.
It can also feel a bit overwhelming once you get into it.
After consulting on Google Analytics for years, both independently and as the head of marketing at an analytics startup, I have 10 customizations I consider vital for every site I run.
Once they’re in place, you’ll have:
- Keyword data in Google Analytics. Yes, I’m completely serious. Keyword data is back.
- An account structure that will save you if you ever accidentally nuke your Google Analytics data.
- Metrics to help you drive your business.
- A roadmap to clean up your URLs to make your reports accurate. (They’re not as accurate as you think they are.)
- Alerts to help you catch catastrophic data failures within 25 hours.
- The Google Analytics tracking script installed like the pros.
- A method to filter out data from your office IP so your company doesn’t accidentally skew the reports.
Let’s dive in.
Connect Google Analytics to Google Search Console
Way back, Google Analytics used to have keyword data in all its standard reports. You were able to see which keywords sent traffic to which pages. And if you had ecommerce tracking or goals set up, you could see how much revenue each keyword produced for you.
It was amazing.
Then Google decided to remove the keyword data from Google Analytics.
So, instead of amazing keyword data, everything got lumped into the dreaded “not provided” group.
Google killed the keyword data in Google Analytics.
I thought the keyword data was done forever — I never expected to see it again. I resigned my fate to needing tools like SEMrush or Ahrefs for keywords.
Then a funny thing happened.
Google started investing a lot of time into improving Google Search Console. In the last few years, it’s gotten incredibly good. The data is a goldmine. Google also improved the integration between Google Search Console and Google Analytics so it’s now possible to get a lot of that missing keyword data back.
That’s right, keywords are back in Google Analytics. All you have to do is sign up for a free Google Search Console account and connect it to your Google Analytics account.
It’s pretty easy. There are only two steps:
- Create a free Google Search Console account and verify that you have access to your site. The easiest way to verify is if you already have Google Analytics installed.
- In your Property settings in Google Analytics, connect to your Google Search Console.
Here’s where to find the settings in Google Analytics to turn on Google Search Console:
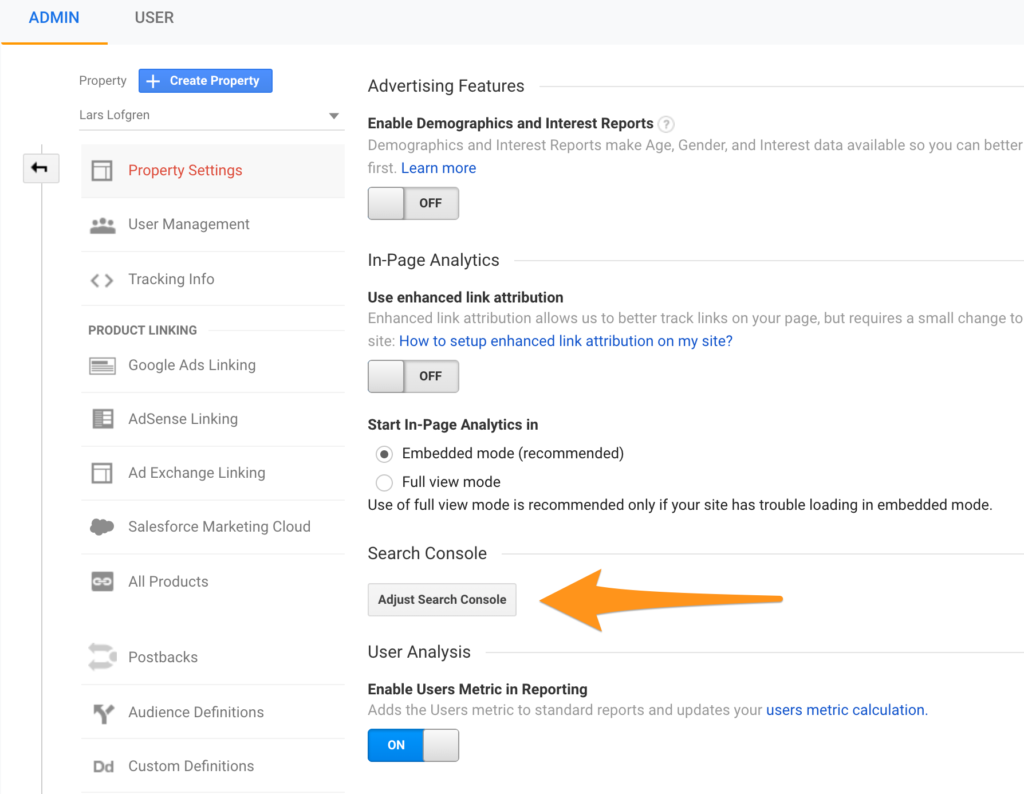
After the accounts are connected, all the reports under Acquisition – Search Console will start populating. Keep in mind that they have a 48 hour delay so give it a few extra days before checking for data.
Create Multiple Views
I consider this a mandatory customization for Google Analytics.
Once data makes it into your Google Analytics reports, it’s permanent. Nothing can change it. Google has an entire processing pipeline for all the data it collects. Once data has been processed, there’s no going back.
So what happens if you use one of these Google Analytics customizations and accidentally nuke your whole account?
That data is permanently gone. When you fix the setting in your account, you won’t get any of your old data back. Only data from that moment onward will be clean.
Even if you just make your reports a bit messier with the wrong setting, there’s no going back.
In other words, the stakes are high.
We all make mistakes. And it’s a good idea to create two extra views for your Google Analytics profile as a backup.
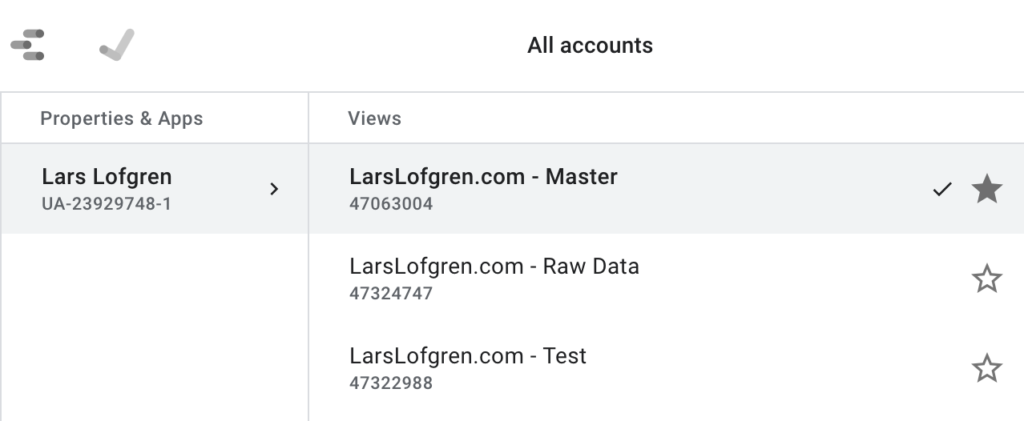
On every one of my Google Analytics properties, I create three views:
- Master View = This is the main view you’ll do all your analysis with.
- Test View = Before adding a new setting to your Master view, add it here first. This allows you to test it out before impacting your real data.
- Raw Data View = Leave this view completely untouched without any settings configured. If something goes horribly wrong, you always have this base data to work with.
Your Google Analytics views should look like this:
Set Up Events
Google Analytics tracks a ton of stuff without any customization which is why it’s so popular. There’s a ton of value right out of the box.
Sometimes, there are other actions that are also worth tracking beyond the standard sessions, pageviews, bounce rates, and time on site. You might want to track:
- Account creations
- Email signups
- PDF downloads
- Video plays
- Calculator or other tool usage
- Contact form submissions
- Webinar registrations
- Clicks on important links
Anything that’s important to your site can be turned into a Google Analytics event so you can track how often it’s happening.
To trigger events, you will have to add some code to your site that sends the event data whenever the action occurs. Most likely, you’ll need a developer to help you set this up. All the event documentation is here.
Define Goals
In my experience, folks go overboard with goals. Hitting 10 pageviews per visit is a goal, signups are goals, PDF downloads get goals, random events are goals, goals goals goals everywhere.
Usually when I start working on a new site, I end up having to delete a bunch of goals that don’t matter.
My rule: only 1 or 2 goals per site. And they should be goals that closely track to revenue. So if the goal goes up, I expect revenue to also go up. If the correlation to revenue is weak, use an event instead of a goal.
Some examples of good goals:
- Free trial sign up for your software
- New email subscription
- Demo request
- Consultation request
- Affiliate link click
- Webinar registration if this leads to a sales funnel. If it’s a normal content-based webinar, I prefer not to set it up as a goal.
Any event that leads to a sales funnel is a good candidate for a goal. There are really two ways to set up goals like these.
URL Goal
If your site is set up in a way that users always hit the same URL after completing one of these key actions, you can tell Google Analytics to trigger a goal every time someone lands on that URL. This works great for “thank you” pages.
No code is needed for these, you can set it up right away.
Event Goals
It’s also possible to have Google Analytics trigger a goal any time an event fires. This gives you the flexibility to trigger a goal whenever you like since it’s possible to trigger events whenever you like.
You most likely need a developer to help you set these up. Ask them to create a Google Analytics event for you. Once you see the event tracking correctly in the Google Analytics event reports, then go set up a Goal using the values of your event.
Why go through the trouble of turning an event into a goal? Why not just look at the event reports? It makes getting conversions data in your reports a lot easier. Many of the reports are pre-configured to show conversions based on goals. It’s trickier to get the same reports based on just events.
Implement Ecommerce Tracking
If you have an ecommerce store, Google Analytics ecommerce tracking gets all your revenue data into your reports. It’s amazing.
You’ll be able to see:
- Which traffic sources produce the most revenue
- Traffic sources that produce a lot of traffic but no revenue
- The pages that bring in new visitors who end up purchasing
- The user flows on your site that lead to revenue
- How users go through multiple traffic sources before they end up purchasing
Google Analytics doesn’t track any of your ecommerce purchases out of the box. You will need to set up some extra stuff.
There are only two ways to get this set up:
- If you can edit the code of your checkout flow, there’s extra JavaScript tracking that will send purchase data to your Google Analytics account.
- Some ecommerce tools have ecommerce tracking built in. All you have to do is turn it on, hook it up to your Google Analytics account, and the data will start showing up.
First, go check your ecommerce tool and see if it has a built-in integration. Shopify has one. And if you’re not on Shopify, consider migrating. It’s worth the switch.
If you need to set up ecommerce tracking by hand, all the developer documentation is here.
One last thing, remember to turn on ecommerce tracking in your Google Analytics settings:
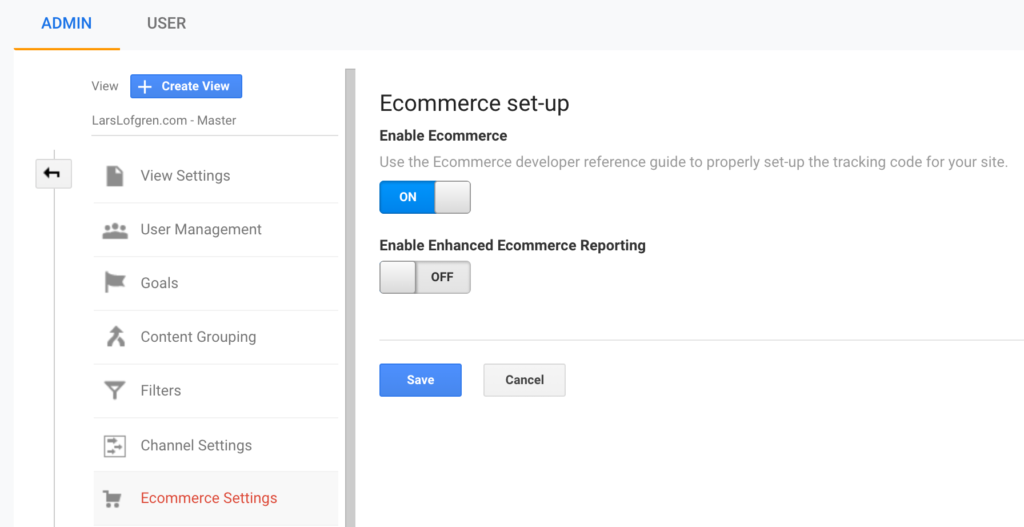
You need to flip the switch before data will start showing up.
Content Groups
Out of everything on the list, Content Groups are the most situational customization. Most sites don’t need to set these up — they’ll amount to nothing more than busy work that’s quickly forgotten about.
But for editorial and ecommerce sites, they make an enormous difference.
Google Analytics considers all your URLs to be equal. It doesn’t lump them into subgroups at all.
If you have a large site and manage the site by sections, this becomes a real problem. You might have Money, Heath and Fitness, and Political news sections that are all managed by different teams. Or, maybe you have different merchandize groups for your ecommerce store. How do you track the performance of those different sections of your site?
You can’t do it with an internal spreadsheet; new posts and products go up too fast to keep one accurate. Even if you can make it work, it’s a real pain to keep updated.
Setting up unique Google Analytics views is one option but only really works if every category has a clean subfolder in your URL. Plus, creating unique Google Analytics properties for each section creates all sorts of extra problems with referrals and tracking everything in aggregate.
The solution? Google Analytics Content Groups.
Using either the Google Analytics settings or by appending your Google Analytics JavaScript with a bit of extra code, you can categorize your site pages into whatever groupings you want.
Once you’ve set up Content Groups, you can take any report in Google Analytics and organize all the data by any content group you’ve set up. For major editorial and ecommerce sites, it saves countless reporting hours.
Clean Up Parameters
It’s pretty common to run into pages like this in your Google Analytics reports:
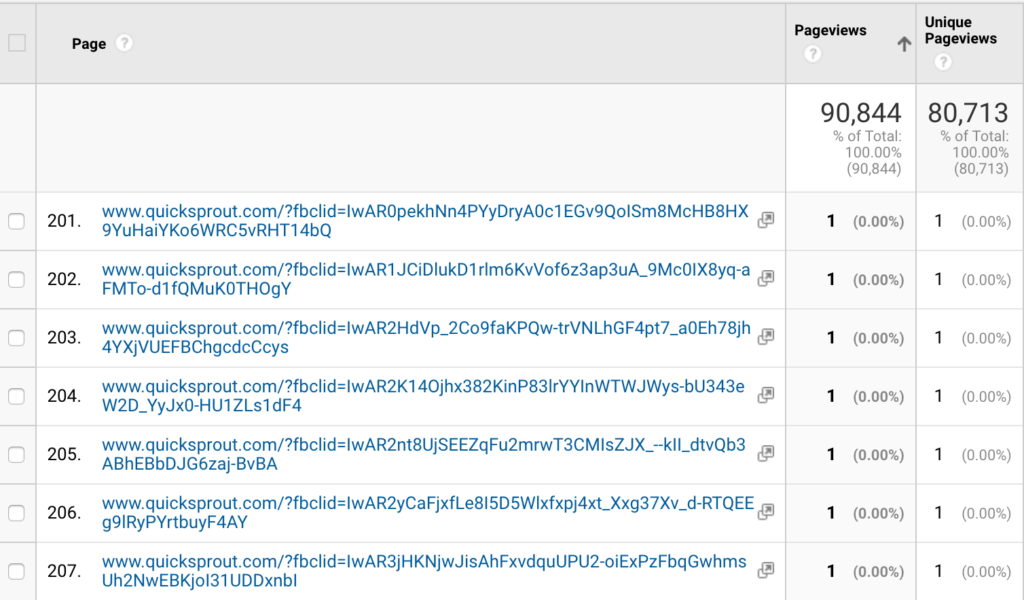
Anything after a “?” in a URL is a parameter. It’s common for tools to add URL parameters to a URL. These parameters don’t change the destination of the URL, they add extra data that various tools can then use.
The problem is that Google Analytics treats parameters as unique URLs. In other words, traffic to the same page will show up in Google Analytics as visiting different URLs simply because the parameters for each user were different.
This splits our pageviews across a bunch of different URLs instead of giving us the real total for a single page on our site. That’s exactly what’s happening in the Quick Sprout example above. Instead of having 7 pageviews for our homepage, we have 7 pageviews split across unique pages because of a unique fbclid parameter that was added.
There’s a bigger problem too.
A lot of marketing automation and email tools will add ID parameters to the end of every URL in their emails. That allows them to track what email subscribers are doing. Even worse, it can populate reports with personal information like email addresses and names. It’s against the Google Analytics terms of service to have personal info in any report so you definitely don’t want this data to end up in your reports.
Here’s how parameters work:
- The end of the URL and the beginning of the parameters is marked with a “?”
- Every parameter has a name and a value. The name is before the “=” and the value comes after.
- Parameters are separated by an “&” so if you see an “&” in the URL, that means there’s multiple parameters.
To clean up your reports and scrub personal data clean, go to the All Pages report. Then sort by least pageviews. This will give you a list of URLs that only had a single pageview. Scroll through about 100 pages and look for any parameters that don’t signify a real URL.
Once you have a list of parameters that are junking up your reports, go to your View settings and add all the parameters that you want excluded here:
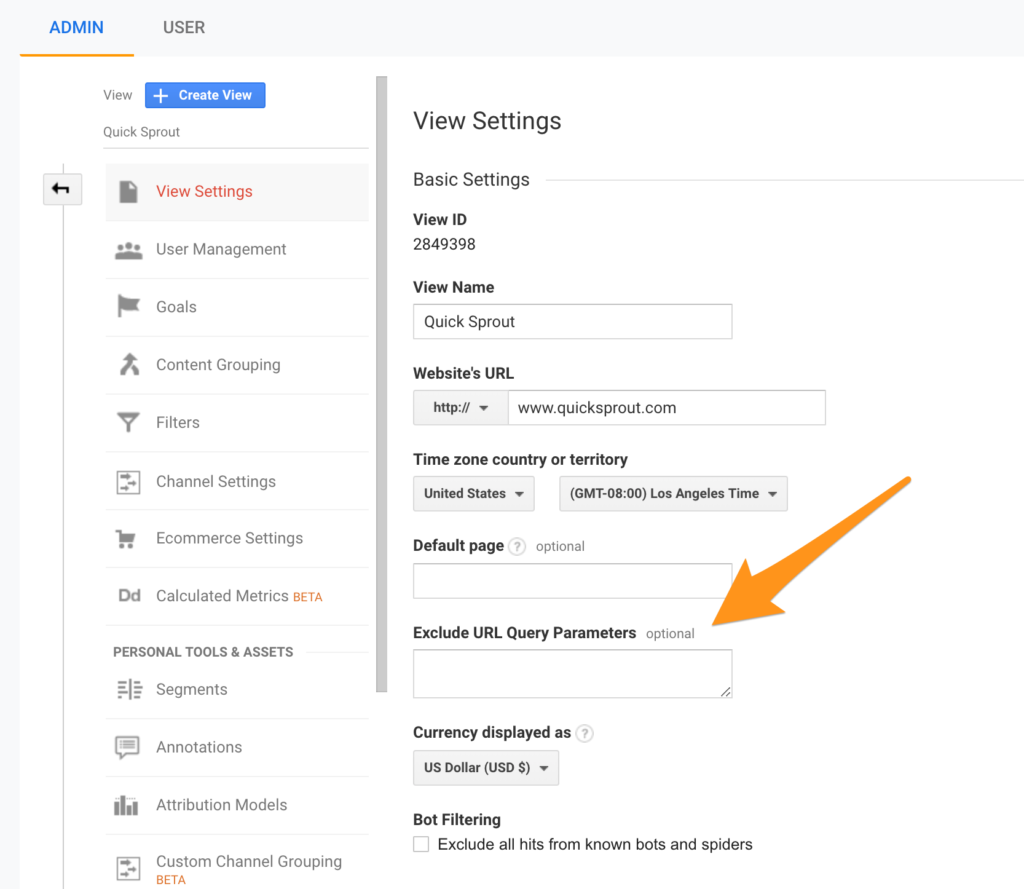
Be careful though. Some sites use parameters for different pages. I personally think it’s a terrible way to structure a site but it does happen. If your site does this, don’t include the parameter for those real pages. Otherwise Google Analytics will stop tracking the pages entirely.
Also don’t include any of the standard UTM parameters that are used to track marketing campaigns. Google Analytics already handles that data correctly.
Install Google Analytics via Google Tag Manager
In our post on setting up Google Analytics, I advocated for skipping Google Tag Manager when setting up Google Analytics for the first time. I still stand by that, especially for folks creating their site for the first time. When you skip Google Tag Manager as a new site owner, you skip a lot of emplexity without giving up much.
If you’re at a stage with your site where you’re looking at deeper customizations for Google Analytics, it’s worth taking the time to get Google Tag Manager set up.
Long term, using Google Tag Manager is a good habit to get into. It saves a bunch of headaches down the road that large sites run into. Keeping all of the JavaScript tags from all your marketing tools in a tag manager makes updates, maintenance, and audits super easy.
Again, if you’re running your site by yourself and hate the thought of learning one more tool, feel free to skip this.
For everyone else, it’s time to remove your Google Analytics Global Site Tag from your site, install Google Tag Manager, and then add Google Analytics to your tag manager.
Once you’ve removed Google Analytics JavaScript from your site, follow these steps:
- Create a Google Tag Manager account and set up a workspace for your site.
- Install the Google Tag Manager Javascript in the same place on your site that you previously installed Google Analytics directly. The JavaScript is under the the Admin section of your Google Tag Manager account.
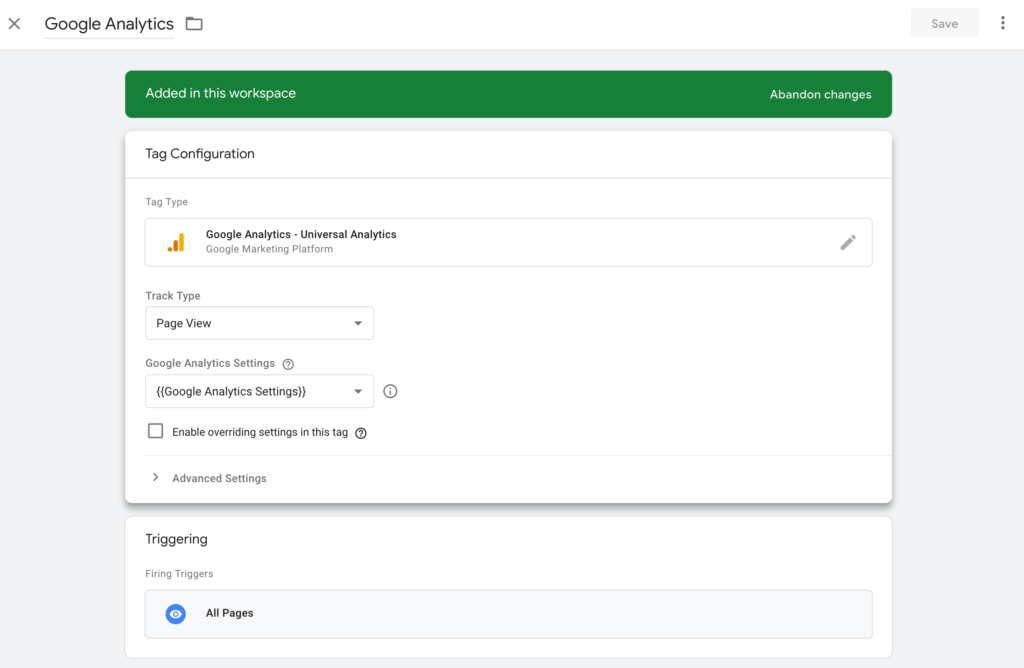
- Create a new tag under your workspace.
- For tag type, choose “Universal Analytics”
- Choose “Page View” for track type.
- Under Google Analytics Settings, choose “New Variable” and adding your Tracking ID.
- Add a trigger that fires the tag on all pages.
- Save your tag and publish your workspace. Don’t forget to publish the new workspace; you have to “push” to production otherwise your changes won’t go live.
Your tag will look like this when you’re done:
To make sure that Google Analytics is working through Google Tag Manager, check your real-time reports in Google Analytics to see if it’s successfully recording data.
Create Custom Alerts
Sooner or later, you site will get hit. Here are a few scenarios that I’ve personally been through:
- A site redesign was launched and Google Analytics was missing when it was pushed to production.
- Another site redesign launched and cut our sign-up flow by 50%. Tracking was working, the new site just didn’t convert nearly as well as the old site.
- Someone was making a few changes to the site and accidentally removed Google Analytics from the entire site. It was missing for about 24 hours before we caught it.
- Google launched a bug in its search algorithm and we lost 40% of traffic in about 30 days.
- On a different site, we lost 40% of our search traffic in 30 days after Google recrawled our site and lowered all our rankings.
- New sign-up infrastructure launched and broke our sign-up tracking, the primary goal of the site.
- I launched a new pricing page and cut our sales pipeline by 50%.
Most of these examples are pretty embarrassing.
Sooner or later, they happen on every site. I find that I run into 1–2 per year.
To help catch major problems like these, Google Analytics has Custom Alerts. You define a set of criteria and whenever that event happens, Google Analytics will send you an email. Even if your team isn’t checking Google Analytics daily, you’ll still catch major problems within 24 hours.
Here’s the alert I like to set up:
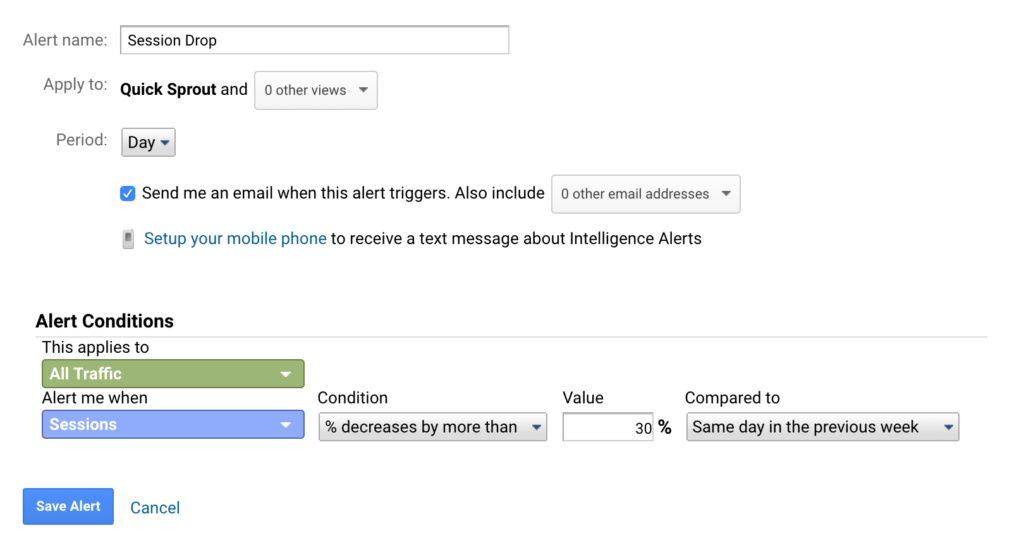
This alert sends me an email whenever sessions decrease by 30% or more compared to the same day the previous week. A few tricks that I’ve learned about custom alerts over the years:
- Alerts by day are the most useful. This will catch catastrophic problems that tank your data immediately. It can take longer for those problems to show up in weekly or monthly data. I also find that normal reporting is good enough to catch the weekly or monthly changes.
- I try to only set up a handful of custom alerts. One for total traffic and one for the primary conversion event on the site are usually enough (sign up, purchase, etc). If too many alerts fire, it becomes a bunch of noise.
- Comparing to the previous week is helpful. Most sites have huge traffic differences between the week and the weekend which are totally normal. These normal fluctuations can trigger alerts if you compare day to day.
- Increase the trigger percentage if you find that you’re getting too many false alarms.
- Some folks set up alerts for positive increases too. I never found them that useful personally. Good news has a habit of taking care of itself. It’s bad news where every minute counts.
Add an Office IP Filter
In Google Analytics, filters give you complete and total power. You can remove and transform your data permanently.
And when I say permanently, I do mean permanently. Be careful with these things. Once a filter is live, it’ll change all the data that’s collected. There’s no way to undo it. If a bad filter is applied, the only fix is to remove it and clean up data that’s collected after. There’s nothing that can be done to fix the old corrupted data.
So proceed with caution on these things.
There’s one filter that many websites should apply: a filter to remove internal traffic.
If you’re running your own business out of your house or from a coffee shop, don’t worry about this at all. The data impact from a single person is so limited that it’s not worth the hassle of adding a filter and maintaining one more setting in Google Analytics. Whenever I start to see the impact of my own browsing habits on one of my websites, my first thought is: “I need to spend my time getting more traffic.” At that stage, I prefer to worry about big things like getting enough traffic and customers.
However, there is a situation where an office IP filter becomes a requirement. When you’re working on a larger website with an entire team of people employed, skewing your traffic data becomes a real possibility. If a couple hundred people all work on the same website, Google Analytics data will become biased.
If your company works out of an office (or several offices), it’s worth the effort to figure out the IP address of your office and apply a Google Analytics filter that excludes all data from that IP. That keeps your employees from skewing your Google Analytics reports during their day-to-day work.
Here’s what your Office IP filter will look like:
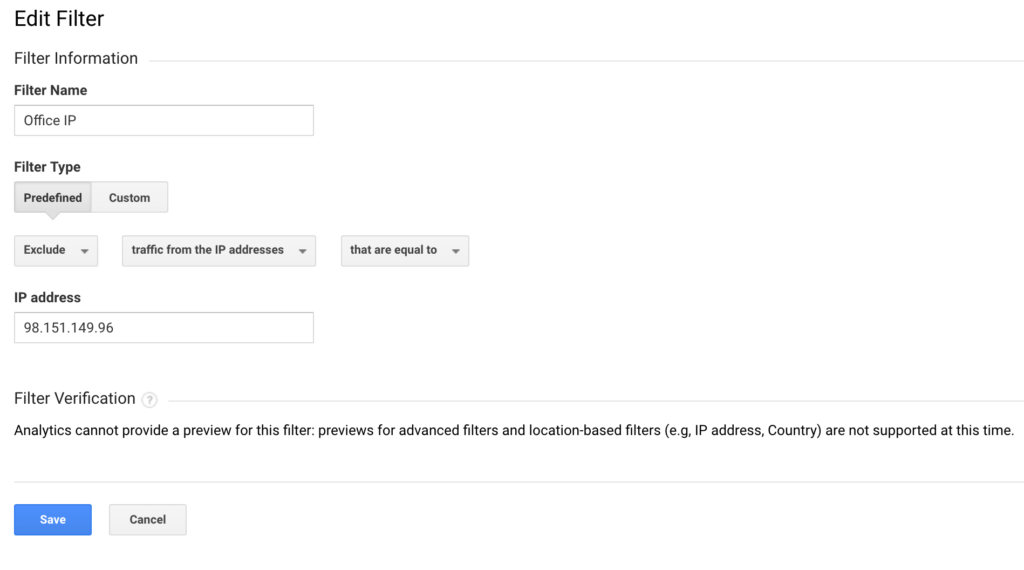
This filter tells Google Analytics to take all data from an IP address and completely ignore it.
Remember to use the new views that you set up earlier. First apply the filter to your Test view, give it a few days to make sure it’s working properly, then apply the filter to your Master view. Filters are so powerful that you always want to test them first. All it takes is accidentally selecting “Include” when you meant “Exclude” to permanently nuke your entire Google Analytics account until your discover the mistake.
Source Quick Sprout https://ift.tt/2UiV36B
Do You Save Money By Making Your Own…
One fairly common question I see from readers is whether or not making something on your own is cheaper than buying it in the store.
First of all, most of the things you make at home actually compare in terms of quality with a fairly high end version of that item in the store. Homemade bread is going to be far better than the cheapest store bread. Homemade pasta is going to be far better than the cheapest store pasta. Homemade laundry soap is going to be far better than the cheapest store laundry soap. This has been pretty much universally true with things I’ve made at home over the years. The homemade version is almost always significantly better than the cheapest version of an item at the store, and usually comparable to one of the more expensive versions.
In terms of price, however, the homemade version usually winds up being comparable in price to that cheapest version. This isn’t always true, as there are some homemade items that end up being cheaper and some homemade items that are very difficult to make cheaply, but it’s a pretty good standard to live by.
Given those two general standards, you’ll find that most homemade items have a financial cost compared to the cheapest version at the store (or maybe a bit less) but end up producing an item that’s comparable to an expensive version at the store. The issue here, of course, is time. Homemade items require some degree of time investment, so what you’re usually asking yourself is whether the time invested in making something at home is worth the savings of the expensive version of an item versus the cheap version. For many people, it’s not, which is why many people skip out on homemade items; for others, there is appeal to making things from scratch, so there’s an additional value in making something at home.
Let’s take a look at the cost comparison for several items I’ve made at home myself in the last year or so.
Homemade Bread
My typical “skeleton” recipe for homemade bread – meaning I’m not adding anything else, like unusual flours or herbs or spices – is just a tablespoon of dry yeast, three tablespoons of sugar, one tablespoon of salt, two tablespoons of oil, and about 6 1/2 cups of flour. This produces two loaves of bread that are roughly equivalent to a high quality store-bought loaf. I wrote about my bread recipe before and also discussed things to do with leftover bread in case you make too much.
A two pound bag of flour, which you can buy for about $1.50, contains enough flour for this recipe with about two cups left over. If you buy a five pound bag of flour, which you can buy for about $2 (I checked the store brand unbleached flour at Target, which is $1.99 for a five pound bag as of this writing), that’s enough to make three batches of this recipe. So, let’s say the flour costs about $0.66. The yeast probably adds another $0.10 and the other ingredients add about $0.10 more. You’re probably using $0.10 in energy by using the oven. So, the ingredients, all told, add up to about $1 for two loaves of bread. You can buy one loaf of the cheapest white bread you can find for $1; buying any bread comparable to this will be at least $3 per loaf. I actually think that this homemade bread is far better than store bread.
So, if you’re comparing homemade bread to the cheapest bread, you’ll save about $0.50 per loaf. If you’re comparing homemade bread to similar quality bread, you’ll save about $3 per loaf (depending on what you buy and consider comparable).
What about the work, though? You really have two options here. You can either make bread manually, which takes about 15-20 minutes of your time spread out over two hours, or you can use a bread machine, which reduces the time to about five minutes, after which you can hit a button and walk away. (However, in my opinion, bread machine bread isn’t quite as good as handmade bread, but it’s still far better than “cheapest loaf at the store.”) You can track down a bread machine at a Goodwill pretty easily, as there’s almost always one there.
So, are you willing to spend 15-20 minutes to save $1 (or $6), or 5 minutes if you have a bread machine? We often make our own bread, but not always – sometimes we’ll decide to ad-lib and have sandwiches for lunch one day and that usually involves just buying a loaf at the store. Part of that is because of the other small drawback of homemade bread – it doesn’t last quite as long because it’s not laden with preservatives. If I have spare time and our meal plan calls for bread, though, I’ll often make a loaf. I compare homemade bread to the higher quality version, so if I’m making it by hand, I’m saving about $20 per hour with the effort. I don’t consider bread machine bread to be quite as good, but it’s much faster, so I stick with the $20 per hour for my effort number with the bread machine, too.
The verdict? If I have a bit of advance warning and I also know it’ll be used up fast, I’ll always bake homemade bread because of the savings. It’s worth it.
Homemade Pasta
Homemade pasta is just flour and eggs, seriously. It’s three cups of flour and four eggs (and a tiny bit of salt and oil) to make enough pasta for my family for dinner. Here’s a basic recipe.
As noted above, the cost of the flour is about $0.33. The cost of the eggs is about the same – $0.33 – as I can find a dozen eggs at the store for $1 pretty regularly. The other ingredients add up to about $0.05. So, the total cost for a batch of handmade fettuccine for my family is about $0.72.
Here’s the catch – it’s fairly labor intensive. If I make it completely from scratch, it takes about half an hour per batch. Mostly, that involves mixing the flour and eggs, rolling out the dough as flat as possible, folding it over, rolling it out again, and then eventually rolling it up and slicing it. It’s a little faster if you have a manual pasta roller, which costs about $20 – you can cut the time down to about twenty minutes. You can make a lot of batches at once, but you have to lay them out to dry and then store them and they last about a month. You’re looking at about 30 minutes per batch.
Another option is to use a pasta making machine. It has one big time cost – the cleanup – and it’s expensive, but it can whip out a batch of homemade pasta with about a minute of effort (and about 15 minutes of waiting). If you want to make several batches, you can usually lay out one batch to dry while the next batch is being made, so it’s much more efficient, but you’re still talking about 15 minutes per batch.
I can buy a box of cheap pasta at the store for $0.99. Comparable high quality pasta costs about $4 for a comparable batch.
So, if I’m comparing handmade pasta without a machine to cheap store brand pasta, I’m saving about a quarter for 30 minutes of effort. That’s probably not worth it for most people. With a machine, it goes down to about 20 minutes of effort for a quarter.
If I’m comparing handmade pasta to high quality pasta, I’m spending about 30 minutes of effort to save $4. I’d say the homemade pasta is still just a little better, but this is a good comparison.
I consider completely handmade pasta to be just a bit better than the machine made pasta, but the machine made pasta blows cheap pasta out of the water and cuts the time in about half. However, a fully automated pasta machine costs about $200, so it’s really not worth it unless you’re going to be making pasta frequently.
The verdict? I’ll make handmade pasta for special occasions because it’s so tasty, but it’s not efficient enough to replace store-bought pasta for most meals. Also, a fully automated pasta machine probably isn’t worth it unless you’re using it all the time for years.
Homemade Laundry Soap
Homemade laundry soap is something I’ve used for many years. I described an early incarnation of my recipe in one of the earliest posts on the site, and offered my revisions later on.
Today, it’s really simple. I put a cup of soap flakes, a cup of washing soda, and a cup of borax into a sealed container and shake it for thirty seconds or so. Then, I put a measuring tablespoon in there and scoop a tablespoon into each load of laundry. That ends up providing 48 loads of laundry, right there, at a cost of about $0.06 per load. Tide, by comparison, costs around $0.30 per load. Thus, over the course of a year of daily washing, this saves us about $75.
For us, as shown in this post, this homemade laundry soap does the trick. Having said that, I have learned over the years that different types of laundry soap and laundry detergent work differently depending on the kind of water you have in your washer. If your water is soft, this soap seems to work just as well (if not better) than laundry detergent; if you have really hard water, it seems like laundry detergent from the store is needed.
The verdict? Homemade laundry soap is a significant money saver for little effort for many water types. However, you should make a batch, use it, and observe the results for yourself, as different water will have different results with different soaps and detergents.
Homemade De-Icer
Living in a northern climate means that for about four months out of the year (or more), removing ice from your windshield in the morning is just part of the routine.
The usual methods, if you have plenty of time, are to start your car, turn on defrost mode, turn the air handling to recirculate the air, and turn up the heat. That will melt the ice eventually, and many people do this and just go back inside for a while. Another option is to use an ice scraper, which is usually a piece of curved plastic that can be scraped along a windshield to remove ice.
To save time, many people buy ice remover from an auto shop that does the job incredibly efficiently. Just spray it on your windows after starting your car, run the wipers when you get inside, and your car is a bit warm and ready to go, so you head out! Easy as can be… except that such ice remover mixes are fairly expensive.
I started using a homemade ice remover mix a few years ago and it works like a champ. All it is is a spray bottle with 1.5 cups of water, 1 cup isopropyl alcohol (rubbing alcohol from your local pharmacy, which costs about $0.79), and a couple of drops of dishwashing soap. Just leave it inside your front door, shake it up as you walk out to your car, start your car, and then spray this stuff on the outsides of the windows. While it doesn’t completely make ice vanish like magic, especially on super-frigid days, it does make the defroster much more efficient and makes any scraping you do trivial. I would rate this stuff as being about 80% as effective as the store-bought solution at about 10% of the price, and it takes maybe fifteen seconds to mix up a spray bottle of it.
The verdict? If you live in a cold climate, having a bottle of this stuff inside your house to spray down windshields on a cold day is going to save you a lot of ice removal time for just pennies, and it’s incredibly effective for the cost. The store-bought stuff is a little better, but it’s also far more expensive and you’re still going to have to scrape off ice many days regardless of which you use (this spray just makes it way easier).
Homemade Dishwashing Detergent
Dishwashing detergent is expensive. Over the years, I’ve tried to find a formula that works really well as a homemade replacement to save $50 a year or so, but I’ve never been able to find one that actually did the trick consistently.
The issue is that the formulas I’ve tried do a good job when the dishes are all pre-rinsed and there’s nothing grimy on them, but they barely touch dishes that aren’t perfectly pre-rinsed. While store-bought detergents (I prefer Member’s Mark from Sam’s Club) don’t always get everything, they do a much better job than homemade recipes.
The best of the homemade recipes I’ve tried, and the one I wouldn’t mind using at least some of the time, is just one part vinegar, one part salt, two parts lemon juice, and three parts water. Mix all of that together and simmer it in a saucepan, stirring it regularly, until it cooks down into a gel-like substance (it’s kind of like thick applesauce). Then, put that in a pourable bottle and just pour it into the slot for detergent in your dishwasher. This needs to be stored in the fridge or else it will ferment a la preserved lemon. By my math, this recipe ends up costing us about $0.12 per load, compared to about $0.25 for store-bought dishwashing detergent. It does a good job, but it’s noticeably worse than the detergent from the store and takes extra effort, so it isn’t something we use at home.
The verdict? I’ve yet to find a homemade dishwashing detergent recipe that works well enough to replace buying it at the store. I’ve tried several formulations and none of them really work very well at all. The best one is cheaper than the dishwashing detergent we prefer, but it takes about twenty minutes of effort to make about thirty loads of cleaner, which saves about $4, and it’s just not quite as good.
Homemade Soap
Sarah and I have made homemade soap several times; here’s the details on one of our soap-making batches. Each time, we’ve made a ton of soap and used it for months if not years; in fact, if you check out most of our bathrooms, you’ll find bars of homemade soap in there.
The truth is that if you’re going to be making homemade soap, it’s really only going to be worthwhile if you make a ton of it – enough bars to last your home for years and probably some to give away as gifts. A small batch of completely from-scratch soap isn’t worth the effort, in my opinion.
The batch listed above costs about $34 in ingredients, according to my math. This ended up producing about 70 (!) bars of soap, and these bars are bigger than most of the typical bar soap you find at the store. They’re much more comparable to the large bars of handmade rough-hewn soap you’ll see at places like Whole Foods. You can certainly add to the cost by adding things like coloring, essential oils, oatmeal, and so on, but even then, you’re probably only raising the cost per bar up to about $0.60 per bar from the $0.50 of the basic recipe.
The cheapest bars of soap I was able to find at the store were $0.69 at regular price, and they were much smaller than the bars we made. I’d estimate that a comparable amount of “cheap” soap to our recipe is about $1. Thus, with our recipe, you’d save about $35 over the cheap soap.
However, you’re probably not going to invest the time and effort to make this soap if you’re just trying to get cheaper than Ivory. This recipe, from beginning to end, probably takes about three hours to make and requires some equipment – you’ll probably already have a lot of it, but you’ll have to buy a few things. Given the equipment and the time, it’s probably not efficient to make this just to beat the cheapest soap at the store.
If you’re making this to save money, you’re aiming to replace handcrafted soap, and that’s where you can save money. Similar handcrafted soap is often sold for $3-4 per bar, thus this recipe is likely saving you hundreds of dollars over the course of using 70 bars of it.
The verdict? This isn’t worth it if you just buy cheap soap at the store. It is worth it, however, if you’re comparing it to buying hand-crafted soap, which is really what you’re making here. It takes a lot of time and some equipment, but it’s a pretty fool-proof method if you take it slow and are careful with it. You just can’t view this as a savings over buying jumbo packs of Ivory soap or store brand soap, because it’s not.
Homemade Coffee
I swear I get a coffee-related question every week, so let’s just have it out.
Coffee is very much dependent on personal taste. Different people simply like different coffees. For me, I am pretty flexible in terms of the beans, but I absolutely prefer cold brew coffee, to the point that I basically don’t even drink other types of coffee. They taste too acidic to me.
Thus, the only way I can really fairly talk about coffee is to discuss what I personally do, which is make cold brew.
I have a simple cold brew coffee maker that I picked up at a kitchen supply store sale for about $10. It’s similar to this one, except the pitcher is glass. It’s all I need to make cold brew coffee – no filters or anything else.
My wife has a simple coffee grinder, which I set on “coarse” and grind 3/4 cup coffee beans when I want to make a batch. I grind 3/4 cup of beans, then take the grounds and put them in the filter, then I pour four cups of cold water over it and stick it in the fridge and let it sit for 16 to 24 hours. I remove the grounds and add them to the compost or toss them and save the liquid, which is about four cups of cold brew coffee. I toss the coffee maker in the dishwasher. That’s it. It takes maybe five minutes. I store it in the fridge and drink it cold, but if I want it hot, I can just microwave it. (If I bought pre-ground coffee, I’d use about 1/4 cup grounds in the cold brew maker.)
My “standard” beans are Eight O’Clock original beans, which you can buy for $19.14 on Amazon. That bag gets me about 16 batches of coffee. Each batch has 4 cups in it. That’s 64 cups of coffee for $19.14 in beans and the negligible cost of water. Let’s say I drink 16 ounces at a time, or two cups. A 16 ounce coffee by my method costs $0.60 and takes maybe a minute’s worth of effort.
For comparison’s sake, a venti (20 ounce) black coffee at Starbucks costs $2.45. That’s a pretty good baseline comparison point. I’m saving about $1.70 each time I drink 20 ounces of coffee at home versus Starbucks.
I don’t add creamer or other flavorings to my coffee, but if you do, I’m pretty confident in saying that creamer and sweetener at home is going to be cheaper than at a coffee shop. While I didn’t get into the details, my wife immediately reported that the creamer she uses is substantially cheaper than the cost difference of flavored coffee at a coffee shop and it’s not even close.
The verdict? If you drink coffee on a daily or near-daily basis, finding a method of making it at home versus buying it at a coffee shop is almost guaranteed to save you significant money. The cold brew method I use is really easy; I spend maybe two or three minutes and make enough coffee for me for two or three days (I drink 12-16 oz. per day), and it saves around $3 over buying the equivalent at Starbucks and I like the flavor of what I make better.
Final Thoughts
I get a personal joy out of trying to make as many things at home as I can and figuring out whether or not they save money. After a trial run or two, the things I make at home from scratch are usually better than most items at the store, so the question is whether the time is worth it. As you can see… sometimes it’s worth it and sometimes it isn’t.
In summary, I consider homemade coffee and homemade laundry soap and homemade de-icer to be worth it almost always. I consider homemade bread to be worth it most of the time. I consider homemade soap to be worth it, but it’s a real job – thankfully, you’re making a lot of it at once. I consider homemade pasta to be worth it on special occasions, but not as an everyday thing. I don’t consider homemade dishwashing soap to be worth it, period (though it smells good).
My general advice is to try making it yourself and make up your own mind about things. You’ll almost always learn something in the process and you might end up finding a better way of doing things in your own life.
Good luck!
The post Do You Save Money By Making Your Own… appeared first on The Simple Dollar.
Source The Simple Dollar https://ift.tt/2Ta4jgz
Here’s Why Shopping for Life Insurance Doesn’t Have to Be Such a Hassle
Getting life insurance seems like such a pain.
I mean, you have to jump through all these hoops — sign a million forms, go to a doctor’s office to get a physical and send a stack of paperwork to an insurance agent. The whole thing is probably going to take weeks!
Maybe you’re interested in getting a life insurance policy to take care of your family in case you die unexpectedly. But let’s face it: At this rate, you’ll probably never get around to it, because it’s a hassle that never quite rises to the top of your to-do list. Does it?
Ah, but what if it were way simpler than that?
If you’re stalled on the whole life insurance thing, try checking out innovative new options like Leap Life’s online marketplace. It’s like a personal shopper for life insurance. Its motto is brutally honest: “Life insurance isn’t fun. Let’s get it over with quick.”
Wow! The folks at Leap Life are not exactly holding back, are they? Clearly, this isn’t your dad’s life insurance agency.
Leap Life simplifies and streamlines the process in a big way. You can apply in minutes, and most healthy people can do it all online — no medical exam required.
Lickety-split, you get instant quotes from top life insurance companies like Prudential, Lincoln Financial, Pacific Life, and Protective, among others.
That way, you can compare them side-by-side to find the best life insurance policy matched to your needs.
Cheaper Than You Think
Leap Life uses your information to predict approval and match you to the most affordable insurance policies to fit your needs. The company says it saves people an average of 50% on their insurance premiums.
The company says its research shows that 80% of Americans can pay 50% to 300% more for their life insurance if they pick the wrong life insurance carrier. The could mean paying hundreds of dollars more per month than you have to.
People overestimate the cost of life insurance, anyway. For instance, nearly half of millennials think life insurance costs about five times what it actually does, according to a 2018 study by the life insurance industry group LIMRA.
No Hassle, Free Returns
Leap Life is updating the old model. If you stuck with the life insurance industry’s traditional way of doing things, you might have to wait weeks to hear whether you’re approved.
You don’t have to wait any longer. And if you change your mind, you’ve got a 30-day money-back guarantee.
Leap Life’s pitch is that it’ll match you with a policy that fits your needs, your health history and your financial situation. “No extra fees, no hassle and free 30-day returns,” the company’s website says.
The company has an A-plus rating with the BBB. It operates in every U.S. state except New York.
You can choose a life insurance policy that lasts from 10 to 30 years, with death benefits ranging from $250,000 to $5 million.
It’s time to get life insurance off your to-do list and move it over to your “done” list.
Really, it doesn’t have to be such a pain.
Mike Brassfield (mike@thepennyhoarder.com) is a senior writer at The Penny Hoarder. He probably doesn’t need life insurance because he’ll probably never die.
This was originally published on The Penny Hoarder, which helps millions of readers worldwide earn and save money by sharing unique job opportunities, personal stories, freebies and more. The Inc. 5000 ranked The Penny Hoarder as the fastest-growing private media company in the U.S. in 2017.
The Penny Hoarder Promise: We provide accurate, reliable information. Here’s why you can trust us and how we make money.
source The Penny Hoarder https://ift.tt/2T6wahT
الأربعاء، 27 فبراير 2019
Tax Return Transcripts: How to Get Copies of Your Old Tax Returns from the Internal Revenue Service
The IRS recommends that you keep tax records for at least three years. If you need a tax return transcript, review these available options for getting one.
Source CBNNews.com https://ift.tt/2IF26Vv
Source CBNNews.com https://ift.tt/2IF26Vv
8 Of 9 Financially Vulnerable Americans Used Tax Refunds To Pay Bills: New Survey Shows Many Americans Living on the Financial Edge
According to a new survey, 87% of financially vulnerable Americans used their tax refunds to pay bills. Discover the other popular uses for tax refunds.
Source CBNNews.com https://ift.tt/2Tj31iv
Source CBNNews.com https://ift.tt/2Tj31iv
When Lost Luggage Is Reclaimed for Good
Ever lost a bag when traveling? This story might just warm your heart and help to ease your pain.
Source Business & Money | HowStuffWorks https://ift.tt/2Vni9ZN
Source Business & Money | HowStuffWorks https://ift.tt/2Vni9ZN
The Four States of the Apocalypse: Conn., Ill., NJ and NY Are Careening Off a Progressive Cliff
One year ago in these pages, we predicted that the Trump tax reform would supercharge the national economy but could cause big financial problems for the five highest-tax states: California, Connecticut, Illinois, New Jersey and New York. We were right.
Source CBNNews.com https://ift.tt/2XvtJUi
Source CBNNews.com https://ift.tt/2XvtJUi
When Lost Luggage Is Reclaimed for Good
Ever lost a bag when traveling? This story might just warm your heart and help to ease your pain.
Source Business & Money | HowStuffWorks https://ift.tt/2Vni9ZN
Source Business & Money | HowStuffWorks https://ift.tt/2Vni9ZN
A Step-by-Step Guide to Building a Budget You Can Actually Stick to
If you’re anything like me, you’re perpetually swinging between vowing to cut all unnecessary spending cold turkey and humming “Treat Yo’self” as you order your third UberEats meal in 12 hours.
Which one you’re doing depends on the day — and how long it’s been since your last paycheck.
The result: a pitiful savings account balance, scrimping to pay the minimum on your credit card and feeling like you’re still living paycheck to paycheck even though your income has come a long way since your first job out of college.
You know there is a way to solve this problem. You know that if you just create a budget — and by some miracle, stick to it — you could finally get the financial freedom everyone else seems to have already figured out.
You also know budgeting is a buzzkill.
But if you give it a genuine shot, we promise that we will, too. We’re in this together.
How to Budget in 4 Easy Steps
Creating a budget doesn’t have to be a grueling process. If you take some time to prepare and learn how to budget in a way that makes the most sense for your lifestyle, you can start on the road toward controlling your personal finances in no time.
We’ve laid out exactly what you need to do in four pretty simple steps.
Step 1: Know How Much You Make and Spend
Before you can make a budget that works, you need to know your numbers. We like to focus on a monthly budget, since most bills are due once a month. Log in to your bank account online, and grab your last couple months’ worth of bank statements. While you’re at it, grab your credit card statements, too.
First, write down your monthly income.
This should be your take-home pay for the month. That’s the money you earn minus deductions for taxes, Medicare, Social Security, health insurance contributions and allocations to retirement accounts like your 401(k) or Roth IRA.
If you have irregular income, it’s best to take a look at what you’ve earned over a longer period of time — the past six months, say — and use the monthly average for your budget.
But don’t just stop there. Add any extra money that comes in from your side hustles. Child support payments. Recurring bonuses or stipends. Financial aid payments. Include it all.
Your next step is the painful part: It’s time to log your monthly expenses.
Start with the recurring stuff: Your rent or mortgage, car note, car insurance, cell phone bill, internet, utilities and debt payments. Don’t forget the fun stuff, like your cable TV, Netflix and Spotify Premium accounts.
From here, you’ll want to start adding up your discretionary expenses. Analyze your spending habits. How much are you spending on shopping, eating out and drinks with friends?
To get a full picture, you can put these things in categories. For example, movies, concerts and museum visits can all go under entertainment. Your gym membership, yoga membership and the drop-in rate on that one CrossFit class can all go under fitness.
Look at a few months of statements to get an average for this part, too. That will give you a more accurate picture of your finances.
Step 2: Set Your Financial Goals
If you’re going to succeed at this budgeting game, you need have an idea of what you’re hoping to accomplish.
It can be a simple short-term savings goal like funding a vacation with your college besties. Or a long-term one, like learning to budget so your kid can go to college without student loan debt.
Set a goal, and make it good — your financial plan could be the only thing that stops you from swiping your debit card to buy yet another pair of shoes this weekend.
I take it a step further and mix my financial goals with my personal ones.
For example, I tend to overspend on restaurant meals. But budgeting less for eating out means I cook more healthy meals at home, so I save while staying on track to accomplish my weight loss goals, too. Then, I can use the money I save to build up my emergency fund or pay down debt a bit faster and continue toward my goal of becoming debt-free.
Step 3: Find Your Favorite Budgeting Method
Once you have a complete picture of your finances, it’s time to pick the budgeting method that works best for you. The one you choose will depend on how much time and energy you have to devote to it.
If you feel comfortable creating an old-fashioned budget worksheet in Excel, you can do that. We’ve got a few super simple ideas you can try if charts make your eyes glaze over.
But even after you’ve picked your favorite budgeting method, don’t be afraid to bend it a little to fit your financial situation.
Bare-Bones Budget
You don’t have to spend several hours each month working on a budget. The easiest way to budget is to grab a pen and paper and simply write down how much you make and how much you need to spend on the essentials — like housing, utilities, food and debt repayment. You save the rest.
That’s it. You’re done.
I’d suggest keeping that sheet of paper somewhere visible to remind you to rein in your spending.
Zero-Based Budget
The zero-based budget takes the bare-bones budget one step further. The goal here is to get to zero at the end of each month. It helps you account for each dollar on the way.
Write down how much you make, and divide it to cover all your bills, savings and discretionary spending until you hit $0 at the end of the month.
Although this plan encourages you to get down to nothing, the idea isn’t to spend without regard; it’s to make sure every dollar goes exactly where you intend for it to go every month.
50/20/30 Budget
This takes all the guesswork out of deciding which expenses should stay in your budget and which ones need to go.
With the 50/20/30 plan, 50% of your money goes to essential expenses like housing, utilities and your car payment. From there, 20% will go to financial goals like savings and investments. The final 30% is yours to spend on the fun stuff like restaurants, movies and drinks with friends.
Cash Envelope Budget
The cash envelope system is good for those who have problems overspending on variable expenses like groceries or entertainment.
Review your monthly income and average expenses to determine how much you spend in each category. Then take out your envelopes, label them by spending category and fill them up with their cash allocations. (You don’t need to use envelopes for fixed costs like rent or car insurance.)
When you’ve spent all the cash in an envelope, you can no longer spend in that category for the rest of the month.
Step 4: Find the Best Budgeting Tools for You
Remember when I said you’re not alone in this quest to budget your money? Well, there are some apps and books that can help.
Budgeting Apps
While budgeting by hand works great, your smartphone can streamline it.
- Mint: My favorite free app is Mint, which is available on iPhone and Android devices, and is also accessible at Mint.com. You connect your bank account and credit cards, then you set a dollar amount for how much you plan to spend in each category.
Mint will automatically analyze your spending and notify you when you get close to your budget limit or overspend. It’s pretty easy to use and can save you lots of time. The only downside is that the “You’ve exceeded your budget” emails can sometimes feel a little judgmental.
- EveryDollar: If you’re a fan of the zero-based budget, EveryDollar is the free app for you. It’s also perfect for side hustlers whose income can fluctuate from month to month. As you manually track your spending with the app, use it to make sure every dollar you make is accounted for.
- Prism: This isn’t technically a budgeting tool, but it’s still worth mentioning. Prism is a free app that puts all your bills in one place, so you always know exactly how much money you have and how much you owe.
You can connect everything from rent and car insurance to student loan payments and your Tidal music streaming account, and you can pay your bills right from the app.
- You Need a Budget: This started out as an app and then became a book, too. It hinges on four rules:
- Give every dollar a job.
- Embrace your true expenses, not your ideal ones.
- Roll with the punches, and adjust your budget as you spend.
- “Age your money,” meaning hold onto it longer, and start to break the habits that leave you living paycheck to paycheck.
You Need a Budget is more hands-on than other apps. It’s also the only option that’s not free. After the 34-day free trial, you’ll pay $6.99 per month for the service.
Budgeting Books
These books will get you on the path to becoming a budgeting pro in no time.
- “The One Week Budget”: This book is an Amazon bestseller by Tiffany “The Budgetnista” Aliche. We’ve even got a copy in our library at The Penny Hoarder HQ. Through a series of worksheets, it walks you through how to analyze your income, track your spending and pay down debt fast so you can get back to saving for the life you want.
- “The Total Money Makeover”: This book was written by financial guru Dave Ramsey. A few Penny Hoarders who have paid off heaps of debt swear by his teachings. His book is also an Amazon bestseller and could be the perfect place to start if you want to break some of those not-so-great money habits and start building a budget that works.
Desiree Stennett (@desi_stennett) is a senior writer at The Penny Hoarder.
Senior Writer Nicole Dow contributed to this post.
This was originally published on The Penny Hoarder, which helps millions of readers worldwide earn and save money by sharing unique job opportunities, personal stories, freebies and more. The Inc. 5000 ranked The Penny Hoarder as the fastest-growing private media company in the U.S. in 2017.
The Penny Hoarder Promise: We provide accurate, reliable information. Here’s why you can trust us and how we make money.
source The Penny Hoarder https://ift.tt/2BPUCcD
Considering Filing for Chapter 7 Bankruptcy? Read This Before You Decide
Filing for bankruptcy is never an easy choice.
But sometimes, it can feel like the only way to escape the vice grip of debt and move on with life.
Most personal bankruptcy filers will turn to a Chapter 7 bankruptcy, which offers almost total debt forgiveness and a quick discharge time.
But before you can get a fresh start from a Chapter 7, you should know the basics — and what to expect from the process.
What Is Chapter 7 Bankruptcy?
In researching your options, you’ll find there are two common types of bankruptcy for individuals and couples: Chapter 7 and Chapter 13. While similar in many ways, they differ in some big areas.
Chapter 7 bankruptcy, also known as “liquidation bankruptcy,” is a bankruptcy by which individuals or couples who are deemed to not have a high enough income to pay back debts can absolve themselves through liquidating their assets.
If the liquidation doesn’t cover the entire debt, then the remaining balance is typically forgiven.
Chapter 13 bankruptcy, also known as “wage-earner bankruptcy,” is for those whose income or other qualifiers make them ineligible for Chapter 7.
These individuals or couples will work with a trustee to create a payment plan lasting three to five years to repay most of their debt, and they won’t have to liquidate any assets unless they choose to.
Of the two, Chapter 7 is by far the most popular.
Here’s how to determine if you qualify (and how to file).
Before You Can File for Chapter 7 Bankruptcy
Before you file, you’ll have to determine if you qualify for Chapter 7. Seeking professional advice from a bankruptcy attorney is the only real way to determine your eligibility, but if you haven’t committed to getting one yet, here’s what they’ll look for.
The Means Test
Because the basis for Chapter 7 bankruptcy is not having the means to pay your debts, the first step in the process is a “means test.”
The means test is a form you’ll file with information on your income, expenses and family size to determine whether you have enough disposable income to repay your debts.
If your income falls below the median income for your state and family size, then you’re more likely to qualify. If not, it’s still possible you can qualify. You’ll have to report your last six months of “necessary” expenses to show that the money left over — your disposable income — isn’t enough to make your debt payments.
Credit Counseling
You’ll have to participate in a pre-bankruptcy counseling session with an approved credit counselor. The Department of Justice provides a list of approved credit counseling agencies in each state, but you can also do it online or over the phone.
This session is meant to give you an idea as to whether you really need to file for bankruptcy or if an informal repayment plan would be better. It’ll also help you with budgeting in hopes that you won’t repeat the bankruptcy process in the future.
The fee for this credit counseling session can range from $25-$50 and lasts 90-120 minutes.
Bankruptcy History
The last thing that can make you ineligible for filing is your history with bankruptcy. You’re ineligible to file if you’ve had another bankruptcy case dismissed within the last 180 days.
You’re also ineligible for discharge if you’ve had debt forgiven in a previous Chapter 7 bankruptcy case in the past eight years or a Chapter 13 case in the past six years.
How Much Does a Chapter 7 Bankruptcy Cost?
Once you’ve checked those three boxes, then you’re ready to file. But be prepared for the costs. The initial filing fee for Chapter 7 — as of February 2019 — is $335.
If you can’t afford the fee, you can either ask the court to split it into four payments or apply for a fee waiver when you’re submitting your initial bankruptcy petition. You’re usually only eligible for a fee waiver if your household income is at least 150% below federal poverty guidelines.
You’ll also need to pay your bankruptcy attorney, which can cost anywhere from $500 to $3,500, depending on where you live.
The Cons of Chapter 7 Bankruptcy
The major downside to Chapter 7 bankruptcy is obvious: potentially having to give up many of your treasured things. But there are other drawbacks you may not think of.
- It will ruin your credit and stay on your credit report for up to 10 years.
- If you’re behind on your mortgage or car payments, then you will likely have to forfeit them.
- You’ll lose any luxury possessions and nonexempt property you own.
- It won’t automatically absolve you of the responsibility of alimony, child support or repaying student loans and mortgage liens.
The Pros of Chapter 7 Bankruptcy
But the upside is great, too: You can get much of your debt discharged and be able to start fresh. Other positives include:
- Chapter 7 bankruptcy can be completed in three to six months (versus three to five years for a Chapter 13.)
- You get to keep all your salary and wages after you file.
- Most states allow you to keep your home and car, especially if you’re current on payments.
- Chapter 7 bankruptcy can aid in getting a family court order to dismiss child support and alimony payments.
- There’s no debt limit to qualify.
If you owe far more than your assets and/or property are worth, Chapter 7 bankruptcy could make financial sense.
Still, while some of your property won’t be taken and sold to repay creditors, much of it will be. Chapter 7 bankruptcy might be better for renters who don’t stand to lose their homes or for others with few assets.
For one contributor to The Penny Hoarder, who told her bankruptcy story under an assumed name, filing Chapter 7 wasn’t just a financial decision; it was an emotional one, too.
After filing bankruptcy when she was more than $100,000 in debt with a $28,000 salary, she battled feelings of guilt, shame and failure as she worked to get her finances back on track.
Take that into consideration when you’re making your own bankruptcy decision.
How to File Chapter 7 Bankruptcy
Once you’ve determined your eligibility and counted the costs, things really get moving. Here’s a step-by-step guide to the process.
1. File Your Formal Petition
Your formal Chapter 7 bankruptcy petition includes submitting many forms and your filing fee or waiver application to your local bankruptcy court.
2. Submit Documents to a Bankruptcy Trustee
You’ll need to submit proof of the information you submitted in your initial petition to your bankruptcy trustee. The trustee will be in charge of executing your bankruptcy. They’ll round up your property, sell it, challenge creditors if needed and monitor your eligibility for Chapter 7 throughout the proceedings.
3. Attend the Meeting of Creditors
You’ll attend one meeting with your trustee and creditors after filing. You and your trustee will review the documents you sent them with the creditors, and they will, in turn, inquire about your finances and property.
That’s usually the end, unless there’s a need for more investigation or documents, in which case your trustee will schedule another meeting.
Be aware that if you don’t show up to your meeting, the court will dismiss your bankruptcy case.
4. Take the Debtor Education Course
To get your discharge, you’ll have to take one more course called the Debtor Education Course. This one is about two hours long and can usually be taken with the same agency you did your pre-bankruptcy counseling with.
You won’t want to procrastinate on this. You only have 60 days after your initial meeting of creditors to file your completion certificate with the court.
Failing to file your completion certificate will cause the court to dismiss your case, and you’ll have to pay the filing fee again to reopen it. You’ll also probably have to file an extra petition requesting they accept the late certificate.
5. Get Your Discharge
Once you’ve followed the steps, the court will officially discharge your qualifying debts and close your case.
Be sure to hold onto your discharge order, because while creditors will no longer have any claim to your debt, some may still try to come for it. All you’ll have to do is send them a copy of that discharge order to get them off your back.
What to Expect After You File Chapter 7 Bankruptcy
Between filing and discharge, there are a few events you should look out for.
Automatic Stay
Once you file bankruptcy, creditors and collectors will have to stop trying to collect their money while the case plays out. That’s called an “automatic stay.”
If a company continues to try to collect during the stay, it’s violating a court order. Let the company know in writing, and the collections will likely stop. If they don’t, notify the bankruptcy court, and they’ll likely pursue litigation against the company.
Seizing of Assets
Your trustee will handle all of this for you. In the unlikely case your home is one of those assets, the trustee cannot come over without first consulting you. And if there’s any disagreement as to what is included in the bankruptcy estate, you can file forms to dispute.
Receiving Reaffirmation Agreements
For secured debts that you want to hold onto — usually your primary mortgage and car loans — you’ll have to sign a reaffirmation agreement for each debt, which will waive the discharge of that particular debt. These will be sent to your attorney and will have to be signed by both you and the creditor before you receive your discharge order.
Jen Smith is a staff writer at The Penny Hoarder and author of “Meal Planning on a Budget.” She gives money-saving and debt-payoff tips on Instagram at @modernfrugality.
Former staff writer Desiree Stennett contributed to this post.
This was originally published on The Penny Hoarder, which helps millions of readers worldwide earn and save money by sharing unique job opportunities, personal stories, freebies and more. The Inc. 5000 ranked The Penny Hoarder as the fastest-growing private media company in the U.S. in 2017.
The Penny Hoarder Promise: We provide accurate, reliable information. Here’s why you can trust us and how we make money.
source The Penny Hoarder https://ift.tt/2H687ID
الاشتراك في:
الرسائل (Atom)