
الخميس، 6 يونيو 2019
Retailers stop selling Fairlife dairy products after animal abuse allegations surface
Source Business - poconorecord.com http://bit.ly/2XunIXH
How Consolidating Credit Card Debt Impacts Your Credit Score
When it comes to credit cards, your best bet is always to pay your balance in full every month. Unfortunately, that’s not always possible. Sometimes life happens and people make mistakes when it comes to managing their credit card accounts. Other times people use credit cards in such a way that they simply don’t have enough disposable income to pay them in full.
Either way, if you’ve charged more on your credit card accounts than you can afford to simply pay off, debt consolidation is one option that might help you to eliminate your high-interest debt. While considering whether debt consolidation will save you money, it’s also important to consider how consolidating credit card debt impacts your credit scores.
The news is generally good. Consolidating credit card debt not only has the potential to save you money on interest charges, but it might also give your credit scores a boost at the same time. Of course, it all depends on which method you choose to consolidate your debt, and how well you manage that process.
How Credit Card Debt Impacts Your Credit Scores
Before you can understand how credit card consolidation might help your credit scores, it’s helpful to understand how credit card debt affects those numbers in the first place. As far as credit scores are concerned, high credit card utilization isn’t a good thing. In fact, it’s just the opposite.
Credit scoring models, like FICO and VantageScore, are designed to pay close attention to the relationship between your credit card limits and your balances. This is known as your revolving utilization ratio. As you use more and more of your credit limit, your revolving utilization ratio increases. This almost always lowers your credit scores.
- Read more: How Credit Scoring Models Actually Work
Best Ways to Consolidate Credit Card Debt
Consolidating your debt is a process where you take multiple outstanding account balances and combine them together. With credit cards specifically, there are multiple ways you can consolidate your debt. Here are two popular options:
- Balance transfer: A balance transfer involves using another credit card account (new or existing) to pay off the balances on your other credit cards. You move the balances from your high-interest cards to a lower-interest card — sometimes even with a 0% APR introductory period.
- Personal loan: A personal loan or an unsecured installment loan can be used to pay off the balances on your revolving credit card accounts. In this case, you’re borrowing money in the form of a single loan for the purpose of paying off your various credit card debts, and you’ll repay the single loan.
When Consolidating Helps Your Credit Scores
If you manage the process wisely, there’s a good chance that consolidating credit card debt could improve your credit scores.
Remember, a high utilization rate on your credit cards can potentially drive your scores downward. When you use a personal loan to pay off all of your credit card balances, your revolving utilization drops to 0%, because you’re paying off your revolving debt with an installment loan. And while you have the same amount of debt, the new debt is no longer considered credit card debt.
Of course, if you consolidate your credit cards onto a new balance transfer card, your revolving utilization ratio won’t be reduced by as much. A balance transfer card with a low introductory rate could potentially save you more money in interest charges if you can pay off the debt before the teaser rate expires, but the positive impact on your scores might not be as noticeable.
Potential Problems
You shouldn’t decide to consolidate your credit card debt without taking a moment to at least consider the potential downsides. Although consolidation will often save you money and could help your credit scores, too, there’s a chance the process could backfire if it’s not managed well.
Sometimes people consolidate their credit cards but, with the illusion of a clean slate, get into even more debt in the end. If you pay off your existing credit card balances with a new loan or balance transfer, you have to put those old spending habits on hiatus.
If you continue to use the existing credit cards and spend more than you can afford to pay off in a given month, you’re likely going to end up in twice as much debt.
Read more:
- Will Consolidating Student Loans Help My Credit Score?
- Best Balance Transfer Credit Cards
- Three Ways to Raise Your Credit Score Fast
- The Best Personal Loans
John Ulzheimer is an expert on credit reporting, credit scoring, and identity theft. The author of four books on the subject, Ulzheimer has been featured thousands of times over the past decade in media outlets including the Wall Street Journal, NBC Nightly News, The Los Angeles Times, CNBC, and countless others. With professional experience at both Equifax and FICO, Ulzheimer is the only credit expert who actually comes from the credit industry. He has been an expert witness in over 230 credit related lawsuits and has been qualified to testify in both federal and state courts on the topic of consumer credit.
The post How Consolidating Credit Card Debt Impacts Your Credit Score appeared first on The Simple Dollar.
Source The Simple Dollar http://bit.ly/2K1iwYo
Navigating Learning Disabilities and the Cost for Treatment
Living with a learning disability can be a source of great frustration if it’s not fully understood – especially during a child’s school-age years. These disabilities have very little to do with a child’s behavior or level of intelligence. Rather, it comes down to understanding that people who live with learning disabilities are living with a different cognitive wiring than others.
For this reason, a learning disability can affect multiple areas of a person’s life well into adulthood. What can be helpful, however is early diagnosis and early intervention. By identifying a learning disability and implementing adequate and affordable tools for treatment, your child can have a full and productive life.
Types of learning disabilities
There can be a danger of generalizing all learning disabilities by saying that they merely cause difficulty with comprehension. The reality is there are multiple types of learning disabilities, and each have their own fingerprint.

According to the National Center for Learning Disabilities, about 10% of children in the U.S. live with some form of learning and attention issues. They range from the “specific learning disabilities” – which is the lawful designation under the Individuals with Education Disabilities Act (IDEA) – to the related but slightly different disorders that don’t quite get the same designation.
Here are a few of the more common types of specific learning disabilities and their traits:
Dyslexia
Referred to as a Language-based disability, where a person has trouble deciphering written words. This disorder makes it difficult to comprehend, recall, write, or spell words.
Approximately 15% of people have some form of dyslexia.
Dysgraphia
A learning disability that affects handwriting and fine motor skills. This disability can make it difficult to spell, write legibly, or think while writing.
Approximately 7% – 15% of people have some form of dysgraphia.
Auditory Processing Disorder
A sensory disorder that affects how the brain interprets sounds. Even if a person has normal hearing and vision, this disability can make it difficult to process sounds to make any meaningful connection.
Approximately 5% of children are living with a form of APD
Language Processing Disorder
A sensory disorder very similar to APD, but specific to interpreting language. This disorder makes it difficult to process words or sentences into receptive communication. Speech is also impeded.
The percentage of diagnosis is similar to APD, but there are specific areas of difference
Visual Perception Disorder
A disorder that affects how the brain processes visual stimuli. It can make drawing or copying shapes very difficult. It can also affect hand/eye coordination.
The symptoms and percentage of diagnosis can overlap with those of dyslexia, but there are specific areas of difference
Nonverbal Learning Disorder
A neurological disorder that affects the interpretation of body language, facial expressions, or other nonverbal communication. This disorder can also cause a person to have weaker visual-spatial and social skills.
Studies suggest that approximately 1% of people are diagnosed with a specific NVLD. However, this disorder is most closely connected to Asperger’s syndrome
Dyscalculia
A math learning disability that impairs a child’s ability to process number sense, facts and mathematical reasoning.
Approximately 5% – 7% of students in the US have this math-based learning disability.
Learning disorders are different from other conditions such as deafness, blindness, and autism. While these conditions can make learning difficult, they aren’t considered learning disabilities under Federal law. Also, attention disorders such as Attention Deficit Hyperactivity Disorder (ADHD) is often designated as a learning disorder, but it is not. Differentiating between attention disorders and specific learning disabilities can aid in proper diagnosis and helpful treatment.
Treatment for learning disabilities
If your child has a learning disability, it doesn’t mean they have an illness that needs to be cured. While they do have a lifelong condition, there are treatments that can allow these conditions to be managed.
It’s important to understand that there could be some co-occurring issues that arise with their disability that you may have to be prepared for as well. The key is to first educate your child about their disability so they can better understand their learning patterns. This will help to fend off any frustration when face difficulty related to their disorder.
Secondly, infusing learning exercises and other therapy tools into the daily routine can go a long way for positive reinforcement. In addition, it could encourage any gradual improvement in your child’s condition as they get older. Here’s more info on the potential co-occuring issues and practical treatment tips for each of the specific learning disabilities:
| DISORDER | MEDICATION | TOOLS/TECHNIQUES |
|---|---|---|
| Dyslexia |
|
|
| Dysgraphia |
|
|
| Auditory Processing Disorder |
|
|
| Language Processing Disorder |
|
|
| Visual Perception Disorder |
|
|
| Nonverbal Learning Disorder |
|
|
Educational resources for children with learning disabilities
Thanks to the Individuals with Disabilities Education Act (IDEA), it’s law in this country to provide free and appropriate public education to children with disabilities (FAPE). This means children who experience specific learning or attention-related disorders should be provided non-discriminatory, targeted educational services from infancy through age 21. Although these services can seem pretty straightforward, there are some unique traits that are specific to the child’s condition. It’s also important to note that not all children will be eligible for these services.
Eligibility
If you suspect your child should receive special education services, their public school will follow federal regulations to evaluate your child. There are two steps to this evaluation process.
The first step is an educational evaluation. This is usually conducted by the child’s teachers along with the school psychologist. The evaluation includes observing the child in the classroom and evaluating their academic records. A determination is also made during this stage whether or not the child has at least one of the 13 disabilities that are covered under IDEA. Afterwich, a report is written up.
The second step is the eligibility determination. Based on the evaluation, the school will decide if your child’s disability calls for special education services. Even if your child is shown to have one of the 13 covered disabilities, it still doesn’t guarantee that special services will be granted. The school may determine that despite your child’s disability, they are still learning at an acceptable rate within the general classroom setting. If special education services are granted, they will work with you to create an appropriate program for your child within 30 days.
Individualized Education Program (IEP)
Once your child is granted special education services, an Individualized Education Program is created. An IEP is a written statement, detailing the purpose, goals, and services related to your child’s needs. These statements are required for anyone who’s receiving special education.
It goes without saying, but it’s vital for parents to be involved with the development of the child’s IEP. It’s just as important for the student (if they’re of age) to be involved in the process as well. Specifically, students who will be transitioning to adulthood soon are encouraged to learn and have a say in as much as they can.

As the annual goals are met during the IEP, your child will be monitored to determine if any adjustments to the program are warranted. These can be helpful benchmarks if you decide to change schools or if there are any administrative changes. Regardless, your child must be reevaluated every three years to determine if they are still eligible for an IEP.
Professionals in the classroom who conduct various phases of the IEP include:
- A psychologist
- A speech therapist
- A physical therapist
- A vision or hearing specialist
- A special educator
Instructional intervention
While an IEP is a strategic plan to help your child learn successfully in the classroom, instructional interventions are methods of tracking their progress. These interventions exist within the overall IEP to allow you to work with educators to monitor the effectiveness of a program. If it’s determined that your child needs a little extra time or additional support on a subject, adjustments will be made through an instructional intervention.
These are usually more targeted towards students with standard academic or behavioral issues rather than students with specific learning disabilities. However, they can be effective in either capacity.
What if my child isn’t granted special education services?
Even though many children are granted eligibility for special education programs at their schools, there are a number who aren’t. It can be tough to get the news that your child has been denied, but it doesn’t mean that your options are eliminated.
504 Plan
If your child isn’t eligible for services under IDEA, schools may encourage you to consider a 504 plan. This is a plan that supports accommodations in the classroom to help manage your child’s learning and attention disorder. Unlike an IEP, a 504 plan doesn’t alter your child’s curriculum. It simply allows for some small adjustments to be made to the learning environment.
Some of the accommodations include:
- Sitting at the front of the class
- Allowing for extra time on tests/assignments
- Taking frequent breaks throughout the school day

Why might someone need to pay for treatment for learning disabilities?
Despite some of the helpful resources provided through the public school system, there are still instances where you’ll need to pay for your child’s treatment.
Your child is outside of the public school system
Some families don’t have access to resources simply because they aren’t in the public school system. Federal law dictates that all children be evaluated for learning disabilities. But free special education services are only provided to eligible public school attendees. Homeschooling or sending your child to private school doesn’t guarantee the same comprehensive coverage.
If your child is found to have a learning disability and they don’t attend public school, you have the option of either changing schools or staying with your private school and receiving equitable services. These are special services that are paid for through public school funding to provide some needed care. However, these funds are limited, so there’s a good chance the services will be limited as well. As a result, families who stay in private school will most likely need to pay for the outside care their child needs.
Here’s more information on special education services provided in private school:
Your child has therapy needs that aren’t provided by the school
Public schools are required to provide free and appropriate public education for kids with disabilities (FAPE). But they aren’t required to provide the very best services available. Your child may have needs that are a little more broad than what might be offered at their school. So purchasing additional services could make sense for you. Or, if you feel more comfortable with a specific private therapist and want to maintain that relationship, that’s also an understandable reason for going outside of school services.
Here are some forms of therapy you might consider if you’re searching for private options:
- Cognitive behavioral therapy
- Occupational therapy
- Social skills counselor
- Educational therapy/special needs tutor
- Speech therapy
Payment options for private learning disabilities treatment
If you’re in the position to seek private treatment for your child’s learning disability, the costs involved should factor into your decisions. Though the services through FAPE are free, including the educational evaluations, private evaluations are not free. Neither are the private counselors and specialized schools. Below are the costs involved with treatment for learning disabilities and some options for funding.
Assessments
| Performed by | Average cost | Funding options |
|---|---|---|
| Primary doctor | Insurance copay ($15-$30) |
|
| Pediatric Psychologist | $800-$200 |
|
| Psychiatrist (Cannot assess learning disabilities, but will recommend medication for co-occurring issues such as ADHD and anxiety.) | Insurance copay ($15-$30) |
|
Therapy
| Treatment | Average cost | Funding options |
|---|---|---|
| Cognitive-Behavioral Therapy | Up to $100 per hour or sliding scale based on income. |
|
| Speech Therapy |
|
|
| Educational Therapy |
|
|
| Occupational Therapy |
|
|
Private School
| Level | Average tuition | Funding options |
|---|---|---|
| Elementary school | $7,770 per year |
|
| High school | $13,030 per year |
|
Tax deduction and tuition reimbursement for private school
According to IRS Publication 502, you can include tuition (including room and board) for private school in your medical expenses when filing your taxes. This is an option only if you can prove that your child attends private school primarily for treatment of learning disabilities.
Even if the school is not primarily a special needs school, you can still take advantage of the option to classify your child’s education as a medical expense. It is, however still recommended that you speak to your financial advisor regarding this issue to avoid any miscommunication with your tax filings.
If you were approved for special education services but your public school is not working to adequately meet your needs, you could opt for placement in an approved private school as part of your child’s IEP. These private schools are licensed and approved for tuition reimbursement by the state.
If you prefer a different private school than the one your child is placed in, there’s a chance you could still be eligible for tuition reimbursement, but it depends on a couple of factors. First: Your school district doesn’t offer FAPE to begin with. Second: Your preferred private school is appropriate for your child’s needs.
Installment loans for disability services
When it comes down to paying for special needs services, leaning on health insurance and personal funds are among the more popular options. The truth is, not everyone is fully insured or confident enough about their financial standing to handle the expense.
An installment loan could be a helpful tool to offset some of your child’s learning disability needs. An installment loan is a loan paid back in installments (a series of fixed monthly payments). The best installment loans come with a fixed interest rate, that rate can vary depending on your creditworthiness and financial history. The hope is to leverage as many high-quality, affordable services as possible. And an installment loan could provide you with the flexibility and funds you need for your child’s care.
The post Navigating Learning Disabilities and the Cost for Treatment appeared first on The Simple Dollar.
Source The Simple Dollar http://bit.ly/2WrWqnI
The Three Questions Revisited
Your Money or Your Life by Joe Dominguez and Vicki Robin was the book that spurred my financial turnaround. At the very moment when I was realizing I needed to do something drastically different in my life with regards to my finances, this book was the first one that I happened to read from the pile of books that I checked out from the library, and it changed my life. I’ve written about it and referenced it countless times on The Simple Dollar, and several years ago I even wrote a “book club” series covering the book in incredible detail.
There are several pieces of this book that continue to guide and inspire my own financial journey, but one particular part really stands out. I devoted a brief article to it several years back, but I wanted to circle back and examine it again.
So let’s start from the beginning.
Not Money, But Hours of Your Life
The first portion of Your Money or Your Life focuses heavily on the idea that, rather than focusing on the money that you have, you should instead consider the hours of your life devoted to earning that money.
The authors do this by working you through a calculation of your “true hourly wage,” which basically boils down to your income from the last year minus all expenses related to earning that income (taxes, eating out, transportation, clothing, equipment, travel, and so on) divided by the hours you worked plus time outside of work devoted to work-related tasks like commuting, entertaining for work-related purposes, going to work meetings and conventions, working from home, and so on. I’ve written about this concept many times before: Figuring Out Your True Hourly Wage and What It Means, Using Your True Hourly Discretionary Income to Make Smarter Purchases, Wasted Time and Your Real Hourly Wage, and so on.
Let’s say, for example, that Jonas makes $60,000 a year. He has a salaried job where he’s at work about 50 hours a week and gets two weeks of vacation a year, meaning he works 2,500 hours a year. His nominal hourly wage is $24 per hour.
However, he also spends half an hour commuting each way (an extra 250 hours per year), does a couple hours of work at home at least three days a week (an extra 300 hours per year), goes on two weeklong trips per year for work (another 200 hours per year), and spends assorted hours doing things like taking a workplace guest out for dinner or shopping for professional clothing (let’s say another 50 hours per year). He’s also often stressed out after work and sits on the couch in a daze watching sports news for half an hour when he arrives home to “unwind,” adding another 125 hours per year. That’s 925 extra hours on top of the normal 2500 he works in a year, bringing the total to 3,425 hours.
On the flip side of that, he has a car for commuting that consumes fuel and depreciates in value and will need to be replaced (let’s call it $4,000 a year), he eats out with coworkers a few times a week at $10 per meal ($1,500 per year), he pays income taxes and other associated taxes (let’s call that $12,000 per year), and he has to maintain a good work wardrobe with business casual clothes and occasional dressier items ($300 a year). We’ll tack on another $200 for miscellaneous items, bringing us to a total amount of money lost of $18,000, bringing his actual salary down to $42,000 per year.
When you divide $42,000 per year by 3,425 hours, you get $12.26 per hour. That’s not nearly as good as Jonas might have thought.
In fact, it was this true hourly wage calculation that played heavily into my decision to switch to a full time writing career. My take home income wasn’t nearly as high, but I instantly lost the cost of the commute, the cost of a wardrobe, the cost of eating out with coworkers, the cost of work travel – it all instantly vanished. I also lost the time commitment to those things. Thus, even though my salary dropped precipitously, my true hourly wage actually went up a little bit.
Great, but how is this useful?
For me, knowing my true hourly wage is useful because it translates the expense of a purchase easily into the hours of my life I had to work for that item.
For example, let’s say my true hourly wage is $12, like Jonas. I’m thinking about buying a $300 blender. That blender equates to twenty five hours of my life spent working, twenty five hours of my life where I’m not doing what I want to be doing. Twenty five hours spent in front of a computer or doing paperwork or doing … well, all of the professional tasks I don’t really enjoy, instead of twenty five hours spent going on a hike or reading a fun book or playing a tabletop game or any of the dozens of things I love to do with my time and find deeply personally fulfilling.
Is that worth it? Is that lost time a fair trade for that $300 blender?
Let’s go way down this rabbit hole.
The Three Questions
On page 109 of the paperback edition of Your Money or Your Life, there’s a section about the three questions that will transform your life:
1. Did I receive fulfillment, satisfaction, and value in proportion to the energy spent?
2. Is this expenditure of life energy in alignment with my values and life purpose?
3. How might this expenditure change if I didn’t have to work for a living?
This is basically an expansion and formalization of the thought process I described a bit earlier, where I was considering buying a $300 blender and wondering whether it was worth the portion of my life that I was trading for it.
The three questions, as listed here, work best when you’re evaluating expenses you’ve already incurred. For example, you might use those questions when going through each line on a credit card statement. You’ll take the cost of that expense, divide it by your true hourly wage to see how much of your life you gave up for that item, and then you ask yourself those three questions about the result.
So, let’s look at these questions one at a time.
Did I receive fulfillment, satisfaction, and value in proportion to the energy spent?
Your Money or Your Life suggests on page 112 that you literally use a simple marking system as you go through your credit card statements or the lines in your budget:
Take a look at each [budget] subcategory with this question in mind. If you received so much fulfillment from this expense of life energy that you’d even like to increase spending in this category, place a + [next to it]. If you received little or no fulfillment from it, place a – [next to it]. If the expense feels okay just as it is, mark [it] with a 0.
This works with budget categories, with credit card statements, with bank statements, with receipts (item by item) – anything where you can see an itemized breakdown of your spending. Just translate each dollar amount into the hours of your life that you spent working in order to buy that item, then ask yourself whether spending that much of your life was a real win or not.
If you’re like me, you’ll find that it’s really hard to justify putting a + down at all. There will be a lot of things that earn a 0, mostly because they’re basic life expenses. There will be quite a few things that it makes sense to put a – next to.
Once you’ve done that, look really carefully at the items you marked with a -. Those are the areas where you’re spending money and it really doesn’t feel worth it. Those, right there, are the things you should be cutting out of your spending going forward.
It’s very worthwhile to actually do this practice for a while. Get in the habit of evaluating your receipts, your credit card statements, and your bank statements with this strategy. Mark everything with a +, 0, or -, and then review those markings when you’re done. Try to pound into your head what things are consistently marked with a -, because those are the things that really aren’t paying off for you.
Is this expenditure of life energy in alignment with my values and life purpose?
You can do this exact same thing by looking at your expenses through your values, goals, and overall life purpose. Is this expense in line with those things?
At first glance, you might think that this is just a rewording of the first one, but think about it again.
For example, let’s say that I have a line on my credit card statement for a $50 meal at a nice restaurant. This might have fulfilled me and been worth the four hours of work I had to put in to earn it, but was it really in line with my values and goals and life purpose?
On the one hand, the meal was delicious, but on the other, it was absurdly unhealthy, which is wildly out of line with health goals I have for myself.
On the one hand, I got to go out to eat with a close friend I hadn’t seen in a long time, which was definitely worthwhile, but could I have had that valuable social experience in another setting? Did I even really talk to my friend before setting up the dinner at the expensive, unhealthy restaurant?
It might have been a really fulfilling experience, but in a number of ways, it wasn’t really in line with my life goals and values. I absolutely got a ton of value out of eating out with an old friend, but I let down my health goals and I also didn’t really give my friend any room for input in this, either. I could have done this better.
That kind of thinking is the reason for this question. Sometimes, you’ll see a particular expense as being fulfilling enough to have been worth it, but at the same time big aspects of that expense actually work in opposition to your life goals.
For a non-financial example, consider that box of doughnuts that my wife brought home as part of an end-of-year celebration at her workplace. It might bring me some immediate fulfillment to eat one … mmmm, doughnut … but it’s not at all in alignment with my life goals. I’m way better off eating an apple if I want a sweet snack.
How might this expenditure change if I didn’t have to work for a living?
This question is insightful because it reveals how much of our spending really is entangled with our jobs. We spend a surprising amount of money simply because we’re employed.
For example, consider a young couple with a baby who have just added child care expenses to their budget. If they didn’t have to work for a living, that child care expense would disappear. It’s an expense wholly brought on by the need to work for a living.
Another good example is food costs. If you no longer have to work for a living, home food preparation becomes much easier and much more straightforward. You can make inexpensive meals at home because you have a little extra time – or, more truthfully, the schedule flexibility – to do so.
Another interesting example is simple home repairs, like a broken faucet. A person who is working might not have time to deal with it, so they just call a repairperson. A person who isn’t working would have the time to just deal with it themselves.
If you take this question seriously, it provides some real feedback with regards to your true hourly wage. If you observe that an expense would go down if you were no longer working, then the portion of that expense that’s due to your work should be accounted for in your true hourly wage.
The “Internal Yardstick of Fulfillment”
Over time, if you ask these kinds of questions regularly when reviewing your expenses, you start to develop what Your Money or Your Life calls an “internal yardstick for fulfillment.” As you go through and ask these questions and make those + and 0 and – markings, it all starts to turn into an innate real-time sense of whether expenses are really worth it for you, and you start to have a much higher threshold in terms of the amount of fulfillment you need from something in order to spend your money on it.
This entire exercise is really about building that internal tool for judging whether purchases are worthwhile both in terms of whether they fulfill you right now and whether they match with what you want out of your life long term.
In fact, the reason many people get into spending trouble is that their internal yardstick of fulfillment is way out of calibration. By default, our internal sense of whether a purchase is actually fulfilling and in line with our life goals gives a ton of false positives because modern life encourages those false positives. The entire marketing industry, for example, exists to give us false positives with regards to those kinds of questions if we don’t consider them too deeply. We are encouraged to buy houses that are much bigger than we need, cars that are much more extravagant than we need, all kinds of consumer goods and electronic goods we don’t need, all because we have this sense that they will fulfill us when they really don’t.
The only way to build a good instinct as to whether a purchase will give you enough fulfillment and enough direction toward your long term goal to be worth the hours of your life you gave up to get the money for that purchase is to get out of the heat of the moment and reflect on lots of your past purchases in a deeply honest way, understanding that you most likely did spend at least some of your money in a way that’s out of alignment with what really works best for you.
In other words, you probably need to recalibrate your internal yardstick, and you need to do it surprisingly often. It’s through things like the process listed here, where you go through and “score” the items on your receipts and on your bank statements after the fact, that you’re able to recalibrate.
Final Thoughts
The three questions that you should ask yourself regarding your purchases is one of the most powerful take-home messages from Your Money or Your Life. That questioning process, and how it recalibrates my internal yardstick of fulfillment in terms of how I use my money (and my time) so that I can make better decisions in the moment, is a key part of how I’m able to (usually) make good financial decisions on the fly, ones that reflect my own sense of fulfillment, my values, and my long term goals.
For me, what really clicks with this system is that it’s constantly nudging me toward financial independence. All of these questions eventually boil down to reaching a state of life where I don’t have to rely on an employer or a paycheck and I’m free from having to do work in exchange for money to have the life I want.
Everyone is going to have different things that fulfill them, different priorities, different values, and different long term goals. This process helps you to figure out what’s most important to you.
Good luck!
The post The Three Questions Revisited appeared first on The Simple Dollar.
Source The Simple Dollar http://bit.ly/2IlYG6S
How to Create a Website With Squarespace
Squarespace is one of the most popular website builders available on the market today.
It’s a quick, easy, and legitimate way to get a new website up and running from scratch. Anyone can build a website with Squarespace. You don’t need to be too tech-savvy, know how to code, or have any prior design skills to have success using this resource.
Squarespace is known as an all-in-one solution for creating a website on a singular platform.
The company was originally founded in a University of Maryland dorm room back in 2003. Over the past 15+ years, millions of websites have been created with Squarespace. So it’s safe to say that they have grown exponentially over time.
In terms of their reputation and reliability, there aren’t too many negative things you can say about Squarespace.
So for those of you who are ready to build your first website, using an industry-leading platform is definitely going to be a top option for you to consider.
Even if you’ve created websites in the past on other platforms, it’s worth reviewing this guide since not all website builders are the same. Regardless of your experience level, I’ll walk you through this simple step-by-step process of creating a website with Squarespace.
Step #1: Sign up
Obviously, you can’t use the platform and build a website without creating a profile.
So head on over to the Squarespace homepage and click on one of the many CTAs located on the page. These buttons will redirect you to sign up.
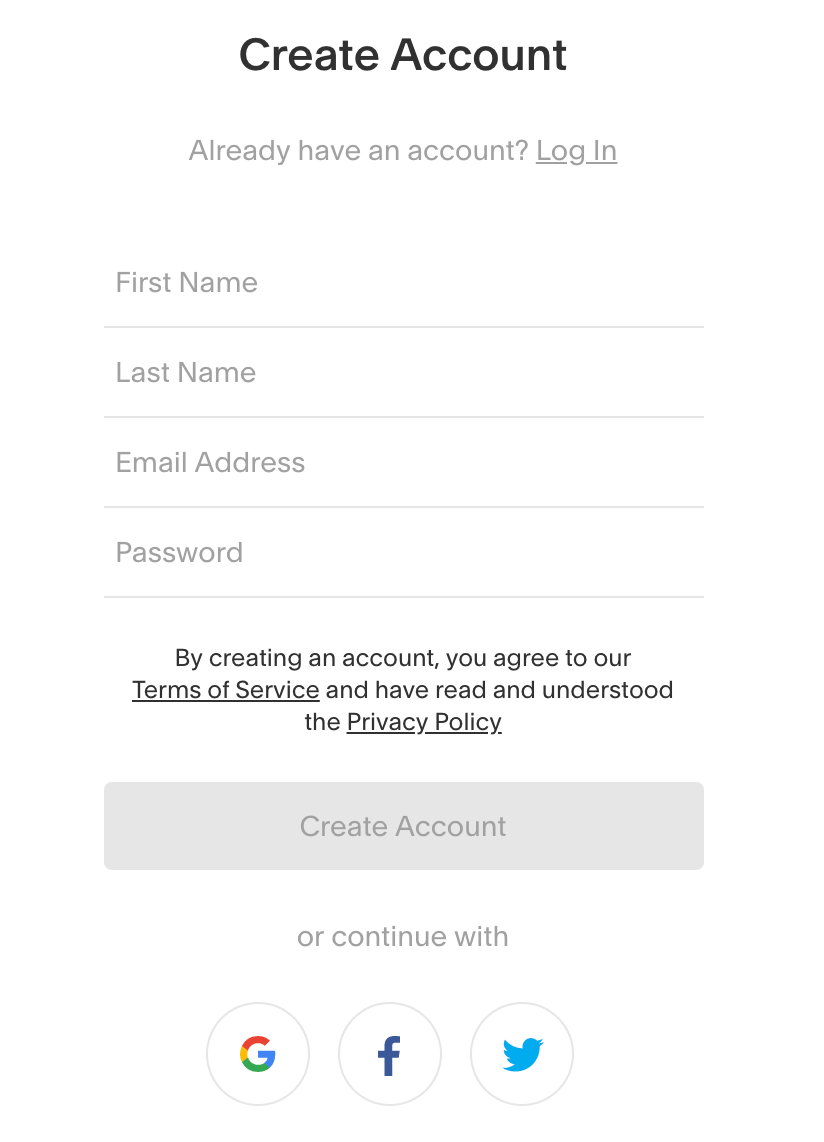
Creating an account doesn’t get much easier. You don’t even need a credit card to join and start building.
All Squarespace requires is your first name, last name, email address, and password. It took me about ten seconds to enter my information into these form fields.
You can also log in with your Google account, Facebook profile, or Twitter account to expedite the process even more.
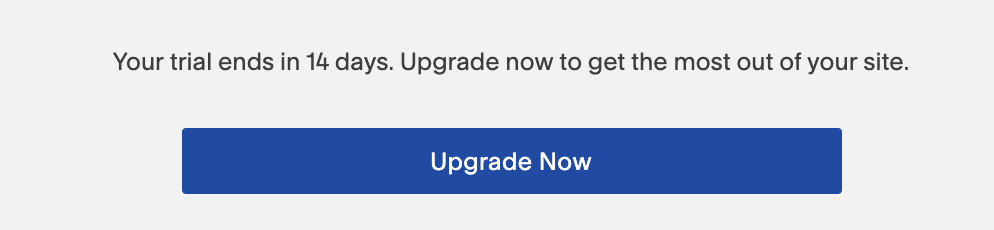
Once you have an account, you’ll be able to start creating a website immediately. Squarespace gives you a 14-day free trial so you can test out their software without having to commit to anything just yet.
So even if you’re on the fence about using Squarespace and you’re considering one of the other best website builders on the market, it’s worth trying out for free.
Step #2: Choose your plan
Technically, you don’t need to do this just yet.
As I just mentioned, you have two weeks to use Squarespace before they even ask you for billing information. So for those of you who aren’t sold on the platform just yet, you can skip over this. But with that said, you should at least be familiar with the pricing plans.
Look for the “upgrade now” CTA at the bottom of your dashboard if you’re still using the free trial.
Squarespace has four plans, segmented into two categories.
- Websites
- Online stores
Let’s review the website plans first.
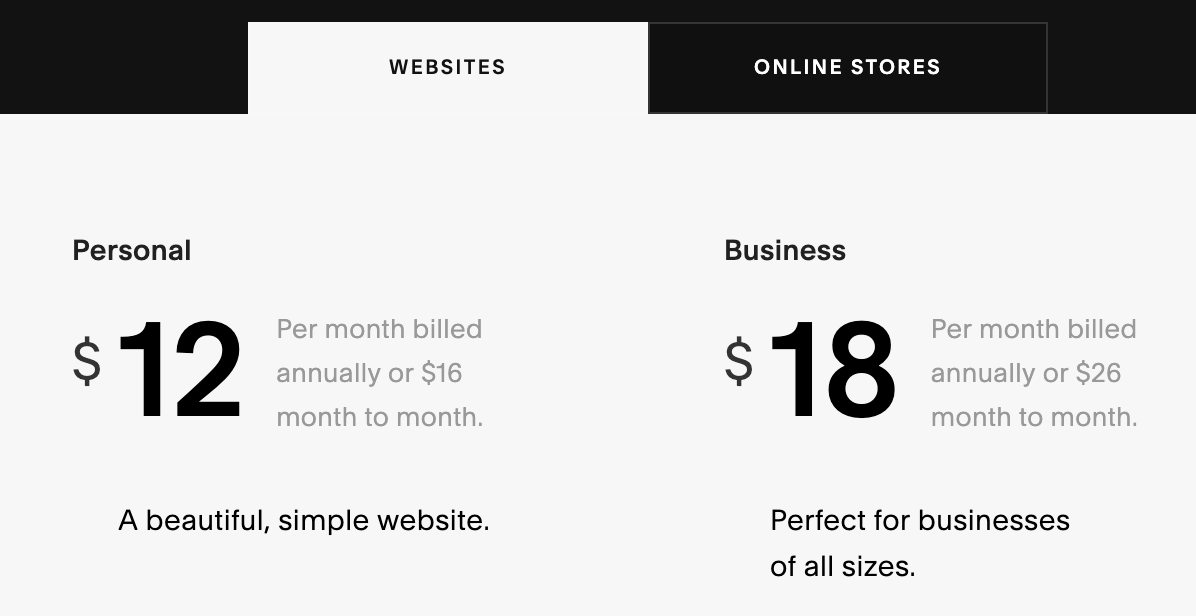
Pricing starts at $12 per month for a personal website if you sign up for an annual contract. This same plan will cost you $16 per month if you elect to go with a month-to-month plan.
The personal plan comes with features like:
- Unlimited storage and bandwidth
- Mobile optimization
- Metrics and analytics
- Custom domain
- SSL
- 24/7 support
Only two different accounts can contribute to the website if you have a personal plan, which isn’t a problem if you’re running the website on your own.
But if you’re creating a business website and want to grant access to multiple partners, employees, or an agency, the business plan will be more suitable for your needs. This plan comes with unlimited contributors, all of the features in the personal plan, as well as:
- Free year of G Suite and Professional Gmail account
- $100 credit for Google Ads
- Pop-ups
- Custom options with CSS and JavaScript
- Premium blocks
- Announcement bar
The business plan costs $18 per month if you sign up for an annual contract, or $26 per month if you’d rather get billed on a monthly basis.
Now let’s take a look at the plans designated for online stores.
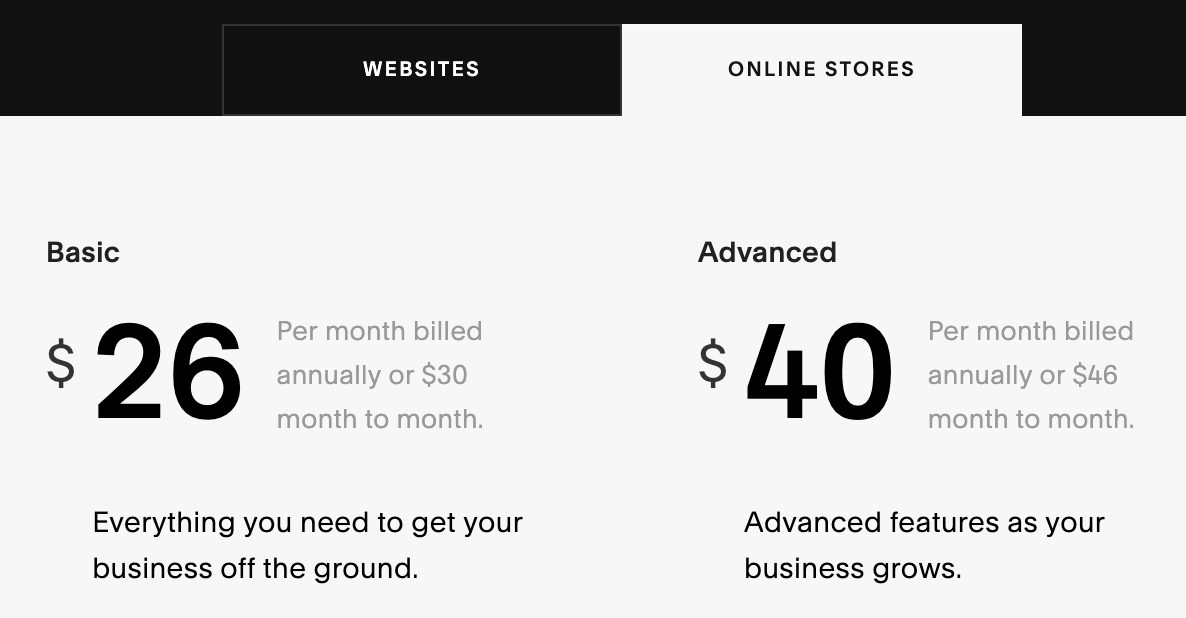
The ecommerce options are a bit more expensive, but they’re more advanced as well.
Even the basic online store package comes with all of the features from the business plan. It also includes benefits like:
- Unlimited products
- No transaction fees
- Mobile website and mobile checkout process
- Metrics specifically for ecommerce shops
- Customer accounts
- Ability to sell with Instagram shoppable posts
- Integrated accounting system
- Manage inventory, orders, coupons, and taxes
This plan sells for $26 or $30 per month, depending on if you go with the annual renewal or month-to-month contract.
The advanced online stores plan is the top-tier package offered by Squarespace. For $40 per month (annual) or $46 per month (month-to-month) you get additional benefits like:
- Subscriptions
- Shipping
- Shopping cart abandonment recovery
- Discounts
- Gift cards
- Ability to integrate your ecommerce shop with third-party services for production and fulfillment
As you can see, all four of these plans are very different. It should be fairly easy for you to decide which one is best for your new Squarespace website.
Step #3: Add a domain
By default, your Squarespace site will have a built-in domain name. This is usually a random combination of words, letters, and numbers.
You can change this domain and keep it for free, but it’s going to have a Squarespace.com URL.
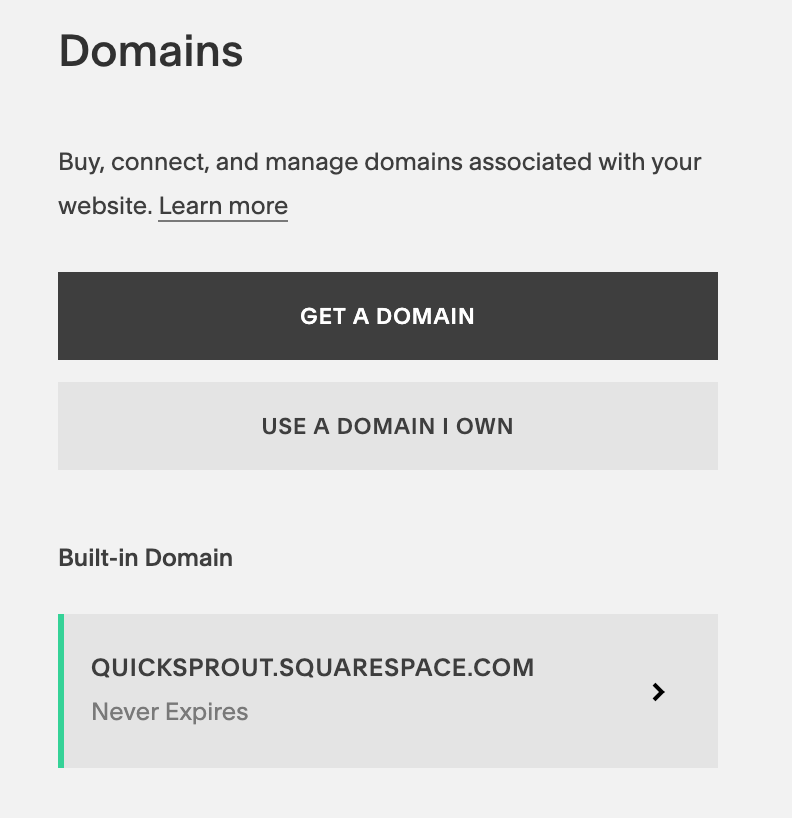
As you can see from the screenshot above, I customized my built-in domain to Quicksprout.squarespace.com. But that’s not very professional.
So you’ll want to use a domain that you already own, or get a new domain through Squarespace.
If you already own a domain, you just need to transfer it to Squarespace. After it’s transferred, you can manage all of your domain settings and website settings in one place.
It’s worth noting that you need to meet certain requirements in order for the transfer to be completed. If you don’t meet those requirements, you’ll have to connect the domain instead of transferring it. Here’s a resource with more information about how to transfer your domain to Squarespace. You can also review this page about connecting a domain if you don’t meet those requirements.
For those of you who still need a domain, I highly recommend you review my guide on how to buy the right domain. This will make the process much easier for you to understand.
Step #4: Customize your style
When you first get started, you’ll be asked some preliminary questions about the goal of your website. This is optional, but it gives Squarespace more information about what you’re trying to accomplish so they can steer you in the right direction.
Examples of goals include:
- Display my photographs
- Publish my videos
- Publicize my brand
- Promote my business
- Write a blog
- Create a portfolio
- Sell my products
- Advertise my restaurant
Next, Squarespace will show you some different themes for the design of your website.

You’ll have four different homepage layouts to choose from.
If you’re not crazy about any of them, don’t worry. You’ll be able to completely customize everything later on. So just choose the one that you like the best for now.
This will give you something to work with, as opposed to starting with a blank canvas and building from scratch.
You’ll also be asked to choose your font. Again, this can always be changed down the road.
Step #5: Add pages
So far, you’ve only chosen a layout for your homepage. But now you need to add other pages on your site.
In order to do this, navigate to the “pages” menu on the left side of your Squarespace dashboard.
These are some of the options for pages you can add to your site:
- About
- Appointments
- Blog
- Contact
- FAQ
- Gallery
- Events
- Location
- Menu
- Newsletter
- Press
- Registry
- Reservations
- RSVP
- Store
- Team
- Terms of service
- Testimonials
Depending on what you choose, an appropriate template will be provided based on the type of page you’re creating. For example, a gallery page and FAQ page will have different default layouts.
As you add new pages to the builder, they’ll appear on your website preview page.
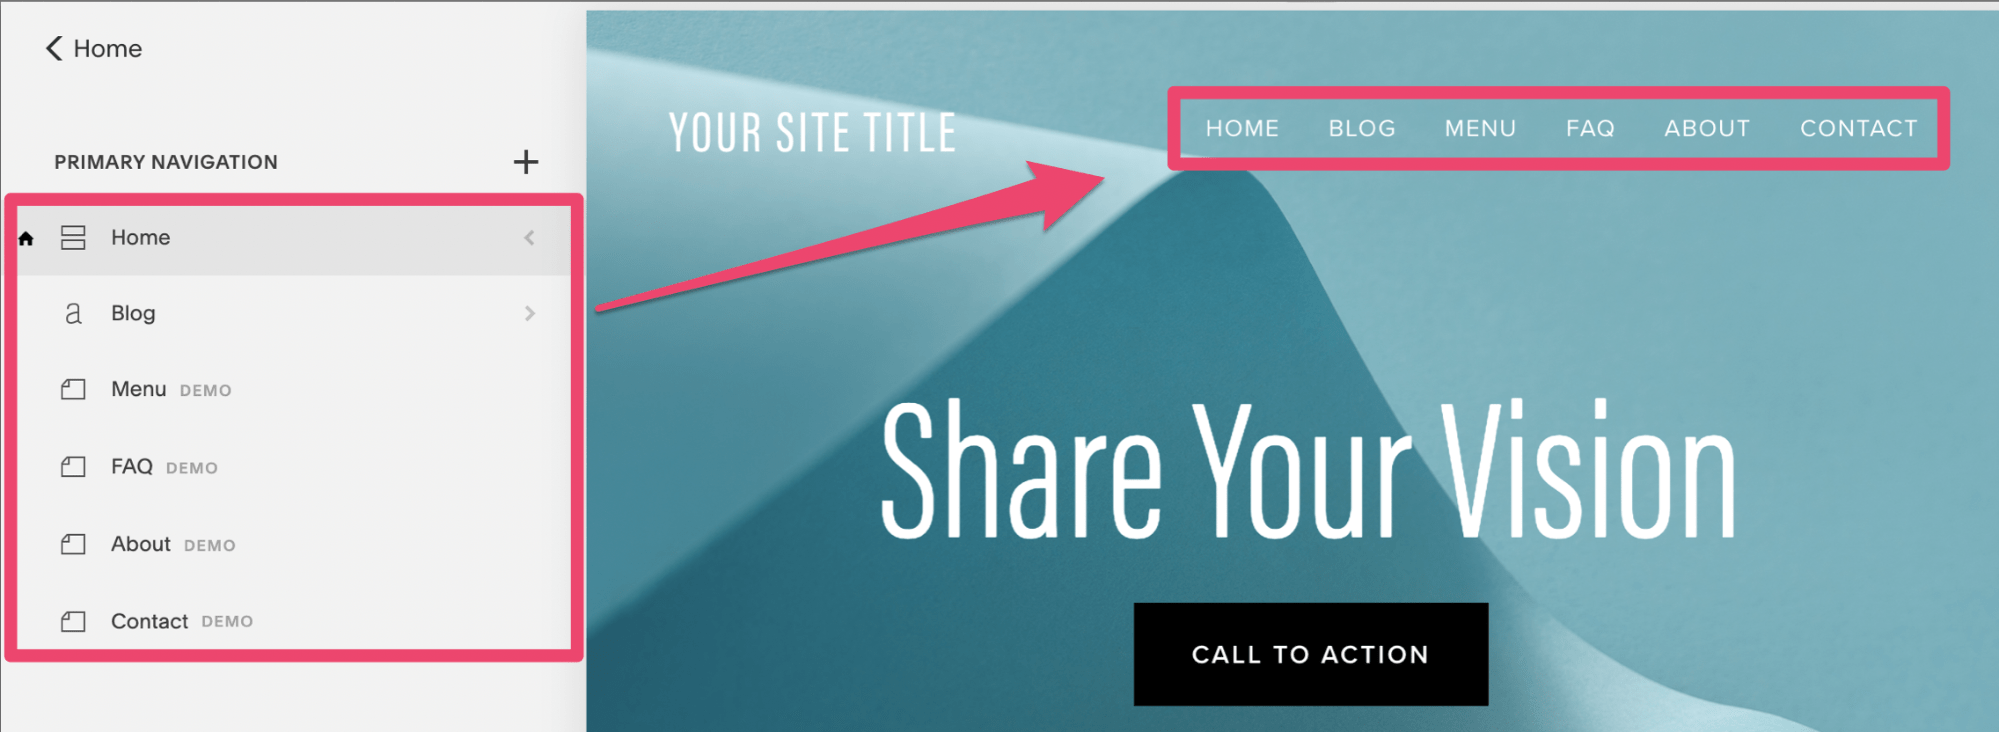
I just added some basic ones as an example.
They are all primary navigation pages, meaning they’ll show up on the homepage, as you can see from the screenshot above.
Squarespace lets you add secondary navigation pages, as well as footer navigation pages to your website as well.
Step #6: Choose a template
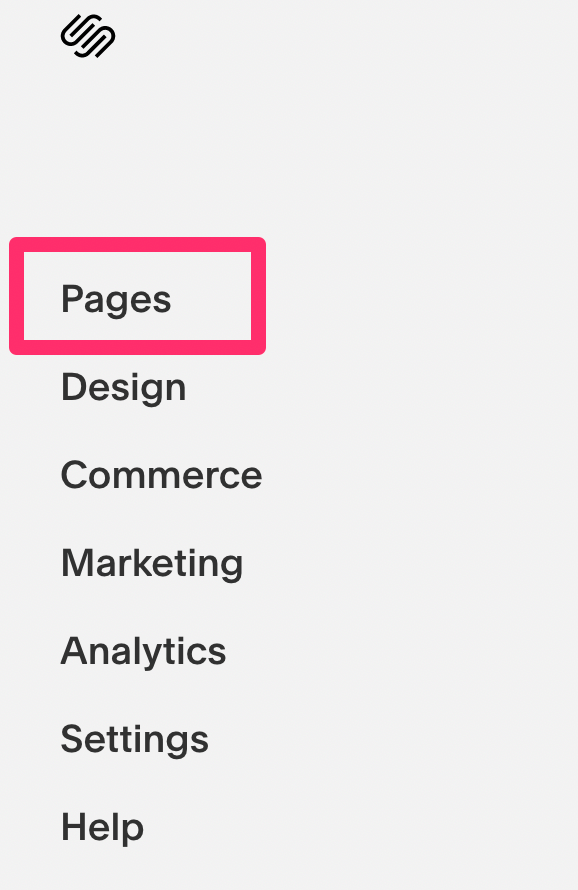
From your main dashboard, navigate to the “design” menu.
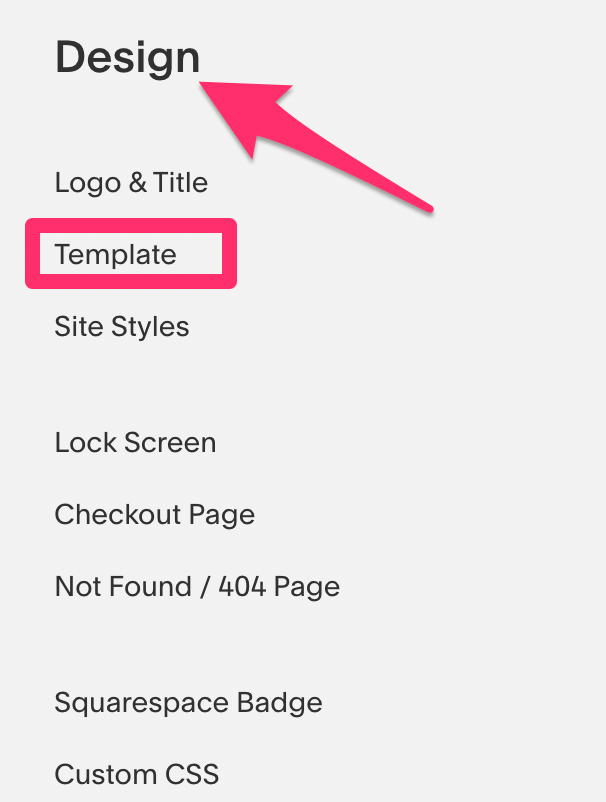
From here you can install a template that flows with the theme that you’re trying to accomplish on your website.
I recommend searching for templates by category:
- Online store
- Portfolio
- Business
- Professional service
- Nonprofit
- Blog
- Restaurant
- Event
- Wedding
- Photography
- Music and entertainment
- Health and fitness
- Travel and tourism
Obviously, a fitness website and restaurant website should look very different from each other. That’s why it’s much easier to pick a theme based on a category that your website falls under.
You can always customize the templates to make them more personal to your site. So you won’t have to worry about using the same theme as another Squarespace website.
It’s worth noting that certain parameters and special features that have already been built into templates cannot be altered.
No matter what Squarespace plan you choose, you’ll have access to every template on the platform.
Sometimes Squarespace discontinues templates. So it’s important that you don’t uninstall a template after you’ve used it on your site. If you decide down the road that you want to change it, you can always try a new one. But you won’t be able to switch back to a discontinued template after it’s been uninstalled and discontinued.
Step #7: Edit images
By default, your site will have some images on the pages after you pick a style, theme, and template. But since these are just random stock images, you’ll definitely want to get rid of them and use your own.
This is very easy to do. Just hover the cursor over your site preview page and click on the “edit” button.

That’s how you change everything on your Squarespace site.
You’ll take the same approach for editing text, adding or removing blocks, changing the size, and moving the location of a feature. But for now, we’ll just stick with the images.
Hover your cursor over an image that you want to change. Another box will appear above it. You’re going to select “edit” again.
Then delete the image by clicking on the trash can icon. From here, you can upload a new image or search for another stock image.

Continue doing this on all of your pages until you’re satisfied with the layout and have replaced all of the default photos with your own original images.
Step #8: Set up ecommerce features (optional)
You can’t access the ecommerce features if you’re still using the free trial. So if you’re ready to launch your ecommerce shop with Squarespace, then you’ll need to upgrade to a paid plan.
Here are some of the settings that you can control from the Squarespace commerce menu:
- Orders
- Inventory
- Customers
- Discounts
- Payments
- Checkout
- Customer accounts
- Notifications
- Shipping
- Taxes
- Accounting
- Apps
If you just have a blog or personal site, then don’t worry about any of this. But if you’re planning to sell online with Squarespace, you definitely need to get familiar with all of these settings so you can manage and customize them to fit your needs.
Step #9: Promote your site
Take full advantage of the marketing tools offered by Squarespace. Head over to the marketing navigation menu and you’ll see options for:
- Email marketing campaigns
- SEO tools
- Announcements
- Pop-ups
- Selling on Instagram
- Share buttons
- Ads
One of my favorite features here is the URL builder.
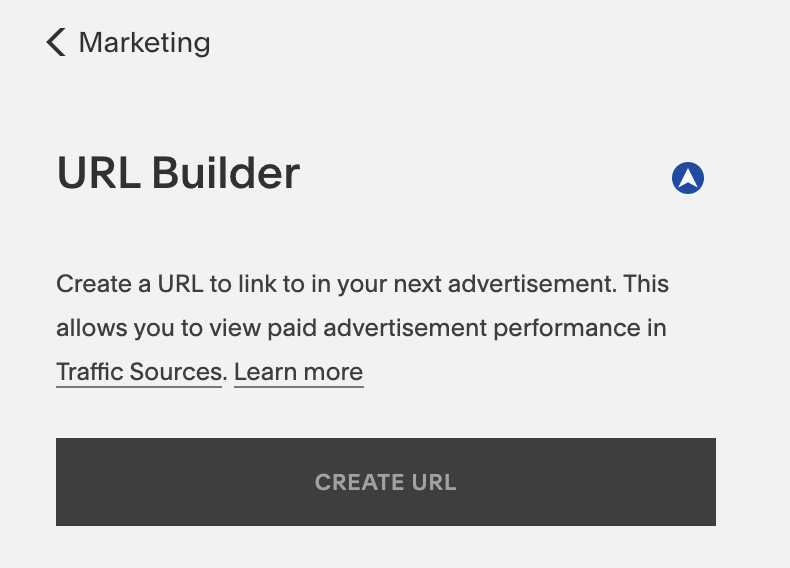
Use this tool to create custom URLs for keeping track of specific marketing campaigns. That way you can measure the success to repeat what’s been working, and abandon what’s not.
Step #10: Publish your website
When you’re building a website with Squarespace initially, it’s not live.
It’s actually impossible to publish your site on the web while you’re still in the free trial phase. But once you’re ready for it to go live, go to the “settings” menu from your dashboard.
From here, select “site visibility” to continue.
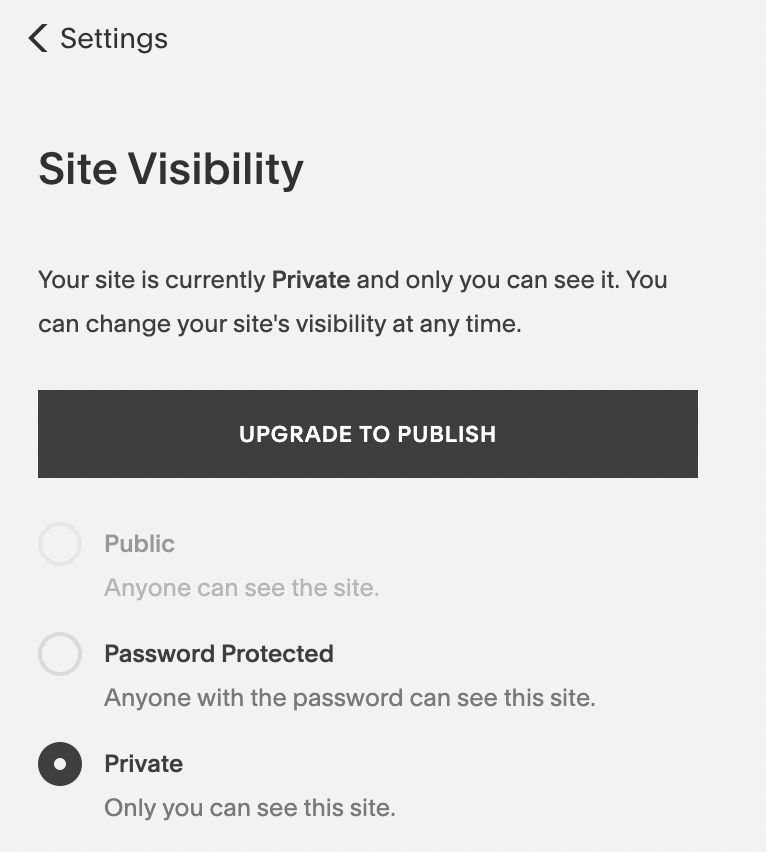
Since I’m still using the trial, the public option is unavailable. But for those of you who have started to pay for Squarespace, you just need to pick “public” from the bullet list.
Get familiar with the other options on the settings menu. From here you’ll also be able to manage things like your business information, social media accounts, permissions, billing, G Suite, and domains.
Conclusion
Building a website in 2019 has never been easier. With website builders like Squarespace, you can literally get a website off of the ground in less than an hour.
While I wouldn’t recommend publishing a new site that quickly, the option is available at your disposal.
If you’re a beginner and want to create a website with lots of design options and custom features, Squarespace will definitely be one of your top options.
For those of you who aren’t completely sold on Squarespace just yet, no problem. At the very least, take advantage of the 14-day free trial. Use this guide as a reference and go through the step-by-step process that I’ve outlined above.
Source Quick Sprout http://bit.ly/2KxdL88
Website Builders to Avoid in 2019
So you’re ready to build a website but don’t know how to get started. Don’t worry; we’ve all been there.
One of the first steps is finding the best website builder to meet your needs based on the type of website you’re trying to create. But if you run a Google search for website builders, you’ll quickly realize that there are dozens of options to choose from. This can be a bit intimidating.
If you’ve never built a website before, it might be tough to tell the difference between a good website builder and a platform that’s going to give you nothing but problems.
That’s what inspired me to write this guide. Everyone else out there is telling you what website builders you should be using, but very few people are telling you which ones to avoid.
Before you get started, ask yourself if a website builder, in general, is even your best option.
For those of you who are experts in HTML, CSS, and want complete control and customization from the backend, you might not be happy using a website builder to create your site. This is especially true if you’re trying to create a site that’s intended to become the next Facebook or something like that.
But for everyone else, using a website builder to create your site will likely be your best option.
Website builders are great for small business owners, ecommerce sites, selling services online, photography portfolios, hotels, restaurants, blogs, and personal sites. It’s the perfect way to build a site if you don’t know much about coding, design, HTML, or CSS.
How to evaluate a website builder
Now that you’ve decided that a website builder is your best option, it’s time to figure out which platform to use. Once you start browsing the web, there are specific indicators you should be looking for to determine if a website builder is suitable for you.
At the same time, there are also certain red flags that will tell you if the site builder is one that should be avoided altogether.
These are the factors that need to be taken into consideration when you’re evaluating a website builder.
User experience
In this case, you’re the user who needs to be having a good experience. That’s why you need to pick a website builder that’s very easy to use.
If it has complex navigation, doesn’t offer drag and drop building, and makes it difficult to preview the pages you’re working on, then you’re going to struggle.
On the flip side, you don’t want to go with a website builder that has been simplified to the point where you lose the ability to complete certain functions.
I always recommend starting with a free trial of a website builder before you commit. The week or two that they give you for free will be a good indication of the builder’s ease of use.
If you’re experiencing too much friction, it’s in your best interest to explore other options.
Support
Once you decide on an option, it doesn’t automatically mean that you’re going to become an expert at building websites overnight. There’s a good chance that you’re going to have some questions that require assistance along the way.
So make sure you pick a website builder that offers great customer support.
For example, Wix has exceptional support pages.
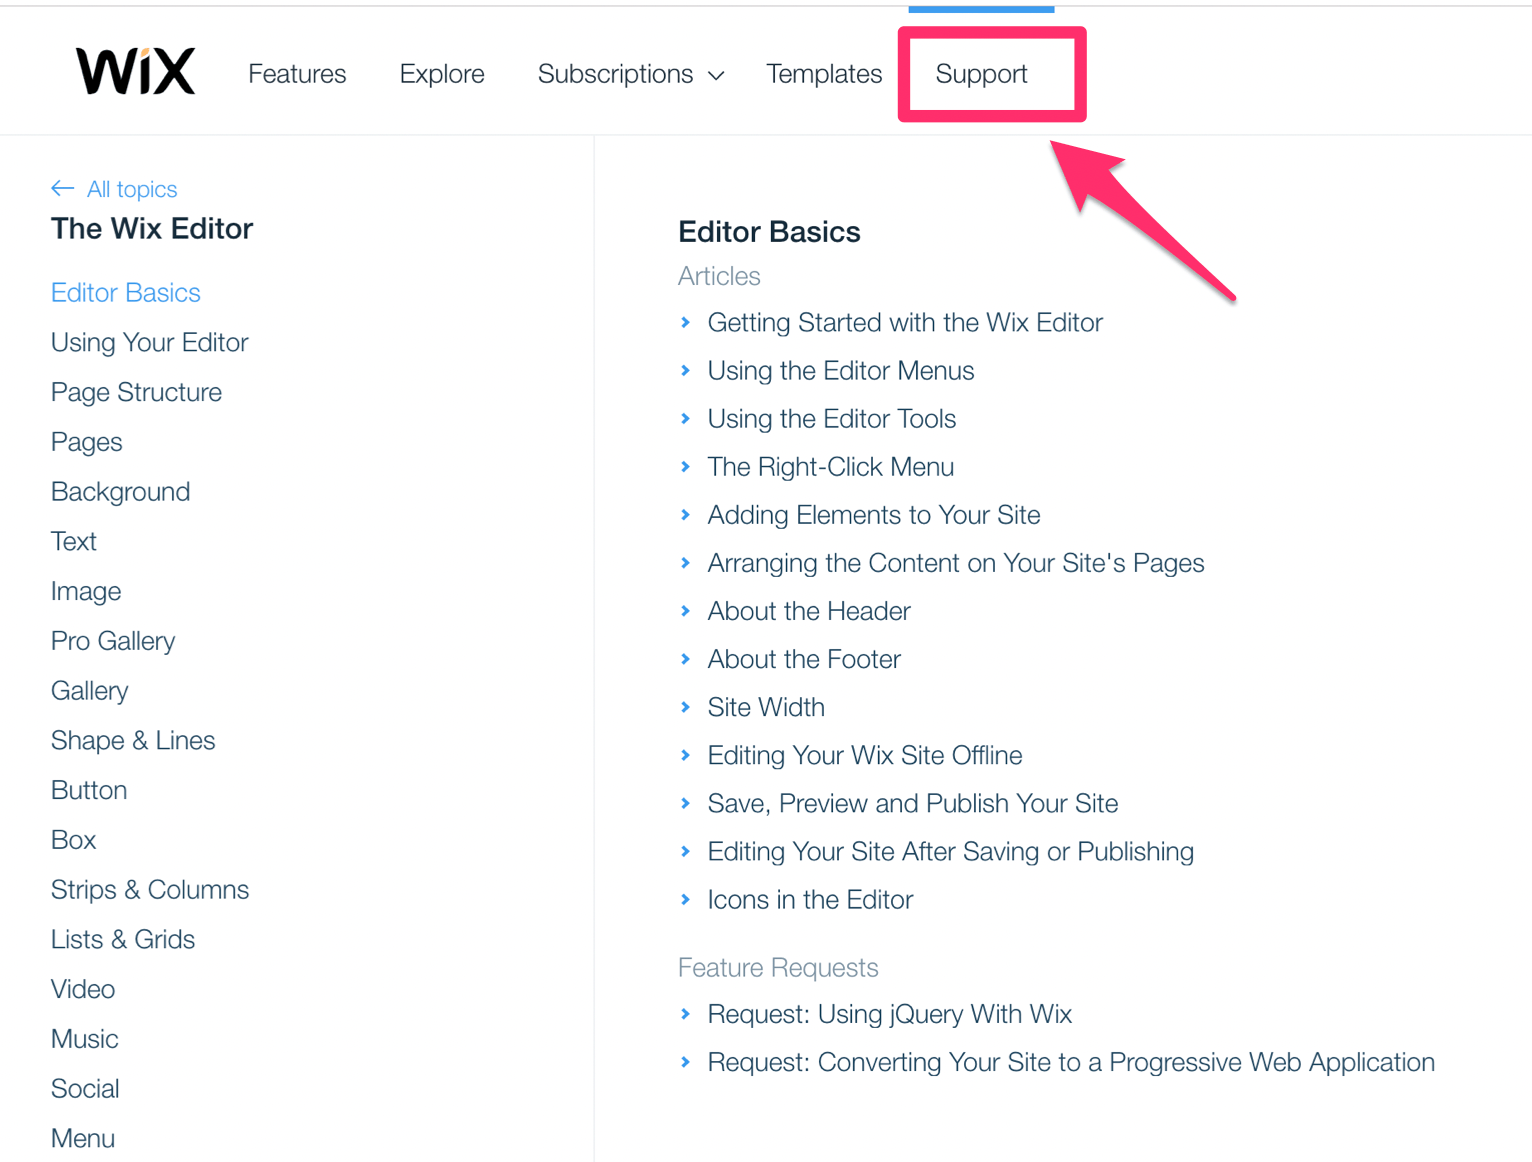
These are all of the guides and articles they offer related to the editor basics. They also have extensive guides about:
- Plans
- Domains
- Site management
- Mailboxes
- Mobile editor
- Wix stores
- Technical difficulties
- Marketing tools
- SEO
The list goes on and on. Furthermore, Wix offers 24/7 support if you need additional assistance that requires the help of a customer service representative.
As one of the top website builders on the market, you can always refer to Wix support and compare it to the builder that you’re evaluating to see how it stacks up. See if the other option provides tutorials or access to representatives when you’re in a bind and need help right away.
Features
I briefly mentioned this before when we were discussing ease of use. You don’t want to pick a website builder so simple that you end up losing features.
You need to make sure that everything you want to do on your site is available.
Right now your site might be something basic, like a blog. But in the future, you may want to expand and add things like a shopping cart to build an ecommerce website.
- Mobile-friendly design
- Image gallery for portfolios
- Templates
- SEO checker
- Profiles for site visitors
- Password protection for pages and content
- Connect your domain name (even if you didn’t buy the domain directly from the builder)
For those of you who haven’t purchased a domain yet, you can check out my guide on the best domain registrars.
Quality
At the end of the day, you don’t want the process of building and managing your website to interfere with your final product.
The people who land on your website don’t care what builder you’re using or how difficult it was for you to create it. First impressions matter. All they want to see is a professional site that’s legitimate and user-friendly.
You can’t afford to overlook this reality as a new website.
Think about it from the perspective of people landing on your site.
How can get you them to stay on your site and keep coming back in the future? If your website builder is making your site look unprofessional or untrustworthy, you’re going to struggle with this.
Furthermore, you don’t want to have a website that looks basic and cookie-cutter.
Performance
Website speed and uptime are two factors that can’t be overlooked when you’re evaluating a website builder.
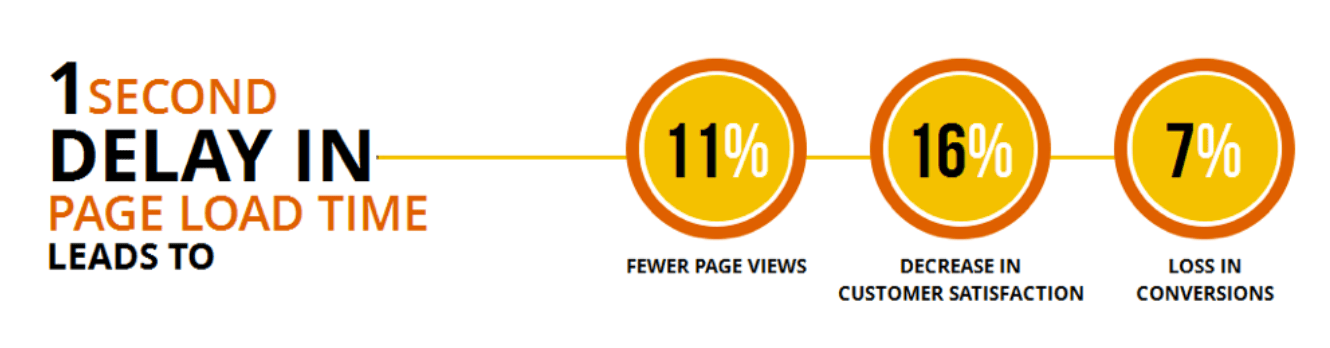
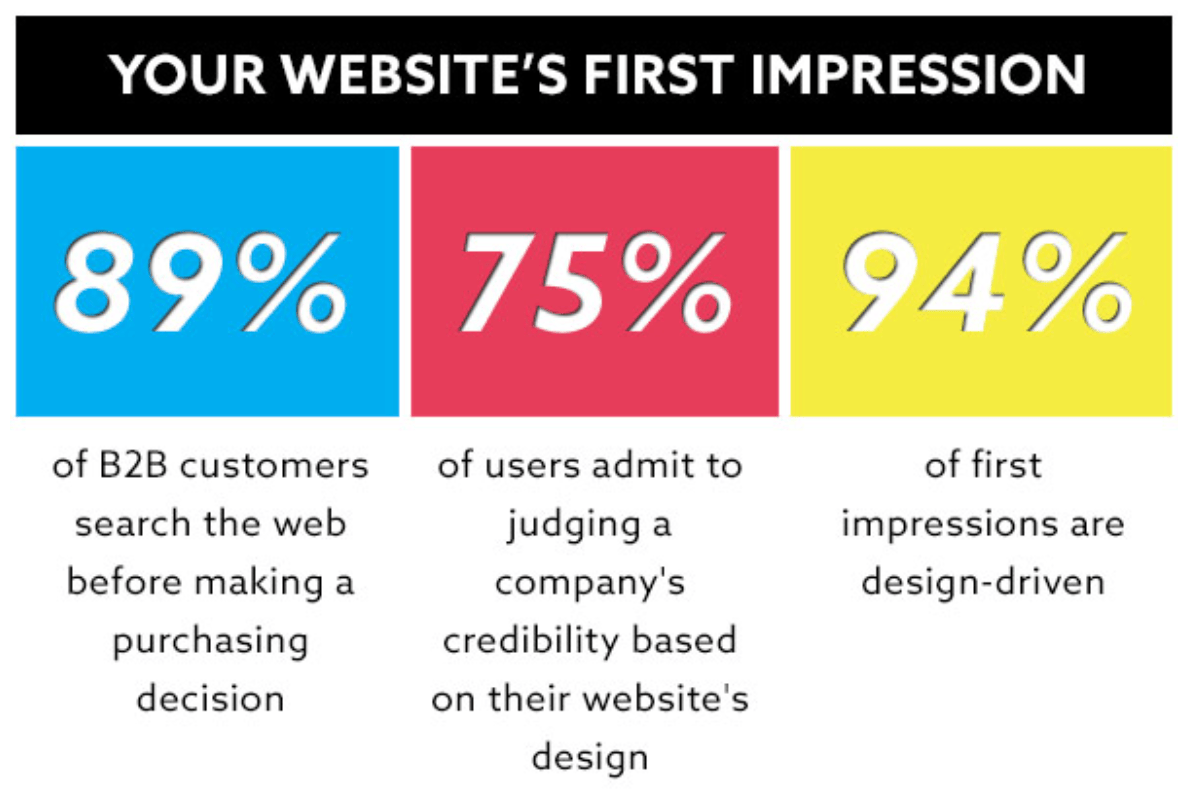
83% of people expect a web page to load in three seconds or less.
Most website builders will claim to have 99.9% uptime and lightning fast loading speed. But you can’t always take their word for it.
Like any other product or service you buy online, you should read reviews. See if other website owners are complaining about the website builder and the performance of their sites.
While nearly every website builder will have some negative reviews, it’s definitely a red flag if you see more bad reviews than good ones for a particular builder.
Price
When it comes to picking the best website builder, cheaper isn’t always better. But at the same time, the most expensive options don’t always equate top quality.
It’s all about value.
Find a website builder that has different options based on your specific needs.
Look for transparent pricing. Some builders will try to fool you by signing you up at a promotional rate. Then all of a sudden six months later you’re paying triple the price that you initially agreed to. So make sure you read all of the fine print before you pay for anything.
Webs
One of the first website builders that I’d avoid is Webs.
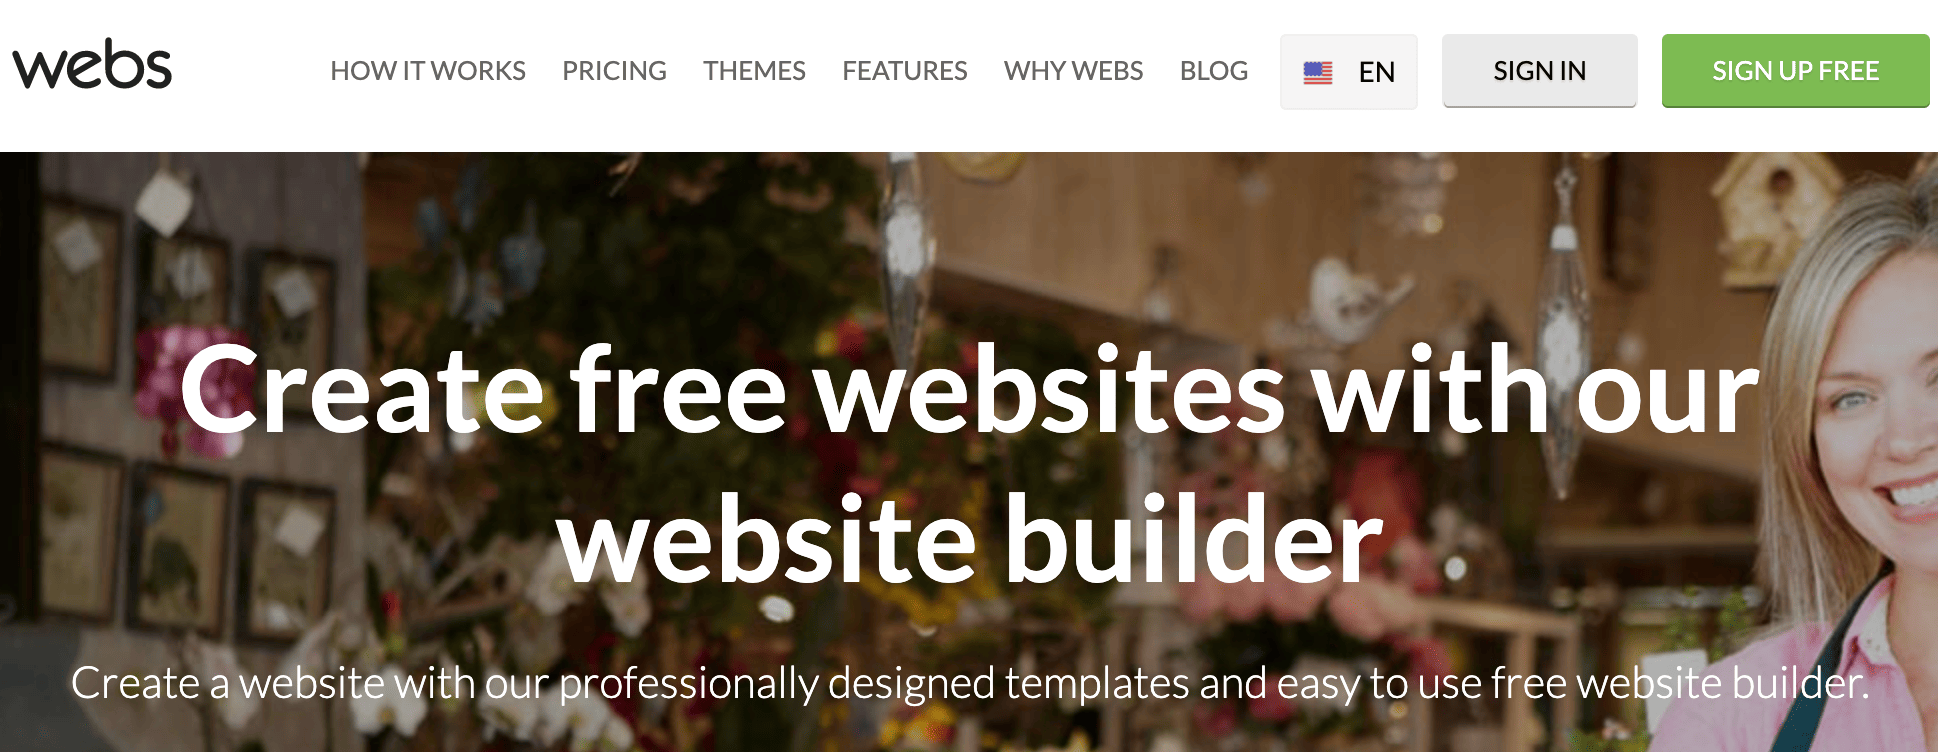
At first glance when you’re browsing through they’re site and what they offer, everything appears to be in order.
They have affordable pricing with plans starting at:
- $5.99 per month
- $12.99 per month
- $22.99 per month
Webs even offers a 30-day money back guarantee. Custom domain names and emails are included in all of their plans.
However, Webs definitely has its fair share of flaws.
The building process is actually pretty simple, but you’re going to be extremely limited in terms of your design options. The builder itself feels outdated, and your final product can end up feeling the same way.
Some browser extensions won’t work with this website builder either. Overall, the interface just feels awkward when you’re using it.
Webs is definitely not ideal for ecommerce websites and can get expensive when you start adding on those features.
For those of you who are considering the cheapest plan starting at $5.99, the only way to reach customer support is via email. That’s not ideal if you need help right away. Their middle-priced plan offers live chat in addition to email, but only the top tier plan comes with phone support.
The response time for email support is slow, according to reviews. You can usually expect an answer in about two days. I couldn’t imagine having to wait two days to get an answer about something important related to my website.
While Webs might be affordable and easy to use, it’s just underwhelming. With outdated themes, you’re going to be pretty limited with the type of website you can build using this platform.
Doodlekit
Doodlekit is another option that I’d avoid at all costs.
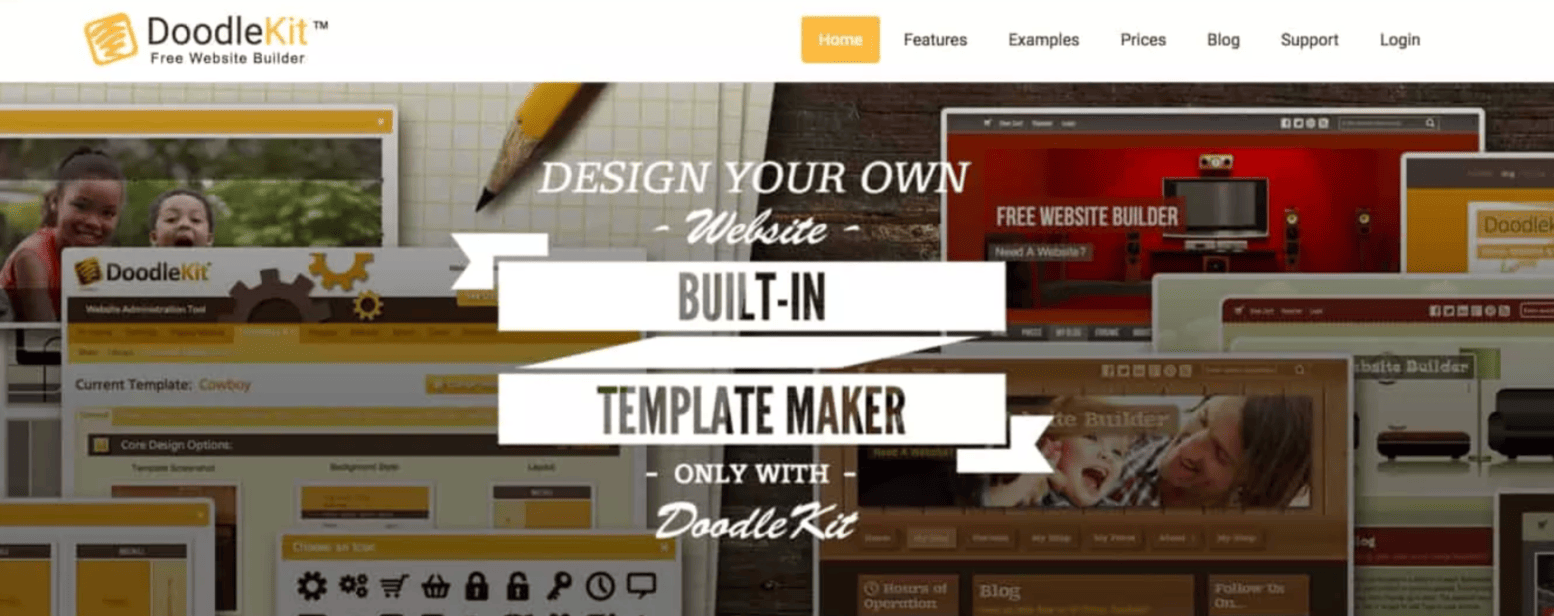
Normally, I don’t like to bash or badmouth websites, products, or services. But truthfully, Doodlekit has more negatives than positives to talk about.
It’s not user-friendly in any stretch of the word. It’s also very difficult to edit their templates.
I have lots of experience using website builders, and I found myself frustrated and confused trying to make what I thought would be simple changes.
Doodlekit has over 100 themes, but quantity doesn’t always translate to quality.
The themes are so outdated that adding them to your website would be a huge mistake. Customizing and making changes to these themes feels impossible.
Doodlekit has a free website builder, which might sound appealing for some of you who are trying to save some money. But I wouldn’t recommend that either. Their other plans range from $10 to $40, assuming you get billed on an annual basis. The month-to-month plans start at $14.
If you don’t want to take my word for it, give the free option a spin. But I’d say you should avoid the hassle altogether and find a better website builder instead.
Yola
Similar to Webs, Yola is actually pretty easy to use.
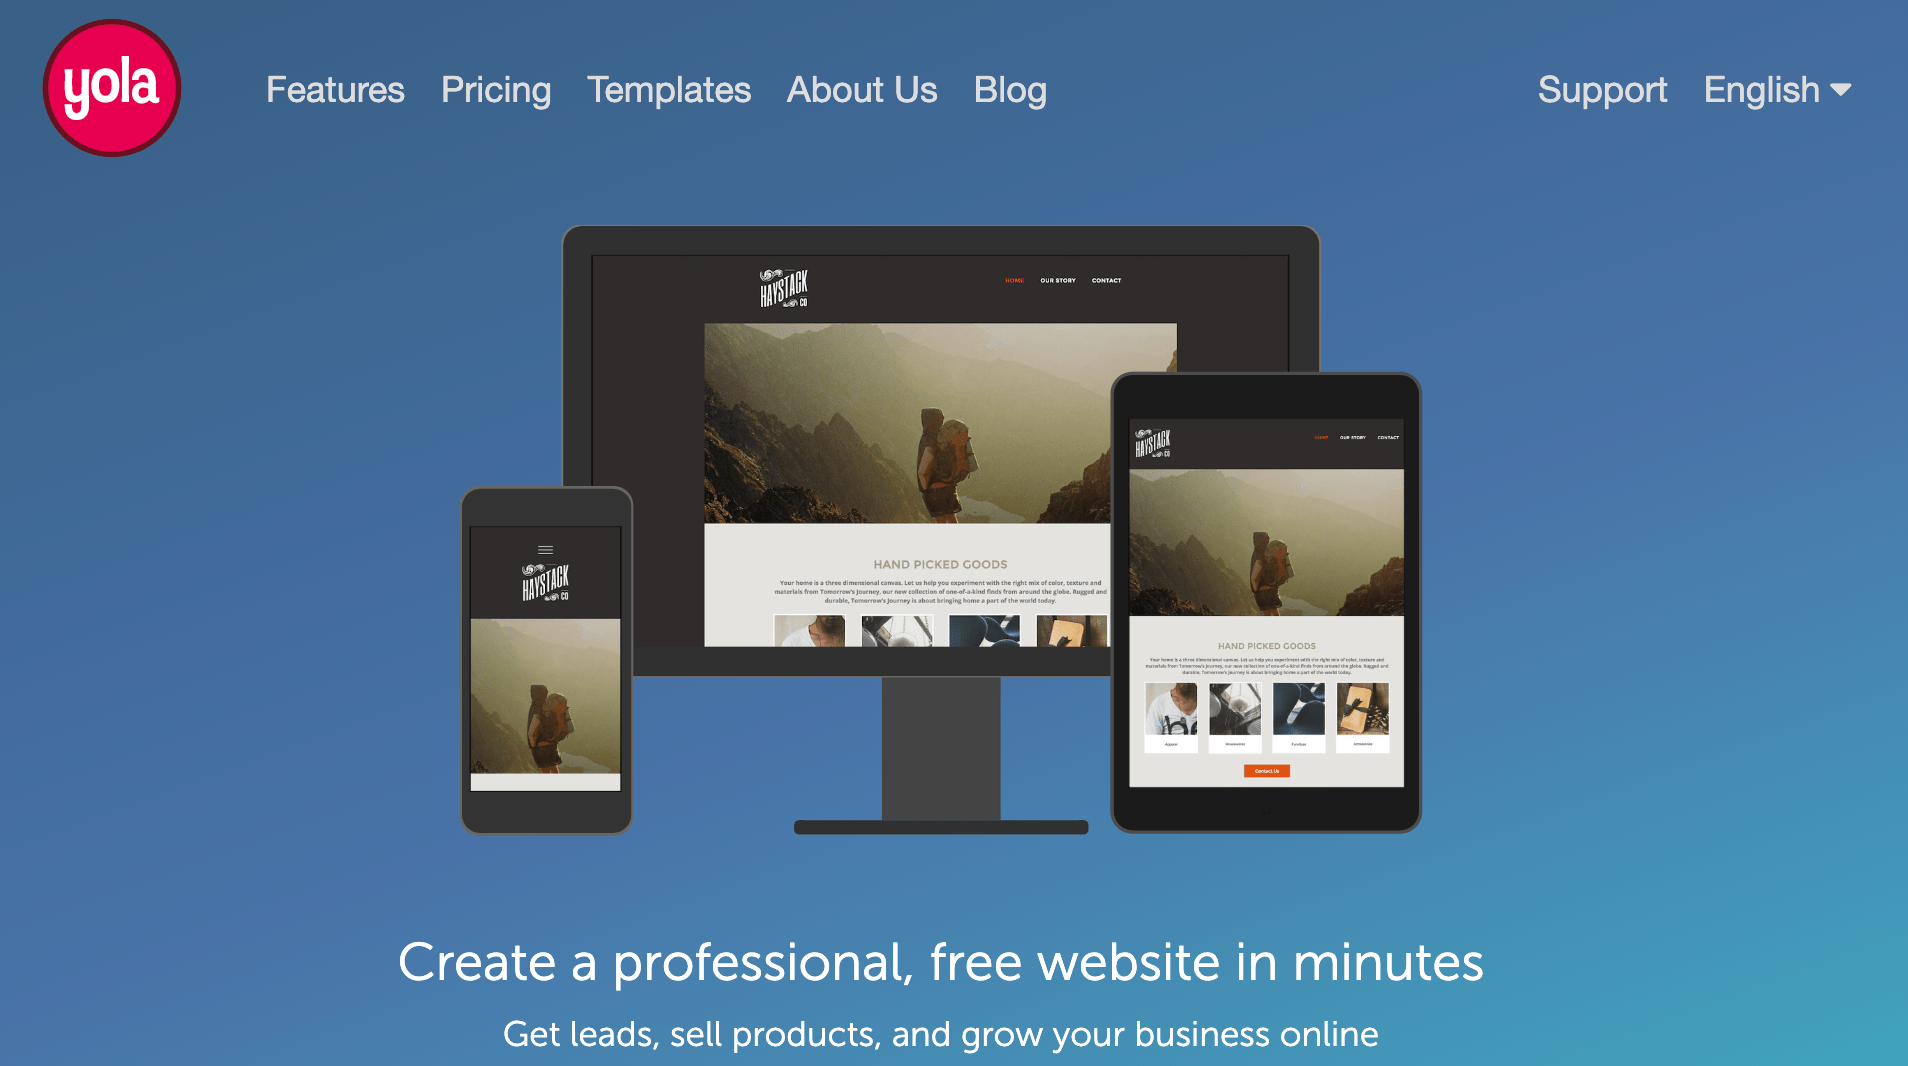
However, that ease of use comes at the cost of being very limited. While the building process isn’t challenging, it gets tedious after a while.
The templates are outdated and feel rigid.
You end up having to make so many changes to the templates that it pretty much defeats the purpose. They have more than 250 themes, but the themes look like they belong on websites that were being built ten years ago.
That’s definitely not ideal when you’re competing with websites that have responsive designs and videos playing in the background.
Yola has affordable pricing, including a free plan. But the free plan has a Yola subdomain and only lets you create three pages. Obviously, you can’t build a legitimate website like that. The sole benefit of the free plan is that it gives you a chance to sign up and test the builder out before you have to pay.
Pricing ranges from $5 to $20 per month based on annual contracts or $7 to $30 for month-to-month contracts.
All plans, with the exception of the free option, give you a custom domain. You can also add a Yola store for $10 per month to any of the paid plans.
While this sounds appealing, I don’t think you’ll end up being happy with the user experience or final website product. That’s why I have Yola on my avoid list.
Jimdo
In terms of performance and ease of use, Jimdo is actually pretty decent. You can get your website up and running fairly quickly.
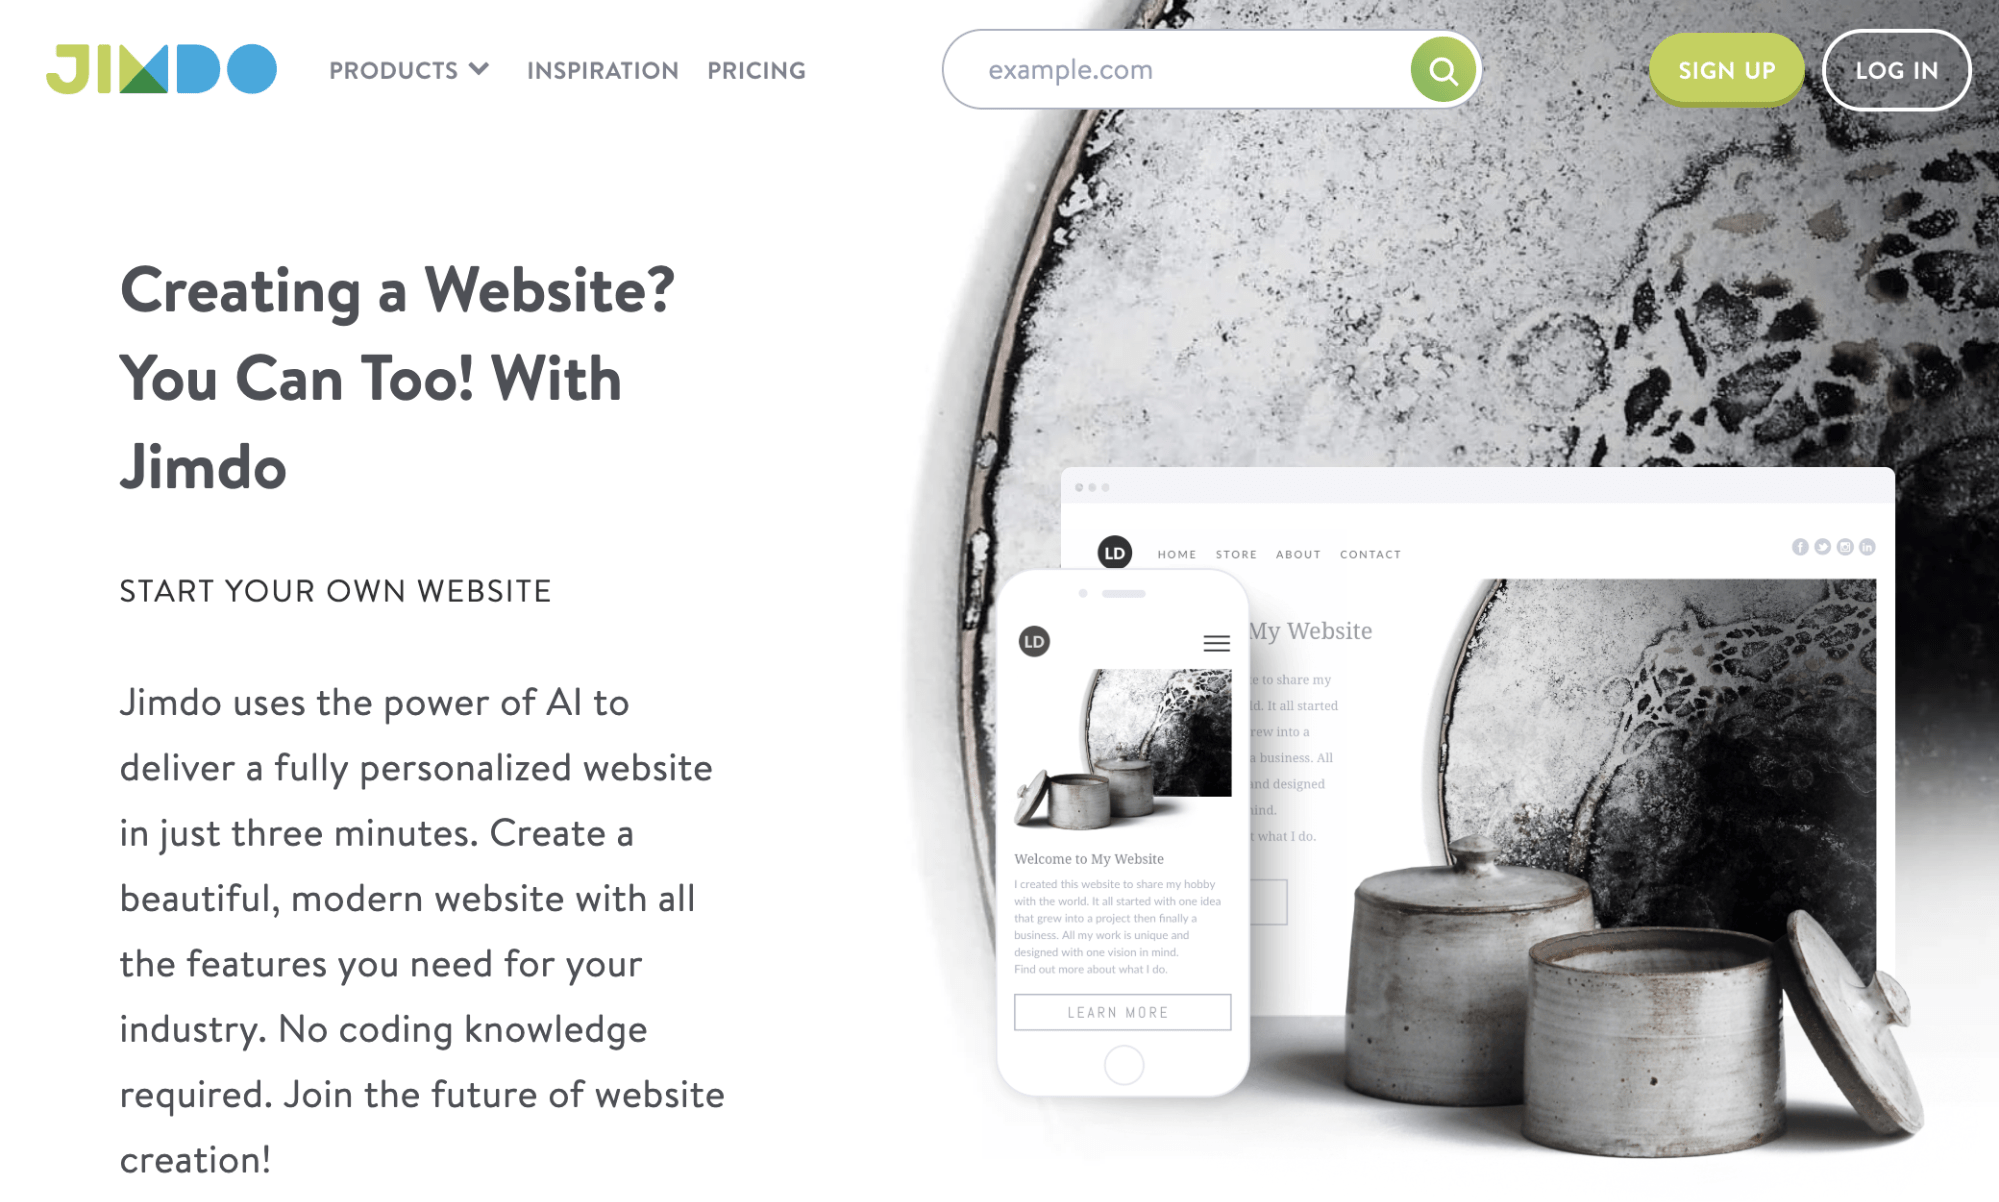
But with that said, Jimdo is very limited.
They have less than 20 themes for you to choose from. You’ll be able to change the color scheme, add text, and add images. But beyond that, building a unique website that’s fully customized with Jimdo will be a challenge.
Your final site will feel very cookie-cutter and basic once you’re done.
Jimdo offers more pricing options than every other site on this list.
- Free
- $9 per month
- $15 per month
- $19 per month
- $39 per month
They also have ecommerce options. With Jimdo, you get a free domain for a year, but then it will cost you an additional $20 per year after that promotional rate expires.
While Jimdo isn’t awful, the lack of customization options and themes hurts it in my mind. There are better choices out there for you to consider.
Conclusion
There are lots of website builders on the market today. Like any other product or service, some options are better than others.
That’s why you need to know how to evaluate a website builder.
- User experience
- Support
- Features
- Quality
- Performance
- Price
These are all factors that need to be taken into consideration.
Based on these criteria, there are definitely website builders that you should avoid, like the ones that I mentioned in this guide.
Now that you know what to avoid, check out my list of the best website builders to steer you in the right direction.
Source Quick Sprout http://bit.ly/31cAH2x