Yet another retailer is calling it quits.This time, it's Payless ShoeSource. The Topeka, Kan.-based chain said it plans to file for bankruptcy later this month and will close all 2,300 stores, according to Fox Business.Attempts to find a buyer for Payless were unsuccessful, [...]
Source Business - poconorecord.com http://bit.ly/2GsrZpI

الجمعة، 15 فبراير 2019
How to Create a Website in 120 Minutes — Step-by-Step
Creating a website used to be a massive project.
And expensive too.
Everything had to be built by hand and businesses needed to work with an online marketing agency that would charge them tens of thousands of dollars to build the site. If you wanted a professional-looking site, that was your only option.
Things have gotten a lot cheaper over the years.
Now it’s possible to get a polished site for less than $100. About $10 to buy the domain, $30–60 for a good template, and $5–10/month to host it. It’ll look so good that people won’t even realize that you built it yourself. It’ll look like some high-flying marketing agency built it for you.
Not only has it gotten cheaper, it’s also gotten a lot easier.
I’ve broken down the 9 simple steps to create your website from scratch. You’ll easily be able to run through these steps over the next 120 minutes.
Step 1: Pick a Name and Find a Domain
These are not two separate steps, unfortunately.
I really wish I could sit down, pick any name that I want for my business, and be able to create the site that I want around that name. Now that the internet is a couple of decades old, we all have to face the reality that most of the good domains have been taken.
Here’s how a naming session always seems to go for me:
- In a moment of inspiration, we think of an amazing name.
- We hold on to this name for months, maybe even years.
- It’s time to start the business, so we go to purchase the domain.
- The domain is taken.
- We try a dozen small variations of our original idea, all taken.
- No biggie, we thought of one brilliant name, we’ll think of another one.
- Backup idea #2 = taken.
- Backup idea #3 = taken.
- Backup idea #4 = taken.
- Despair sets in.
- We start considering names that we don’t actually like, hoping that anything is available.
- We come up with 2 or 3 options that we don’t like at all.
- Then we spend a week trying to come up with a name that’s both available and a name that we can live with.
- Finally, we find one.
Websites have also become so embedded in our day-to-day lives that it’s better to change the name of the business to match an available domain than it is to pick a poor quality domain. Through this process, I almost always end up with a completely different name than I originally intended.
This is why I consider the “naming my business” and “buying the domain” steps for creating a business to be the same step. I try to only lock myself into a name once I have the domain.
We put together an in-depth guide on buying domains here.
The good news is that the rest of these steps are a breeze once you have your domain purchased. It’s the first and hardest step.
Step 2: Register Your Domain
Real quick, let’s sort out the difference between a domain registrar and a web host.
A domain registrar is a company that specializes in buying (registering) domains.
A web host, on the other hand, specializes in running servers that host websites.
Every web host will desperately try to get you to also registrar a domain through them. The reason is that it’s a great upsell for them. They’ve spent most of their resources building out a hosting service, then they offer domain registration as a convenience, increase the price a bit, and collect a nice chunk of extra profit from you.
My philosophy is to buy things from businesses that specialize in that exact thing. Prices will be better and so will quality. That’s why I also use a domain registrar for buying domains and a web host for hosting. I never mix up the two.
We put together a detailed review of domain registrars here.
Step 3: Decide What Kind of Site You Want
Most guides on creating a website will push you into using WordPress. It’s the most popular and flexible website builder. And that’s usually a good recommendation.
But there are a few situations where I recommend different options.
Simple Portfolio or “Business Card” Sites
Many businesses need a simple website that tells people a few things:
- Who the business is for
- What the business does
- Sometimes a portfolio that shows off some work
- Contact info
This kind of site gives the basic info for the business, nothing more. If this is what you need, Squarespace is your best option for creating your website. It’s incredibly simple to use and will give you a professional site at a very low price. It’s perfect for small businesses.
Squarespace will try to convince you that they can handle everything. That’s not true.
They’ve created the simplest and easiest website builder out there. Truly, it’s a joy to use.
However, they completely lack all the advanced features that an online business needs. The ecommerce functionality is extremely limited, and I don’t know any serious online marketer that uses Squarespace for a content site. If your business an online business, Squarespace isn’t a legitimate option. You’ll hit the limits of its features too fast.
If you know that you want an ecommerce store from the beginning, start on Shopify and skip Squarespace. And if you know you want a blog or are planning on doing lots of content, start on WordPress.
Squarespace makes the most sense when you just need a clean, professional-looking site that gives some basic info on your business. It’s perfect for small businesses, freelancers, and artists.
Here’s another way to think about it: If you’re building a business that doesn’t live and die on its website, it just needs a website in case anyone looks for it, like a business card, then go with Squarespace. But if you’re website is your business, use one of the more tailored platforms.
Ecommerce Sites
If you’re planning on building an ecommerce store for your site, don’t use WordPress. We have an entire post here on when to use WordPress for ecommerce and when not to. The short story: it rarely makes sense to use WordPress for ecommerce.
The best option, by far, is Shopify. There used to be more competition in the ecommerce tool space but Shopify got too far ahead. Now they’re really the only option and they have an incredible reputation. You won’t regret using them for an ecommerce site.
If you’re going this route, we have a 9-step guide on how to create an ecommerce website. We also have a guide on how to start a store that drives real sales. Both of those guides will get you pointed in the right direction.
Blog Sites
If you want to create a blog with a bunch of content, you need to use WordPress. We have a detailed guide on starting blogs here.
WordPress powers over 30% of the entire internet. So it’s the only real option for starting a blog these days.
What about Joomla or Drupal? Or Typepad?
WordPress left all those other platforms in the dust about a decade ago. They’re not even legitimate options at this point. Pick WordPress — there isn’t a single situation where you’ll regret it.
When I originally started with this online thing, Drupal sites were still pretty common. I partnered up with an engineer friend of mine and we did a lot of freelance work migrating sites from Drupal to WordPress. Even back then, WordPress was a clear winner.
Now when I come across a site on any of these other tools, it’s kind of exciting. It’s like finding an ancient artifact. “This still exists!? How fascinating!”
Don’t use any of these other tools, stick to WordPress.
Everything Else
If you’re not sure or have another vision for your site outside the categories above, use WordPress. It’s the most flexible platform out there. It will do ecommerce, it’ll do simple portfolios, it’ll do massive content sites, it’ll do Fortune 500 marketing sites, it’ll do it all.
You might have to customize it more than other platforms in some situations but you can make WordPress do whatever you want it to. And just about anyone in online marketing knows their way around WordPress so you’ll be able to find plenty of people to help you when the time comes.
Whether you want to build your site by hand or you have an online marketing agency to do it for you, you should still build on top of WordPress. It’ll shortcut a lot of the programming work and give you the ability to edit basic items on your site without having to edit any code. I’ve managed marketing sites of venture-backed tech startups that employed dozens of engineers — we still had our marketing site built on top of WordPress. It’s the standard choice.
Step 4: Get a Host for Your Website
For the rest of this guide, I’m going to assume that you’ve picked WordPress to build your site. If you want an ecommerce site, skip the rest of this guide and follow our guide on creating an ecommerce site.
WordPress is the tool that you’ll use to build your website. But you also need a host that will store your site and make it available to anyone who visits.
We have an entire guide here that goes through all the best web hosts.
Hosting plans usually start around $5/month.
Step 5: Install WordPress
Just about every website host has a 1-click install of WordPress. It’s usually under a section called Tools, Website, Software, or Content Management Systems (CMS). It’ll look something like this:
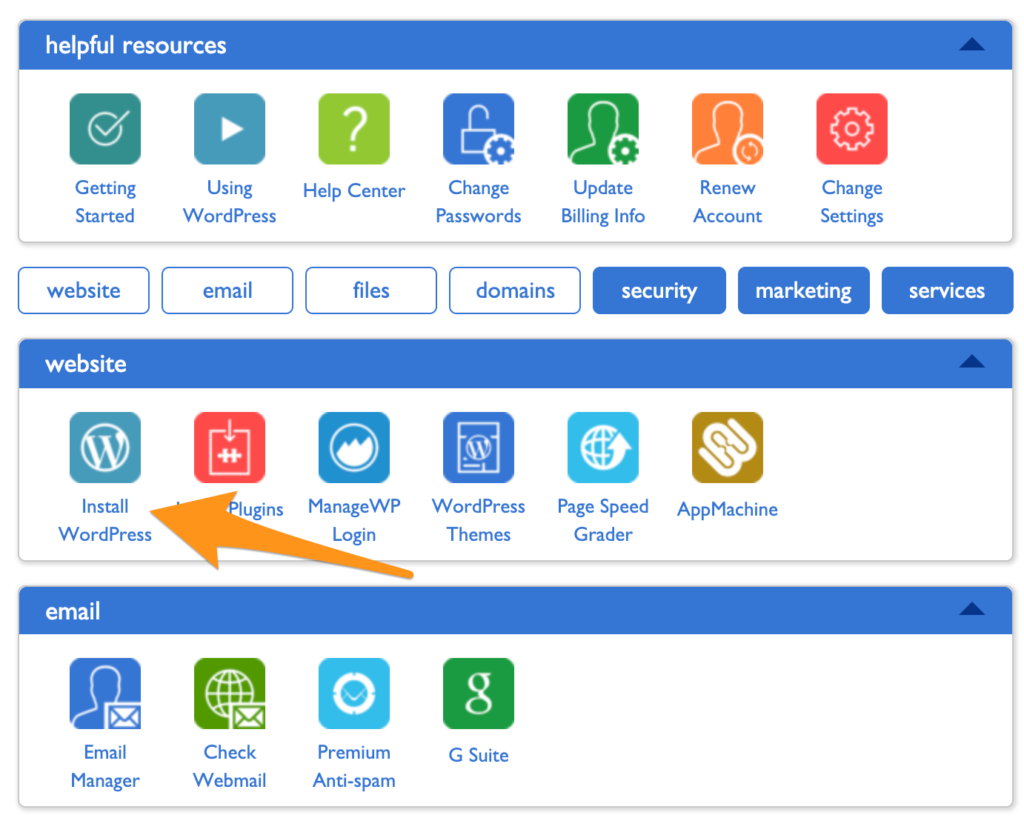
If you have trouble finding it, contact support at your host and they’ll be able to walk you through it.
Step 6: Point Your Domain to Your Host
Let’s do a quick recap.
- You bought your domain using a domain registrar.
- You signed up for a hosting plan.
- You installed WordPress on your host.
Now you’re going to connect all that stuff together by pointing your domain to your host. Then when people go to your domain, they’ll end up on your site.
There are a few technical settings you need to apply. This involves configuring a few nameserver settings on your domain registrar for your domain. Your host will give you the correct settings; you’re looking for their nameserver settings.
If you get stuck, contact your host and they’ll give you all the info you need.
Once you have the nameserver info from your host, go into your domain registrar and configure those settings for the domain that you want to point at your site. Once you’re done, it’ll look something like this:

Step 7: Install a WordPress Theme
Think of WordPress as the guts of your site, it’s all the pumping that makes your site work.
WordPress uses themes to determine how your site looks. This makes it really easy to change how your site looks without having to rebuild your site from scratch. Swap out your old theme for a new one and ta-da! Your site will look completely different.
These days, I purchase all my themes from StudioPress.
Heads up, WP Engine bought StudioPress and now includes all the StudioPress themes in its hosting plans. WP Engine is more expensive but it’s perfect for serious bloggers. It’s a great way to save money on your theme if you are planning on building a large site to begin with. WP Engine is our recommended host if you’re looking for the best. The downside is that WP Engine tends to be more expensive than other hosts.
Back to themes, are there other options?
You betcha. ThemeForest has a marketplace of WordPress themes. There are literally tens of thousands of themes to pick from. They’re usually in the $30–60 price range. When looking for theme, I rank them by the most popular or the highest rating. Then I pick one I personally like.
After you’ve purchased a theme, go to the WordPress Theme settings and upload your theme. The Theme settings are under Appearance in the WordPress sidebar menu. You’ll have to click through “Add new” and “Upload Theme” in order to see this option to upload:
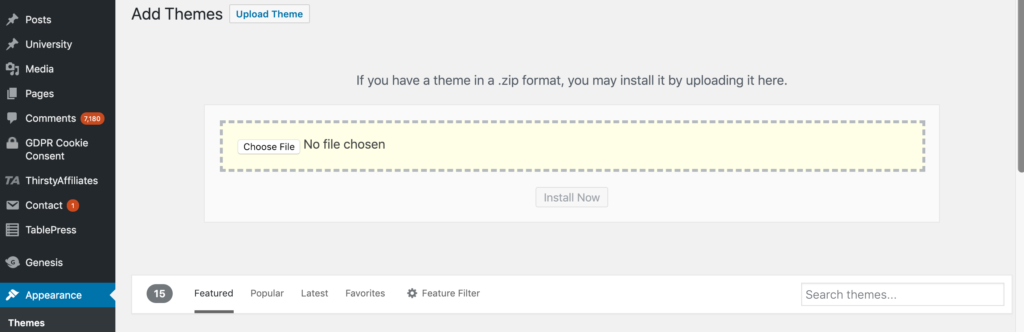
Go ahead and upload the .zip file you received when you purchased your theme.
After it’s uploaded, you’ll also have to click “activate” on the theme in WordPress to make it go live.
Step 8: Add Content
Now the fun part — it’s time to create the individual pages of your site.
You’ll do this within WordPress.
WordPress has two types of content: pages and posts.
Think of posts as blog posts that are published under a “blog” section of a site. If you’re not planning on having a blog, then you can skip posts entirely.
Pages are the more permanent pages on your website. Like your About or Contact Us pages. When you’re first creating your site, you want to get a batch of pages live so your site feels real.
Every website has a few standard pages you should create:
- Homepage – Your WordPress theme usually has settings for this page.
- Contact Page – Create a new page and install a WordPress form plugin so you can add a form to the page.
- About page – Tell your story and why you’ve started your business.
- Product or services pages – For the main services or products that you’re offering, it’s a good idea to create a dedicated page for each.
- Blog – If you’re building a blog, make sure all your posts get listed here.
This list will get you started. You can always add more later.
Step 9: You’re Done!
At this point, you have a fully functioning site that looks great.
I’m not going to lie, there’s a lot of extra configuration you can do to your site: you can add WordPress plugins that upgrade your site, build out a blog, add an email list, grow traffic, the list is endless.
You don’t have to do any of this extra stuff — it’s all optional. It depends on your priorities and goals.
When you’re ready, these guides will walk you through the extra stuff that’s worth considering:
- The Best SEO Plugins for WordPress
- The 5 Best WordPress Cache Plugins
- The Best Email Marketing Services
- 5 Easy Steps to Creating a Sitemap For a Website
- Brand New Blog. No Traffic. Here’s What to Do.
Source Quick Sprout http://bit.ly/2GrxchC
16 Little Perks I Use To Boost My Mood When I’m Down Without Spending Money
The winter blues strike me hard each year. When the Iowa winter reaches a point where it’s fairly miserable to go outside and the days are short to boot, I wind up spending far too much time inside. This causes me to not get enough sunshine, and even though I have a couple of good tricks for keeping the winter blues specifically at bay (vitamin D and a full spectrum light box), my mood can still be pretty low at times during the winter.
Over the years, I’ve developed a lot of simple little inexpensive tricks that help me lift my mood and I never rely on them more than I do this time of the year. They’re just little things I do that are designed with just two principles in mind. One, they need to be able to quickly improve my mood. Two, they need to cost next to nothing.
Here are sixteen of these tricks; they’re the ones that I think actually have the most universal appeal. Many of these seem to have a “winter” angle, but they work pretty well throughout the year. If you’re finding yourself down in the dumps, try a few of these things and see if they help.
Drink lots of water. This is probably my number one strategy for keeping my mood up. I find that there’s a pretty strong connection between drinking plenty of water and being in a good mood. The more water I drink, the better I feel about my life and the world around me. If I don’t drink much water, my mood slips.
Do some high-intensity exercise for a short time. Do something with enough intensity so that you find yourself panting for breath. Wait until you’re close to breathing normally, then do it again. Repeat a few times. Your blood will be pumping and full of endorphins that make you feel a lot better.
Maintain a playlist of uptempo songs that you like and play it when you need a boost. I maintain a playlist of Youtube videos consisting of uptempo songs that make me want to jump around, and when I’m feeling the winter blues, I’ll turn it on. I’ll often start doing household chores while the music is blaring and I find that my chore tempo gets faster and faster while my mood lifts. (The playlist has a lot of Queen in it.)
Eat a lot of eggs, milk, yogurt, and fish. These foods are strong sources of natural vitamin D, which is something your body is missing out on in the winter months. Sunlight’s interaction with your skin is a powerful source of vitamin D, but if the weather often drives you indoors, make sure that eggs, dairy, and fish are a part of your diet.
Stretch. One of the best things I do throughout a given day to simply feel better is to spend several minutes stretching. I stretch out my arms, my legs, my shoulders, my sides… basically every muscle group in my body. Stretching simultaneously dumps a bunch of endorphins into your bloodstream while also improving blood flow to the muscles in your body, which leaves you feeling great.
Read books you’ve missed out on, preferably in a spot with lots of natural lighting. I’m an avid reader and there are definitely times when I slow down with my reading during the summer months, leaving me a backlog of titles I want to read. During the winter, I get caught up (to a degree). Since we’ve done some minor home renovations, there’s a wonderful sunny spot to read during the day in our home and I’ve been taking advantage of it to catch up on some books I’m excited about.
Do social things. Find as many opportunities as possible in your life to spend time with other people, particularly people who make you feel good about yourself and the world. Go to community events. Spend time with friends who bring some positivity to the table. You’ll feel better simply being around other people.
Have a big “winter project.” Each winter, I try to select a “major project” of some kind that I want to complete by the end of the winter, and I make it my goal to spend at least some time each day moving forward on that project. This winter, for example, my goal is to set up a new office for myself in a different room in our home, move into that new office, and transform my old office into a bedroom. Many winters, my goal has centered around reading a particular book series. Just choose a project that you’ll have to knock off in little bits over the course of months.
Keep warm. One of the best ways to feel the winter blues is to feel cold at home, so I try to avoid that as much as I can. I dress warmly and comfortably at home all throughout the winter – layered clothing, hoodies, wool socks, and so on. Even when I want to go outside, it’s just a matter of putting on shoes and a coat most of the time. Feeling cold tends to equate to feeling down to me, so I try to keep it at bay.
Install and use some full spectrum lighting. In several rooms in our house, particularly ones that I spend significant time in, I have light bulbs installed that provide full spectrum lighting. These lights subtly fool your brain into thinking that you’re in a sunny area, even when you’re stuck inside working on a project.
Eat a lot of fruit when snacking. Rather than snacking on candy or unhealthy savory snacks, just keep a lot of fruit around for snacking. When you have the munchies, grab an apple or a banana or some berries from the fridge instead of some candy bits. You’ll be surprised how much better you feel over time.
Plan out and schedule your summer vacation. Whenever I’m feeling trapped inside by winter weather and a bit down about the seemingly endless winter, I spend some time plotting out my summer vacation. Envisioning fun in the summer sun in great detail is a pretty solid mood lifter, especially when that translates into taking action and setting plans in motion to make that fun a reality.
Turn on the fireplace if you have one. This ties into the “keep warm” strategy, but there’s something primal and valuable about looking into a fire. Get cozy near the flames and let yourself get warm and you’ll find your mood lift (even if you get a little sleepy, because fires usually make me think of nighttime and getting ready for bed).
Do some volunteer work, even if it’s super small scale. Just do something for someone else without any compensation or reward for yourself. It can be a big effort if you want, but it doesn’t have to be. You can spend a day working at a food pantry, or you can simply help someone load their groceries so they can get out of the cold a little faster. Just do something for someone and it will lift your mood.
Get close with other people. I mean this both in the physical sense and the emotional sense. In the physical sense, I mean cuddle up with a loved one. Touch each other. Hold each other close. In the emotional sense, I mean have a meaningful conversation with someone. Listen to what they’re saying. Get on their wavelength and try to help them with what they’re feeling. Both of those things are powerful mood lifters.
Start your meal off with a salad. Whenever you’re about to eat lunch or dinner, start off with a small salad of some kind, ideally centered on a mix of different vegetables. This puts something quite healthy in your belly right at the start of a meal. I find that eating healthy is a great way to lift one’s mood and a salad at the start of a meal lets you still enjoy whatever you want but makes sure that you don’t eat excessive amounts of unhealthy stuff later in the meal.
All of these tips have very little cost associated with them and are quite effective at elevating one’s mood. I use these methods to get through cold winters where I have to spend a lot of time indoors and other periods of my life where I feel a little melancholy. That being said, these are not a good substitute for treatment of mental health conditions; if you find yourself feeling blue for an extended period or find yourself feeling so down that it’s difficult to get through the day or get out of bed, contact a mental health professional.
The post 16 Little Perks I Use To Boost My Mood When I’m Down Without Spending Money appeared first on The Simple Dollar.
Source The Simple Dollar http://bit.ly/2BA3y5K
4 of 5 Drivers Saw Car Insurance Rate Hikes Last Year. Here’s How to Get a New Quote
It’s easy to let some of your bills go on autopilot. Like your car insurance.
Honestly, have you looked at your car insurance bill lately?
Go ahead. We’ll wait. It’s probably gone up. In fact, four out of five drivers in the U.S. saw their rates go up this past year, according to research by insurance search engine The Zebra.
The worst part is that it has nothing to do with you or how you drive, but things like the weather in your state, your gender or even your credit score.
Don’t settle for rising car insurance costs. Do something about it. Not all insurance companies are alike — and by comparing quotes you can find out if there’s a more affordable match out there for you.
Compare Rates, and Beat the System
The Zebra, an online car insurance search engine that offers “insurance in black and white,” compares your options from 204 providers in less than 60 seconds.
Here’s how it works:
1. Head over to The Zebra’s search platform. Enter your car’s year, make and model, and your ZIP code. Continue on to answer questions about your driving habits, your car and your life.
On the right sidebar, you’ll watch rates increase or decrease based on your answers. For example, if you’ve gotten into an accident — that was your fault — in the past three years, your rates will kick up. It’s interesting to see what effect your answers might have.
2. After answering some questions, it’s time to compare. The Zebra gives you an “Insurability Score,” which is similar to your credit score except it’s for car insurance, and it teaches you how to get better rates. The site also gives you different options for coverage.
When you’re ready to consider your options and select a quote, you can also receive a phone call from The Zebra for additional support.
A nice representative (a real, live human) on the line asks if you want to speak with a specialist. If you’re truly interested in car insurance and want to ask all the questions, this could be the perfect time.
The study says four out of five drivers saw their rates go up. You can be that fifth driver. Don’t get trapped into a high premium, just keep shoppin’ around and weighing options through The Zebra.
Tyler Omoth is a senior writer at The Penny Hoarder who loves soaking up the sun and finding creative ways to help others. Catch him on Twitter at @Tyomoth.
This was originally published on The Penny Hoarder, which helps millions of readers worldwide earn and save money by sharing unique job opportunities, personal stories, freebies and more. The Inc. 5000 ranked The Penny Hoarder as the fastest-growing private media company in the U.S. in 2017.
The Penny Hoarder Promise: We provide accurate, reliable information. Here’s why you can trust us and how we make money.
source The Penny Hoarder http://bit.ly/2N8HBiT
Dear Penny: I’m Retiring Soon. How Do I Protect My 401(k) From a Downturn?
Dear M.,
Economic ups and downs are inevitable, but sometimes it’s hard to think beyond the downturns.
We seem especially sensitive to the condition of the stock market, since we’ve just passed the 10-year anniversary of the start of the Great Recession. Those memories of turmoil and heartache bubble right back up, and suddenly, we’re checking our retirement account statements with a bit more interest than usual.
To calm your nerves about the state of our economy, I called upon Bridget Todd, head of client strategy and development at New York-based coaching firm the Financial Gym.
“I usually tell clients to think about the 2008 financial crisis, when the Dow Jones Industrial Average lost more than 50 percent of its value,” she explained by email. “In the nine years since, it is up about 200 percent.”
While there are periods of discomfort, she said, the market will always recover. “The most important thing to remember is not to sell when things get bumpy,” she said.
Your 401(k) is a place to hold your investments. You can make decisions about what’s inside that account — stocks, bonds, mutual funds, derivatives, exchange-traded funds — depending on the level of risk you’re comfortable with.
If you’re at least 10 years from drawing from your 401(k), Todd recommends allocating 90 percent of holdings to stocks and the remainder to bonds.
“Stocks are the riskier asset,” she said, likening them to a roller coaster. But that fluctuation is OK. It will all settle out eventually, helping you earn that average stock market return of 7 percent per year that you hear about.
If you’re closer to retirement and nervous about the health of the market, you can pull back on how much you allocate to stocks to reduce your risk. But you still want some of your investment to be in stocks to help that nest egg grow.
In short: Hold on and enjoy the ride. Even if the economy takes a temporary dive, your contributions will still have value to carry you through to retirement.
If only we had that crystal ball in the meantime. Wait. That would probably be insider trading. Maybe skip the crystal ball.
Worried about managing your money in trying times? Write to Dear Penny at https://www.thepennyhoarder.com/dear-penny/
Lisa Rowan is a personal finance expert and senior writer at The Penny Hoarder, and the voice behind Dear Penny. For more practical money tips, visit www.thepennyhoarder.com.
This was originally published on The Penny Hoarder, which helps millions of readers worldwide earn and save money by sharing unique job opportunities, personal stories, freebies and more. The Inc. 5000 ranked The Penny Hoarder as the fastest-growing private media company in the U.S. in 2017.
The Penny Hoarder Promise: We provide accurate, reliable information. Here’s why you can trust us and how we make money.
source The Penny Hoarder http://bit.ly/2SCp5VK
الاشتراك في:
التعليقات (Atom)