Thousands of courses for $10 728x90

الخميس، 4 أبريل 2019

Find Customers With PPC Advertising

PPC marketing is something you’ve probably come across in some form or another.

The paid channel advertising landscape is worth hundreds of billions of dollars. In 2011, the ad-supported Internet contributed more than $500 billion to the United States economy.

Holy smokes. That’s a lot of spend.

The numbers alone tell us that this marketing channel far too robust to ignore, but more often than not, marketers are scared to take the plunge for two reasons:

  1. It costs money to get up and running
  2. There’s a big chance you’ll lose money if you aren’t smart about your strategy

PPC advertising is a powerful marketing medium because it is measurable. It’s possible to calculate both a long-term and short-term value for how much revenue resulted from even one incoming website visit. You can also deploy targeting features to ensure that you’re reaching the right audiences.

LinkedIn, Facebook, Twitter, and Google all offer products for marketers looking to reach customers.

Which network should you use?

The answer to that question goes back to user psychology. Understand what people are doing when they’re using LinkedIn, Facebook, Twitter, and Google products. These details will help you determine which channels are the right fit for your brand and advertising message.

Start by Knowing the Different Advertising Sales Models

The capacity in which you work with a website or advertising network to show your ads will depend on how you are able to pay. Tools like Facebook will generally give you some different options from which to choose. Making the right decision will ultimately impact the efficiency of your online ads. Here is a breakdown of the different paid channel pricing models, as well as their strengths and pitfalls:

CPM/Display

The Basics:

  • Defined as cost-per-mille.
  • You’re billed a flat rate per 1,000 impressions of your ad.
  • You’re not charged for any clicks.
  • This ad format is common on display advertising networks (banners, ads with an image, etc).

What’s an impression? It’s a measure of the number of times an ad is displayed, regardless of whether it’s clicked on or not.
With CPM-based advertising, a specific number of impressions are guaranteed by the ad spend; whereas for other types of online advertising (like CPC), there is no guarantee that your ad will shown.

Strengths:

  • CPM rates can be relatively inexpensive.
  • You’re paying directly for people to see your ad — these are likely to be top of the funnel consumers.
  • You can easily apply a budget that makes sense, as you are only paying for views.
  • Works well for visual, branding-oriented campaigns.
  • Guarantees that your ad will be shown the number of times that you want it to be seen (per impression).

Weaknesses:

  • If people aren’t clicking on your ads and converting, you risk overspending.
  • Performance (resulting sales from ad views) are tough to accurately track and monitor.
  • You can’t easily quantify the return of your traffic buy until the end of the campaign.
  • Rush of resulting web traffic is uncommon.

Investopedia CPM Ad

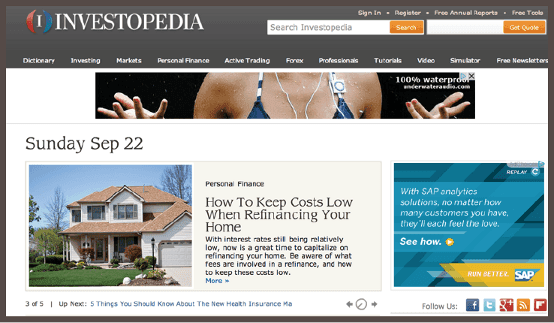
Here are examples of CPM banner advertising on Investopedia.com (see the ad from Underwater Audio on the top of the page). It’s possible to purchase ads with sites like these directly or through the Google Ad Exchange.

Here is how Forbes runs display advertising (see the banner ad from HP at the top):

Forbes CPM Ad

PPC (also called CPC)

The Basics:

  • Defined as cost-per-click.
  • You pay for every click on your ad, at a price determined by the marketplace value of the keyword or expression you’re interested in.
  • CPC marketplaces operate on an auction model, where strong-performing ads are likely to win.
  • Strong performance is defined by a function of ad click-through rates (CTRs) and the CPCs that the advertisers are willing to pay.

Strengths:

  • Clicks are straightforward to track.
  • You’re only paying for traffic directed to your site.
  • It’s possible to place budget caps on traffic coming in through large networks.
  • CPCs and budgets are modifiable in real time.
  • You can make modifications to campaigns (CPCs and budgets) in near real-time by tracking performance on your website.
  • You only pay for the clicks you need.
  • When well-optimized, CPC traffic can be a significant and well optimized traffic driver.
  • For marketers who are tracking ROI, CPC advertising can be much more cost-effective than traffic generated via CPM.

Weaknesses:

  • You’re competing against other advertisers for traffic, which can cause CPCs to become high and sometimes unaffordable.
  • Clicks coming in now may result in monetization later — attribution models need to be accurate.
  • If you’re not bidding with a competitive CPC, it’s entirely possible that you won’t get traffic.
  • It’s complicated.
  • If you don’t have a handle on your strategy, it can quickly become super-complicated.
  • It requires a dedicated resource to monitor and optimize campaigns.
  • You need to know what you’re doing to see an ROI.
  • You may lose significant money initially in order to optimize over time.

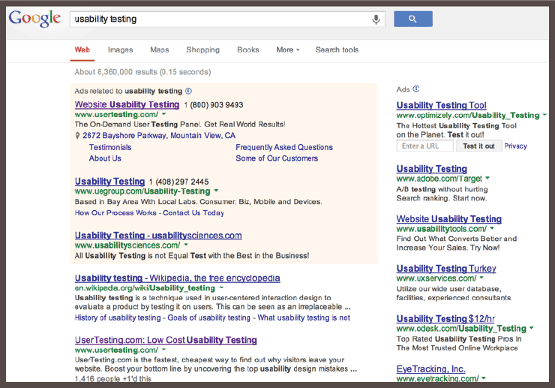
Here are example PPC ads targeting the keywords “usability testing” on Google:

Google PPC Ad

CPA and Revenue Share

The advertiser pays for traffic based on a proportion of revenue earned. For instance, if you advertise on pqr.com, you will pay 20% on sales generated from pqr.com’s traffic. If no conversions or transactions occur, you won’t pay.

The strength is that you pay for performance. The downside is that because performance is difficult to track through the correct attribution models, this type of advertising model is quite rare.

Cost Per Install (CPI)

CPI stands for cost per install and it’s geared towards mobile app developers.

Strengths:

  • You pay directly for installs.
  • Some ad network algorithms will decrease costs for higher number of installs.
  • On some ad networks (like Facebook), you can target your creatives and messaging to people who have downloaded similar apps in the past.

The main weakness is that you pay the same amount for user-installs that yield both high and low long-term user value.

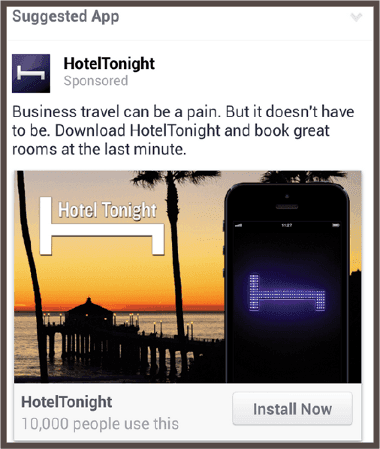
Here is an example of a mobile ad from HotelTonight, an app that helps consumers book hotel rooms at the last minute. These ads are targeted to Facebook newsfeeds.

Facebook CPI Ad

Cost Per View (CPV)

Cost per view is a rate structure for video advertising, you pay per number of views to your video ad.

Strengths:

  • Structured entirely for video-based advertising.
  • You can choose to have ads autoplay or for users to click “play.”
  • You can very easily find the right videos and users through massive distribution networks like Google/YouTube.
  • Video is a highly engaging marketing medium.

You’re paying for views, not conversions. So CPV has all the same weaknesses as CPM ads. It’s easy to esceed your budget if the traffic doesn’t convert.

Here is an ad for a television show before a YouTube video that will teach you how to dance in a club:

YouTube CPV Ad

Key Concepts of PPC

Your paid channel advertising campaigns are only as strong as your overarching strategy. Here are some important concepts that you should know before you shop around for advertising opportunities:

Day Parting
These are features that allow you to pace how ads are shown throughout the day. You can specify that ads are shown during certain hours of the day only.

Remarketing or Retargeting
Market to your existing audience. If you’re an e-commerce company, you can show them products they’ve already expressed interest in buying. You can remarket to users through a variety of platforms including Google’s advertising network and Facebook (more on this topic below). Here is an example of an ad that was remarketed to me (Ritika) via Facebook — I’ve been shopping around for the perfect laptop bag.

Geotargeting
Target your advertisements to audiences at the country, state, city, or metropolitan area level.

Interest-based Targeting
Connect with audiences based on their browsing activity/shopping behavior/interests.

Behavioral Targeting
Target advertisements to users based on past purchase activity.

Quality Scores
These are ratings of how well your advertisements align with your offer/marketing message/landing page. Quality scores are especially important for Google. Higher quality scores can result in lower CPCs (aka – cheaper web traffic). Advertisers are incentivized to show high quality ads.

CPC/CTR
Costs per click (CPCs) will frequently decrease with higher ad CTRs. In online auction models, the highest CPC bidders will not always win.

Targeting capabilities and features typically vary by ad network, but these concepts are fairly standard.

Match Types
Keyword match types control which searches or terms initiate your ad. This concept relates to precision.

For instance, you can use broad match to show your ad to a wide audience, phrase match to ensure that your ad is part of a searched expression, or exact match for the most rigid possible precision. Negative match lets you pick keywords and expressions that you don’t want to align with (for instance, your competitor’s branded keywords).

Match types are most relevant to search engine marketing but frequently apply to other text-based marketing channels.

How to Choose the Right PPC Network

Choosing the right ad network is an important strategic decision. You should base your decision on the following criteria:

1. Available Targeting Options

  • How will this ad network help you reach the right audience with the right advertising message at the right time?
  • Do you care more about demographic targeting, interest-based targeting, or both?
  • Do you care more about reaching a B2B or consumer-facing audience?
  • Do you care about reaching a certain demographic or cross section of the internet, or are you trying to reach general consumers?

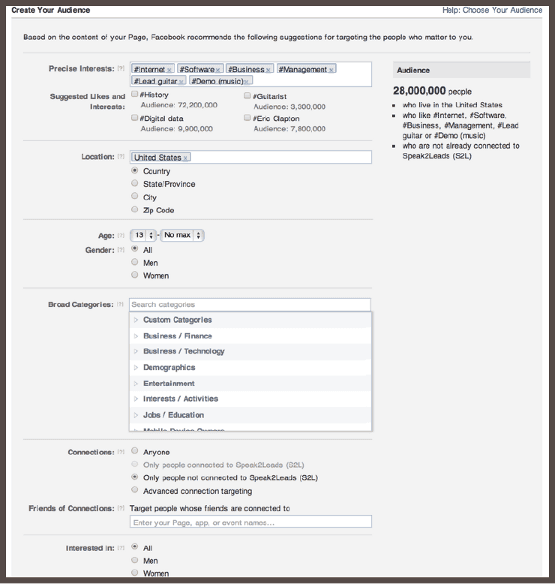
Here are example targeting options that are available on Facebook:

Facebook PPC Targeting Options

2. User Experience Alignment

How well does the ad network align with certain user experiences?

  • Search advertising through Google AdWords and Bing can help you reach consumers based on keywords they’re researching online.
  • Facebook advertising allows marketers to show display ads that drive awareness about new businesses, services, or products.
  • LinkedIn advertising allows marketers to target professionals (by interest or job title) when they’re browsing through feeds, job listings, or groups.

3. Ad Format

Are the ad formats likely to inspire user engagement and align with your brand’s needs?

Unattractive ads will generate a negative user experience, costing you time and money. Don’t jump into an ad network because you feel like “everyone’s doing it.” Choose ad products and features that create the best user experience possible.

4. Ad Network Reputation

The Internet is filled with dark corners of shady people who are manipulating web traffic.

Low CPCs are frequently too good to be true, coming from click farms, spambots, and shady user experiences.

Make sure that you’re reaching real people and delighting them with a positive user experience. ‘Cheap web traffic’ is usually too good to be true. Make sure that you’re always working with a reputable web traffic partner with publicly accessible testimonials and reviews.

Know What You Can Afford and Work Backwords

Start with your user value and work backwards:

  1. On average, how much does your business earn, per user, through CPC advertising?
  2. What type of margin are you hoping to make?

A common mistake that marketers make is working with in-session ROI data. This is the wrong approach. You need to look at your customers’ lifetime values in tandem with what you’re earning in the short run. These metrics will give you significantly more flexibility with your marketing spend.

Let’s say that you learn that a customer is worth $1,000 in the first year and $5,000 over the course of three years. You can hypothetically spend up to $4,999 on marketing in the short run.

Granted, you wouldn’t want to spend that much money to acquire a customer. You should focus on establishing a happy medium, in between the maximum and minimum. If you increase your PPC spend to $1,000, you may realize that you’re able to get 5x more customers compared to spending $500. In the short run, you may not make much money, but in the long run, your earnings will be significant.

You shouldn’t optimize your marketing campaigns for in-session revenue. Instead, you should ideally be optimizing them using lifetime value metrics as that will allow you to acquire more customers and make more profit.

Focus on Driving Conversions, Not Just Traffic

We emphasized earlier that traffic is only part of the marketing equation. You need to focus on driving conversions and sales through your PPC traffic acquisition.

A/B testing isn’t optional. You need to include it in your marketing plan. If you can double or triple your conversion rate, your customer acquisition costs will decrease dramatically.

The cost of your web traffic is irrelevant. You can buy cheap traffic? Awesome. So what? What matters most is the ROI you’re driving and how you’re monetizing your marketing spend.

Stop Dwelling on Your Budget

If your paid channel advertising strategy is doing its job, your budget shouldn’t matter. Every dollar you invest should generate a margin-positive return.

Focus on optimizing your ROI, not how much you’re spending on a daily or monthly basis. Once you feel more comfortable with your marketing spend and you are able to track a positive return, you can grow your budget.

Start your spend low, and scale up.

Key Takeaways for PPC

  • PPC acquisition is an extremely viable marketing channel. Don’t let costs scare you away.
  • Focus on generating ROI based on your long-term user acquisition value instead of in-session revenue.
  • There is no one-size-fits-all solution to online advertising. Learn the basics, and choose the right marketing channels for you.
  • Pursue conversion opportunities, not traffic for the sake of traffic. Less traffic is better if you can earn viable business.
  • Start with small tests and scale up as you get more comfortable.
  • Use budgets to regulate your spend. Don’t use budgets as a measurement of efficiency. If your paid channel advertising efforts are truly efficient, you won’t need a budget.


Source Quick Sprout https://ift.tt/2Umc6sx

How to Use the Google Ads Keyword Planner

The Keyword Planner is the one must-have tool for any Google Ads campaign so you can find profitable keywords.

You’ll learn how to add “seed keywords” that help you uncover hidden gems, how to interpret the information the tool gives you, and how to estimate how much traffic you’ll receive from a particular keyword.

Your first step is to log into your Google AdWords account. Click on “tools and analysis,” in the top toolbar and choose “keyword planner” from the list. On this screen, you’ll find three different tool that will allow you to find new keyword ideas or see how an existing list of keywords will perform in AdWords.

The first, “search for keyword and ad group ideas,” is great if you want to brainstorm and find new keywords to add to your campaign. And there are a few ways to do it. The first is just to add keywords related to your niche. So if you sold fitness products you would include things like fitness, weight loss, and other keywords that you think your target audience is using when they search on Google looking for products that you sell.

Landing page is simply a page that you want your AdWords traffic to land on. So if you have one set up just copy and paste the URL into this field, and if you don’t you can just use your home page or an internal page on your site and Google will visit the page, extract keywords and use those to give you new ideas for your AdWords campaign. Or you can also choose a product category. So Google has built in product categories, so just click here and you can choose one of the product categories that fits within your industry. And you can also target the keywords ahead of time.

So if you want to target, let’s say, only people in the US, you’d leave this the same, but if you wanted to add a country or target a different country click on this and choose a different country. If you want to target a different language you can do the same thing. If you want to target Google only and not their search partners like AOL, you just want to leave that like it is.

And if you want to include negative keywords, which are keywords that you don’t ever want to show up in your Google AdWords account, you can just include those here. And you can also use keyword filters. And what that does is it allows you to filter out keywords that don’t meet your criteria. So if have specific monthly search volume that you want to meet or cost per click that’s above a certain level you can click this and then set the criteria here.

Now, keyword options is simply to hide keywords in your account, so if you already have an active AdWords account, you obviously don’t want those to appear again, because you’re looking for new ideas so you want to leave that like it is. And if you want to include or exclude certain keywords, you can include those here. And once that’s all set up you want to click on “get ideas.” But we’re actually going to move on to the next tool. which is “enter or upload keywords to see how they perform.”

And this is really straight forward. This isn’t actually looking for keyword ideas, this is if you already have a list of keywords; for example if you advertised on bing before or a different network you can include those keywords here, or upload them in a CSV file and Google will give you information about how those keywords will perform within AdWords.

Now finally, we have the multiply keyword list feature. And what this does is it allows you to enter different keywords in list one and list two and Google will combine them together. So if you had that fitness site, you’d put keywords like fitness, health, wellness and weight loss and in list two you combine totally different keyword and they’ll combine them with this.

You can put thing like premium products tips and it’ll combine them all together. So once you have a list going you can click on “get estimates” and Google will show the same information just like it would show you from the search for keyword and ad group ideas feature. And that’s actually what we’re going to go over now.

So let’s enter a few seed keywords. And generally want these to be pretty broad unless you have a specific keyword in mind. Just to give you the most amount of ideas. So you’d want to put fitness, weight loss, health, health tips. So you could put general keywords like that. If you’re more in the brainstorming phase.

But if you have specific keywords that you want to use for example, product related keywords like fitness dvds, you could include those keywords into the list instead of or in addition to the more general keywords. But just for the video we’re actually going to use some general keywords so we can see the most amount of ideas.

So you want to put two or three general keywords or include your landing page and then set any criteria that you want and then click on get ideas. Now once you’re here, it automatically shows ad group ideas. Now this is something you might want to do if you’re still in the brainstorming phase.

But you don’t want to specifically just take on an ad group because this might not be appropriate for what you’re selling and the traffic that you want to get. So for example, “weight loss plan,” might be great if weight loss is the primary focus of your product. But if not it may include a lot of keywords that you don’t want. So just to check you can always click on it. And see the keywords that they suggest within that ad group.

Okay, and if you want to add all those keyword to you ad group just click on “add all” and it’ll add all of them, otherwise go back click on the keyword ideas tab and now the tool shows you information about specific keywords related to the keywords that you gave it. So at the top it actually shows the keywords that you entered.

So if you included, let’s say, five keywords it would show five keywords here under search terms. And it also shows you keywords related to the keywords that you entered. So these are basically new keyword ideas. Now if you see one that’s good you can always add it to your account or search for it and get ideas based on that keyword and repeat the process until you’ve found all of the keywords that look like good fits.

So now I’m going to go over what all of the categories mean next to a keyword. So the first is this little graph icon and all that does is when you hover over it, it shows you the variations in search volume over the last 12 months. So this gives you an idea of whether the keyword popularity is trending up, trending down, or whether it fluctuates a lot, for example seasonal keywords. And then average month searches is very straight forward.

It’s the amount of people that search for that keyword per month. Competition represents the number of different AdWords advertiser that are targeting that keyword. Average cost per click is the average cost per click that advertisers pay to get one click from that keyword. And ad impressions share is the percentage of times that your ad appeared when someone searched for the keyword.

So if you haven’t actually advertised that keyword before this will always be zero percent. So when you see a keyword that look good you can click on the blue button here and that keyword will be added to the ad group “my keyword ideas.” And you can always go back and add that to a specific ad group that you want to advertise on later.

So what this little your plan feature does is it gives you an idea of how many click you’ll get depending on how much you bid. So if you bid zero dollars obviously you’re not going to get any clicks and if you bid $21 a click. you’d get 847 clicks a day. which is extremely high because this bid is ten times above the average cost per click.

So what we want to do is move this bar to a more reasonable bid. Something like $2.38. And with that you’d get 645 click which is still actually really really good and it would cost you about $543 a day to advertise at that bid level and you can adjust it left and right to see how many click you would get depending on your bids.

So that’s all there is to using the Google AdWords keyword planner. As long as you add several seed keywords into the tool and then take some of the keywords suggestions and add those back into the tool you’ll find plenty of great keywords that you can advertise on to get targeted traffic to your site.


Source Quick Sprout https://ift.tt/2UhBtM1

How to Optimize Your Google AdWords Quality Score

The importance of Quality Score can’t be overstated.

If you can master Quality Score, you’ll sleep easy knowing that you have an AdWords campaign that’s giving you the best possible ROI.

However, optimizing your keywords, ads and landing pages for Quality Score isn’t easy or straightforward. I’ll go over each element that plays into Quality Score, and how you can make sure your score is at its best.

The success of your Google AdWords campaign will largely revolve around your quality score.

The first thing you want to do is check your quality score to see where you stand. To do that, log in to your AdWords account and click on campaigns. Then click on the keywords tab, and this will show you the keywords in that specific campaign and within that ad group.

Now, what you’ll want to do is hover over this little box here, and this will show you your quality score. So, as you can see, quality score is determined at the keyword level. So each keyword has an individual quality score that is independent of the others, although a lot of people in the AdWords community feel like there’s an account wide quality score that’s factored in, but that’s not official.

As you can see, quality score is rated on a one to ten scale. Ten is best, one is worst, and the lower it is, in general, the more you will pay for clicks and the higher it is, the less you’ll pay for clicks.

Your quality score is made up of three main factors: the click through rate that you get on your ads for that keyword, the ad relevance, and the landing page experience. I’m going to go over what all of those mean and how you can optimize each one.

First let’s talk about the expected click through rate. What that is, it’s the percentage of people that click on your ad for that keyword. So, for people that search for health insurance, if 100 people search for this keyword, and three people clicked on your ad, that’s a three percent click through rate. The higher your click through rate, the better your quality score is, and that’s actually the most important part of quality score. So, if you want your quality score to be high, you want ads that generate a lot of clicks for the keywords that you’re targeting.

The next factor that influences quality score is ad relevancy. So when you look at your ad relevancy and it says average, below average or above average, that represents, according to Google, how relevant your ad is for that particular keyword. What you want to do is look at that keyword and then click the ad tab, and look to see how those ads relate to that keyword. So, for someone searching for, let’s say, White Hat SEO techniques, does this ad really speak to exactly what they’re searching for? Well, obviously not, because it’s below average right?

So even though the ad talks about White Hat SEO, which is part of the search’s query, it doesn’t specifically address the techniques. That’s why this was rated below average. If I was to change this ad and actually speak to specific White Hat SEO techniques, that would increase my ad relevancy. So you want to make sure that you have an ad specifically for each high volume keyword in your campaign.

The last part of quality score is your landing page experience. Landing page experience is exactly what it sounds like, which is the experience the user will have when they click on your ad and end up on your landing page. In general, the more targeted your landing page is for that particular keyword, the better your landing page experience score will be.

Now that we’ve gone over all three factors that factor into quality score, it’s time to show you how to improve and optimize each one.

For expected click through rate and ad relevance, you first want to look at what your ads look like in Google to give you an idea about of why your click through rate and your ad relevance may not be doing so well.

The best way to do that is to click on ad preview and diagnosis. What this tool does is it shows you a preview of how your ads will appear in Google search results, which is important because you don’t actually want to search for your keywords in Google just to look at your ads because, unless you click on it, it’s actually going to make your click through rate worse because that’s an actual search, right?

Enter a keyword that you’re targeting. Click on preview. Then what you want to do is look at your ad, which is highlighted in green. Now, if your click through rate is low, it may be because your ad copy, you know, isn’t that compelling. So what you want to do is look at some of the other sites that are advertising for that keyword and see how well they’re doing. Although you can’t get insider information about their performance, you can probably tell that ads that are in the top three, in this specific area, above the fold, probably have a good quality score because, unless they’re paying an arm and a leg, Google isn’t going to put them here. So what you want to do is look at their ad copy and see what part you might be able to incorporate.

It’s the same story with ad relevancy. Someone searching for the keyword White Hat SEO techniques, might be seeing different ads that target their query more specifically, or, in the organic results, they also might have really good relevancy. So then what you’ll want to do is look at the ads and the organic results, and see what kind of copy they’re using that might be generating them clicks.

Once you have some of this competitive analysis, and also information, about how your ad actually appears, it’s time to go back to your account and incorporate this information into your campaigns. What you want to do is click on campaigns to go back to your campaigns manager, click on the ads tab, and then incorporate any copy that you saw in the paid or organic results into your ad and see if they increase click rate.

You can do that by testing two or three ads against each other and seeing which one gives you the best click through rate. When you have more than one ad within an ad group, AdWords automatically displays both of them randomly so you can see which one performs better in terms of click through rate and conversion.

What you want to do is test multiple ads against each other. See which one has the highest click through rate. Keep that one. Delete the one with the low click through rate. Then create a new ad to test against the winner, and repeat that process until you find a winning ad that gives you a consistently high click through rate.

Once you have that all set up, it’s time to make sure that your ad relevancy is optimized. The best way to do that is to create tightly focused ad groups around high volume keywords.

So go back to your settings tab. Click on keywords and look for keywords that have a below average ad relevance score. Hover over the little box here, and if you see below average, what you want to do is click on the green circle and pause that keyword within that ad group. Then you want to copy that keyword and create a new ad group around this keyword.

To do that, click on the campaign that the ad group is under and click on new ad group. Then you want to create that ad group around that keyword, so in this case, it would be called White Hat SEO techniques. You could actually optimize this ad around that specific keyword. You’d put something like White Hat SEO techniques revealed. You could also include that in the headline to further increase the ad relevance and the quality score for this keyword. Then, you’d want to add that keyword and any very, very closely related keywords to this box. Put your default bid, and then click save ad group.

Now when you look at the quality score for that keyword, you can see that it went from five out of ten to six out of ten, and the ad relevance from below average to average because the ad matches that keyword better.

Finally, we’re going to talk about how to optimize landing page experience. Your first step is to see where your traffic is going and what landing pages that they’re landing on. To do that, click on the ads tab. Hover your cursor over one of the ads and click on the blue link. That will take you to the landing page that your page traffic is going to.

Then you want to check whether or not the content of the page matches the keyword that the person is searching for. So, for someone searching for White Hat SEO techniques, you’d want to make sure that the keyword, White Hat SEO techniques, appears in the title of the page, and within the content.

For example, if you had someone searching for head tennis rackets, you’d want to send them to a page specifically about head tennis rackets, not about tennis rackets in general. The more targeted your landing pages are, the better that part of your quality score will be.

So, that’s all there is to optimize your quality score. As you can see, the most important thing is to have ads that get a high click through rate and that our relevant to the person’s search. Then, when they click on your ad and land on your page, you want to make sure that landing page is very targeted.


Source Quick Sprout https://ift.tt/2K7KW3P

How to Manage Your Campaigns Using the Google Ads Editor

Want to make bulk edits to your Google Ads campaign?

Do you have multiple people working on a single campaign?

Or do you just want to tweak your ads and keywords while you’re offline on a flight?

Then the AdWords editor is the answer you’ve been looking for. I’ll show you how to use this free, yet priceless, tool that has a number of unique features not found within the web-based Google Ads admin area.

Your first step is to download the AdWords Editor, because this is a program that you’ll run on your computer. Just Google AdWords Editor and it’s the first result, so click on that. Then, you want to click on download AdWords Editor. Then, download and install the AdWords Editor just like you would any other program.

Once you’ve installed and opened your AdWords Editor your next step is to choose your default targeting. So, you want to choose a default language and a default location. And, if you want, you can enable anonymous uses tracking so then you can send data to Google and they can improve the AdWords Editor with that. I’m actually going to disable that and click okay.

Your next step is to add an AdWords account that you have administrator access to that will integrate with the AdWords Editor. To do that, click on add account, and then enter the information of your AdWords account, and click next.

Next, it’s time to choose which campaigns you’re going to integrate with the AdWords Editor. If you want all your campaigns, ad groups, keywords, et cetera uploaded choose all campaigns. Or, you can choose a particular campaign from the list by choosing campaign that I select, checking them off, and clicking okay. But, we’re going to use all campaigns for this video, then click okay.

Then it’ll take some time for Google to download the information from your AdWords account into the AdWords Editor. Once everything looks good and you see download complete, click close, and you’re ready to start using the AdWords Editor.

Now I’m going to go over some of the most important features of the AdWords Editor. The first feature that’s really cool is that you can manage multiple accounts within the Editor using the same interface. So, if you’re an agency that has several different AdWords clients, you don’t have to login to each account individually to manage them. You can just add one to the AdWords Editor and then choose it from the drop down menu.

To add a new account just click file, open account, add account, and enter the login details for that account. When you do, you can easily choose the account that you want to manage using the drop down menu.

Another feature of the AdWords Editor that’s very cool and something you can’t do when you manage a campaign within AdWords itself is the ability to make changes without incorporating them right away. This is very important if you have multiple people working on a campaign. Because you can have someone make a change, and then let the supervisor know. That supervisor can login using the AdWords Editor and either approve or reject the change.

Let me show you an example. Let’s say that I wanted to change the max cost per click bid for this keyword from 2 dollars to 2 dollars and 50 cents. When I make that change and click away you’ll notice that there’s a little triangle there. That indicates that it made a change, but that change is not live. So, if I wanted to run this change by somebody before I actually incorporated it into the account I would let them know. They would login to the AdWords Editor, and they would click check changes. From here that person could see what type of change was made. If they wanted to see details they’d click show details and see what changes were made.

Whether you’re doing this yourself or having someone else do it you want to check the changes before you try to incorporate them into AdWords account to make sure that’s okay. For example, if you set an account level max cost per click, and then you try to make a cost per click higher than that, that’s not going to work. So, what you want to do is click on check changes and make sure there aren’t any conflicts between the change that you made and any settings that you might have in your account. If you see green and it says pass checks then you’re good to go. Click close. If for some reason you change your mind or don’t want to incorporate that change just click on revert selected changes and, boom, that change is gone.

If you want to make multiple changes at once click on make multiple changes and choose the change that you want to make. So, if you’re under the keyword section of the AdWords Editor you can add or update multiple keywords or delete multiple keywords. And, if you were making changes to your ads you’d click make multiple changes and then you could add or update the text of multiple ads or delete multiple ads from your account.

When you’re ready for your changes to go live head to the top of the AdWords Editor and click on post changes. Then, click post. If you see that it says successfully posted then you know that that change is now live in your AdWords account.

The next feature that’s very cool is the ability to check for duplicate keywords. This isn’t a huge deal if you’re running a smaller AdWords campaign that has 1,000 or fewer keywors. But, if you’re running a massive, massive AdWords campaign with multiple campaigns, multiple ad groups, sometimes it can be very difficult to identify duplicate keywords that might show up in two different campaigns or ad groups. Fortunately, the AdWords Editor makes identifying these keywords very easy.

What you want to do is head to the top and click on tools. Then, click on find duplicate keywords and then you can set the setting. So, if you want them to be a strict word order, for example it’s the exact same keyword in the exact same order, you can do that. Or, you can use any word order. You can choose the match type. Then, what you want to do is click find duplicate keywords when the settings are to your liking. It’ll let you know if there are any duplicate keywords. If there are they’ll show up here. If not, it’ll look like this and it’ll be blank.

The next feature I’m going to go over is the ability to add draft campaigns into an account. This is really important if you have multiple people working on the same campaign, because then you can give them the ability to not just make changes but actually create campaigns from scratch including keywords, ads, and ad groups before they actually go live.

To do that click on add campaign and choose either a draft cost per click campaign or a draft CPM campaign. Then, you’d set the campaign up just like you normally would. You’d give it a name, include the budget, have a start and end date if you want, whether it includes a display network or just a search network, and then you’re done. You have a draft campaign which someone else can look at, and then approve, and then post it live to the AdWords account.

The last feature I’m going to go over is the ability to export data from your AdWords account. To do that click on file at the top. As you can see, you have multiple different options. You can export your entire account. You can export certain campaigns and ad groups. You can back up your entire account as a backup file. Or, you can export just the changes for sharing with other people.

That’s all there is to using the AdWords Editor. As you can see, this is a very, very cool feature of AdWords that is a lot more than just being able to edit your campaign without being logged in. There are a lot of unique features that can help you get more from your AdWords campaign.


Source Quick Sprout https://ift.tt/2Uib8gM

How To A/B Test Ads In Google Ads

Considering that Quality Score is based mostly on your ad’s CTR, it makes sense to figure out which ads tend to perform best.

Fortunately, Google Ads has a built-in A/B testing feature so you don’t need to guess

I’ll show you how the two approaches that PPC professionals use to split test their ads, and how to know when you’ve found a winning ad.

Your first step is to log into your Google AdWords account and click on “Campaigns.” And then you want to choose an ad group under one of your campaigns. So I’m going to choose “White Hat SEO” and then you want to click on the “Ads,” tab. And as you can see, I already have two ads set up. So you want to have at least two ads set up so you can split-test them against one another.

So basically, there are four things that you can test within an ad. There’s your title, or your headline, the first line, the second line, and the display URL. And Google will show you a preview of what this will look like, depending on where your ad is positioned. And in general the one thing that you don’t want to change when you’re split-testing two ad variations is the landing page.

You can have different display URLs, for example, you could put “www” and then have another ad that didn’t have this, but you’d want them to land on the same page, and that’s important, because if you have different ads going to different pages, it’s very difficult to figure out conversions. It doesn’t make a difference for the click-through rate, but it makes a huge difference for conversions, which is ultimately one of the things that you want to be testing when you split-test ads.

So there’s basically two approaches that you can take to split-testing. You can split-test two different ads and that’s what I’ve done here. Half the time, approximately, Google will show this ad and the other half of the time Google will show this ad and then I’ll get to see which one has a better click-through rate and a lower cost-per-click.

Now there’s one important thing to keep in mind when you’re split-testing two different ads and that’s when you’re first starting split-testing you want the ads to be very different. So when you create a new ad, by default Google will give you one of the ads that you’ve already created. And what you want to do is change this as much as possible. This is not where you want to take one small variable like this and test it against one another because then it will take forever to figure out which one is actually the better ad which is ultimately what you want to find. So what you want to do is create a completely different headline, a completely different description line one, a completely different description line two, and a different display URL.

And when that’s all set, click on “Save Ad.” And as you can see, this ad is quite a bit different from this one so this has a totally different headline, a totally different first line, a totally different second line, and a different display URL because the first character of the display URL is capitalized in this one and it’s lower-cased here. So that’s the approach that you should take if you want to split-test two ads against one another.

The other approach you can take is to split-test several ads against one another and put in a different variable for each one. So, for example, you click on “New Ad,” just like normal, and what you do is you change one thing. So you add a different headline, “Cool SEOK study,” instead of the other one and then you would add that as an ad. And then you create another ad and you would change something here. So, “How to increase traffic.”

So you keep making these slight variations until you have a different headline, first line, second line and display URL combination for all of your ads. And then you just want to run them. And you can see, based on the click-through rate and the cost-per-conversion and the average cost-per-click, which elements of the ad are performing best, and you can incorporate those into your advertising copy for future ads or other advertising that you do online or offline.

So there’s one other important thing to keep in mind and it’s whether or not you’re getting statistically significant results. So let’s say that you had these two ads running against one another and one has a click-through rate of 10%, another one of 5%. You might think that this one’s better. And that could be the case. But you need to make sure that you’re getting enough results that they’re actually significant. And to do that you can use a cool little tool called splittester.com.

So just go to splittester.com, and what you do is, you put the number of clicks from your first ad and the number of clicks of your second ad here. So this is right here, clicks. So you put, let’s say, 150 and then 200, and then you put the click-through rate of the first ads. So click-through rate is here. So let’s say one is 5% and the other one’s 10% and click the “Calculate” button. So, as you can see, we are 99% confident that ad number two is better than ad number one. But if you didn’t have as many clicks to go by, or if the click-through rate wasn’t as big of a difference… in this case, it was more than double… you might not be as confident and if that’s the case, you want to run the test for longer, until you get enough clicks to get a statistically significant result.

So finally, you want to start keeping track of the changes that you make and this isn’t as important if you’re running 15 ads against one another because then you’re just going to eliminate 14 of them and you can just see that this is a winner and then create another one. But if you’re doing several split-tests with two different ads, a lot of times you’ll forget five tests ago the things that you changed, and you might want to incorporate some of those things into your ads. So what you want to do is scroll up and click on “View Change History,” and this will show you all the changes that you made to that ad group.

Now if you want to keep things organized, because by default it shows you information about changes that you made to bids and keywords and things like that, you just want to click on “Add” and it will show you all the changes that you made to “Add.” So, for example, on September 23rd at 7:34 there was a text ad change and to see what exactly what that change was you can click on “Show Details” and it says “Display URL Change” from this to that. Now this is great if you’ve been doing split-testing for a while and you want to go back and see what elements of ads have worked for you and which haven’t.

So that’s all there is to split-testing ads within Google AdWords. As you can see, there are two different approaches that you can take. You can split-test two very different ads against one another, or you can split-test several ads against one another, each one slightly different, and you want to make sure that the differences are statistically significant.


Source Quick Sprout https://ift.tt/2TXIg8z

How to Use Google Ads Extensions

Looking for an easy and effective way to increase your ad’s visibility and CTR?

Look no further than Ad Extensions!

Ad Extensions offer you the ability to show potential customers your phone number, address, mobile app and even your social media stats within your Google Ads campaign.

I’m going to show you how you can use ad extensions to get more from your Adwords campaign. What are ad extensions? Well, you may have noticed when you searched for certain keywords that you see some ads that have more than your typical headline, first line, second line and display URL. They have something extra. In this case, 1-800-Flowers has site links that link to specific categories of their site, like their same-day flower section and their best-selling flower section.

If you search for Staples online, you can actually subscribe to their newsletter right from Google’s front page. Now fortunately, you don’t have to be a Fortune 500 company to take advantage of these ad extensions. Actually it doesn’t cost you a dime more than a normal ad. I’m going to show you how to set that up right now.

Your first step is to make sure that you have the right settings in place when you set up a new campaign in Adwords. When you set up a new campaign in Adwords, by clicking on “Campaigns” and then adding a new search and display, search network only or display network only campaign, you want to make sure that you have all features enabled, because if you don’t, this standard campaign will actually only give you a few ad extension options and all features will allow you to take advantage of all the different ad extensions within Google Adwords.

You might be wondering, “What do I do if I already set a campaign up with standard settings and now I want to change it to all features so I can take advantage of ad extensions?” Well fortunately, that’s very easy to change. You don’t have to set up a new campaign. You can actually modify your existing campaign. To do that, head over to the campaigns area of your Adwords account and click on the campaign that you want to change. Then click on the “Settings” tab and under “Type,” if it says “Standard,” click “Edit” and change that to “All Features,” and then click “Save.” Bingo. Your campaign now has all features enabled.

Now that you have all features enabled it’s time to start rocking and rolling with ad extensions. To do that simply click on the “Ad Extensions” tab. Now I’m going to go over how to use the ad extension section of Google Adwords.

The first button, where it says “View” and then an extension, is a type of extension that you want to either look at data for or start incorporating into your ad so location extensions or extensions where you’re going to include your address, site links or, like I showed you before from 1-800-Flowers, where you can actually link to specific areas of your site. I’m going to go over how to set these up in a minute.

Segments are important if you start running ad extensions, because then you can see how different times, different networks, different devices interact with different ad extensions, and you get a good idea of what ad extensions you should use at what time or with what audience.

Columns are simply a way to customize how you view your ad extensions data, so what you’d want to do is click on “Customized Columns.” By default, it shows you the normal things, like clicks and impressions and click-through rate, and if you wanted to reorder them or take one out or add one, you can do so by dragging elements to the side, clicking “Add” or clicking “Remove” and then clicking “Apply” to apply those changes.

Finally it’s time to actually start adding extensions to our ad. By default, the view is on location extensions, because that’s the most popular type of extension, which is typically used if you’re a local business that wants to show your address to people. So if someone’s searching for bike repairs in San Francisco, you’d want to show them your address and say, “Hey, where in San Francisco?” To do that, click on “Addresses from Google Places,” then click “Plus Extension,” and then this will add the address that you have in your Google Places or your Google Plus local account into your Adwords account.

If you happen to update your address you can do so in Google Places and then it will automatically integrate the new address in your ad extension in Adwords. Once that’s set up, click on “Save.” But if you don’t have a Google Places account that’s OK. You can actually click “Manually Entered Addresses,” click “Plus Extension” and then add your address, just like you would within Google Places, except that you’re doing it within Adwords and this is the address that will show.

Once everything is set up there you might want to add call extensions. This is another popular type of extension with local brick-and-mortar businesses. I’m going to show you how to set that up. Click on Call Extensions. If you haven’t set this up before the default will say, “Call extensions setting, no setting.” What you want to do is add a phone number. To do that, click on “Edit” and if you already have a phone number in your account, like in Google Places, you can choose it here.

If not, click on New Phone Number. By default Google shows what’s known as a Google forwarding phone number and that’s important if you want to track and see how this ad extensions performing because when people call through that phone number, Google will be notified and you can know what ad they used to call the number from, if they happen to click on it from a mobile device you can see how long the conversation lasts. Things like that.

If you don’t want to do that just click on My Own Phone Number and then you just add your own phone number here. Once everything looks good, click on “Save” and you’ll have call extensions all set up.

Next, I’m going to show you how to set up an offer extension. To do that, choose “Offer Extensions” from the drop down menu. Then click “Edit” and then add an offer by clicking the “New Offer” button. Here’s where you add information about your offer, like a headline, what type of discount it is, an image, if you’re going to use this offer in a display network, things like that. Once everything’s set up, you want to click “Save,” and you’ll have an offer ad extension added to your account.

Now it’s time to go over how to set up site links. To do that choose “Site Links Extensions” from the drop down menu, click “Edit” and then “New Site Link.” Here, you can add link text, which is basically the anchor text of your site link, the URL, whether or not you want to show those site links on mobile devices and a description. Once you have one set up, click on “Save” and the site link will be added here. You want to repeat that process until you have at least four site links, so then you can pick and choose different site links for different ads. Once everything is all set up, click on “Save” and then you’ll be able to show site links with your ads.

Next it’s time to go over social extensions. To set that up, choose “Social Extensions” from the drop down menu. Click “Plus Extension” and then you simply add the URL of your Google Plus page here and click “Save” and you’ll be good to go. If you have a lot of activity on your Google Plus page, particularly a lot of pluses, that will display on ads when people search for certain keywords.

Now that you have social extensions set up, it’s time to start working on dynamic search ad extensions. While this sounds a bit complicated, it’s actually really straightforward. It’s basically where Google chooses content on your site to show depending on what people search for. To set that up, click on “Dynamic Search Ad Extensions,” then click “Plus Extension,” and then just add your website domain and your language. You put something like “Backlinko.com,” click on “Save,” and you’re good to go.

Finally, I’m going to go over app extensions, which is nice if you happen to have a mobile app. To use it, just choose “App Extensions” from the drop down menu, click on “Edit.” Click on “New App” and then enter information about your app. So if your app runs on Android, you want to keep this here, but if you run on Apple mobile devices, you’d want to choose iOS and then enter the app ID.

That’s all there is to ad extensions. As you can see, there are a ton of options here, but the most important thing is to choose the ad extension that makes sense for your site and your business, and most importantly, to test to see which ones are actually getting you more results.


Source Quick Sprout https://ift.tt/2HYgAP9

How To Setup Product Listing Ads In Google Ads

If you have a physical product that you sell on your ecommerce website, product listing ads (PLA) are for you.

PLA ads allow you to show off your product’s images, prices, and description within Google’s search results.

However, setting up a PLA campaign isn’t as simple or straightforward as your average Google Ads (formally Google AdWords) campaign. I’ll walk you through the steps you need to take to get your first PLA campaign off the ground.

What are product listing ads? When you run a normal Google Ads campaign and you bid on keywords like Boston dentist or other service based keywords, or informational keywords like SEO tips, you see the normal AdWords ads that we all know and love. You have some ads in the fold and some ads on the sidebar. But, if you search for certain product related keywords that have a strong buyer intent, you have two options. You can advertise like normal with an AdWords ad, or you can use a PLA ad.

This right here is an example of a bunch of different PLA ads. What this is is an ad that shows product information. It shows an image, a price, and a little bit of a description. You can click on it and go right to that section of someone’s site and make a purchase.

Here’s another example of PLA ads. When someone searches for USB microphone you’ll see some PLA ads, and instead of being on the sidebar these are actually above the fold at the top of the search results.

Now it’s time to go over how to set these up for your site. Your first step is to create what’s known as a Google Merchant Center account. This is important because this is where Google actually pulls your product information from. To set up your Merchant Center account just google Google Merchant Center, and it’s obviously the first result. Click on that. Choose your country, click continue.

Then, it’s time to configure your account, which is basically just giving them information about your business like your store name, the description, a website URL, and where you’re located. Once you have all this filled out click on save updates and, bingo, you now have a Google Merchant Center account.

Your first step is to click on the blue button that’ll appear when you first login to your Google Merchant Center account. Then, you want to integrate your AdWords account with your Merchant Center account. To do that with the AdWords account that you’re already logged into just click the blue button. If you want to link your Merchant Center account with a different AdWords account you can add the AdWords customer ID here, click link account, and it’ll do that. We’re going to link it with our AdWords account that I’m currently signed into.

Now it’s time to get your PLA ads all set up. Your first step is to create a campaign just like you would within Google AdWords. You want to give your campaign a descriptive name. So, if you were selling, let’s say, baseball bats you’d call it baseball bats. Then, you’d choose the countries that you want to target with your PLA ads. Then, click create AdWords campaign and continue.

Next, you want to customize your bid and budget. Your max cost per click is just like with an AdWords ad. This is what you pay when someone clicks on your ad. Then, you can set your daily budget. When that’s all set click save campaign settings and continue. Once you see this screen you’re good to go, and then you just want to click on finish. Then you’ll see information about your PLA ad campaign performance like clicks, impressions, click through rate, cost per click, just like you would with a normal AdWords account.

The major difference between a PLA ad campaign and a regular AdWords campaign is that there’s no quality score. The only things that influence your visibility are your bid, your daily budget – so if you go over that, obviously, it won’t show any ads, and the data that you give it in your data feed which I’ll go over next.

Let’s say that you’re not getting much traffic from this. It could be that your bid is too low and you’re not showing up high enough or in enough searches. So, you may want to change that to, let’s say, 20 cents, and you can increase your daily budget. When you want to make a change just make the change here and click on update.

If you want more advanced settings than just being able to modify the bid, budget, and target countries you can click on advanced manage in AdWords and you can actually manage the settings within your AdWords account. As you can see here, you get a lot more robust information. For example, you can filter, you can add and remove columns, you can add new ad groups just like you would within a regular AdWords campaign. So, if you really want to invest in PLA ads I do recommend managing your PLA ads within AdWords.

Once you have everything set up in terms of bids it’s time to actually get your products into the Google Merchant Center so Google can display them as PLA ads. To do that you want to click on data feeds in the side bar, and click on new data feed. This is where you give Google specific information about the products that you sell, like the category, the type, the price, and the availability.

What you want to do is give your data feed a file name, like baseball bats two, or dresses three, or whatever describes what type of products that you’re going to upload. Then, you want to click on I want to use Google spreadsheeets to store, edit, and upload my feed, because that just makes everything a lot easier. Then, you want to keep this checked off, please generate a template spreadsheet for me, and click on save changes.

Then, you want to click on edit spreadsheet. This is the spreadsheet that you want to modify based on what you sell. At the top they give you an example of what to do. You have your ID which is unique to your account, the title which describes what it is, a little description, the condition, the price, et cetera. You would just fill in the blanks for whatever it is that you’re selling.

That’s all there is to PLA ads. As you can see, if you run an e-commerce store that sells a lot of different products this is a great way to get traffic from people that are actively searching for what you’re selling.


Source Quick Sprout https://ift.tt/2Volp7s

How To Set Up a Google Ads Display Network Campaign

The Display Network is a completely different animal than it’s Search Network counterpart.

If you simply copy your Search Network campaign settings over to the Display Network, you’ll likely miss out on a boatload potential clicks and customers.

Fortunately, setting up a Display Network is fairly easy if you know what to do. I’ll teach you how to set up an effective Display Network campaign from scratch, including how to set up your campaigns, ads and keywords for maximum ROI.

Your first step is to log into Google Ads and click on “campaigns.” Then click on the “new campaign” button and click on “display network only.” Then you want to give your campaign a name. So if you are selling tennis rackets, you’d want to call it tennis rackets.

And in general you want your campaigns to be very tightly focused around one product or service that you sell. And then you want to keep the type as “display network only” and keep all features on so then you modify all the features. If you have a search network campaign that you want to copy as a display network campaign, click the drop-down menu and choose the campaign from the list.

But otherwise, you generally want to create a display network campaign that’s a bit different, so you can use display network specific strategies. Now if you want to target people on specific devices, like desktops and laptops or mobile devices, you can do so by clicking on “advanced mobile and tablet options,” and then you include or exclude people that use specific operating systems, devices or internet service providers. And “location or languages” are simply where you want your ads to be displayed and in what language.

Now typically, you want to keep this as United States but if you also ship and service to Canada you’d want to include that here. And in addition, if you want to add a country you could add a country, like Germany, if you happen to service the people that live in Germany.

Now under “bidding and budget” by default AdWords will set the bids to maximize your clicks and that’s typically not what you want because you really want to manually set your bids so you can make sure that you’re spending within your budget and get the most from your money. Now your budget per day you can set that to whatever you like depending on your marketing budget. And if you want to add extensions which are address and phone number information which are added to AdWords ads, you can do that for both the search network and the display network, you can do so by clicking on location and using an address that you already have in a Google Places account or just entering your address. Now once that’s all setup you want to click on “save and continue.”

Now it’s time to setup your first display network ad group. In general you want your ad groups to be very tightly focused. So if you sold tennis rackets on your site, you’d want one ad group there just for a specific brand of tennis rackets or children’s tennis rackets or high performance tennis rackets. So we’re just going to put “Head tennis rackets” because that’s a popular brand of tennis rackets. And your default bid is how much you want to spend for one click in the display networks.

We’re going to set that as a dollar just for now. Now in terms of targeting your ads, in general you want to use display keywords. So this will show your ads on content that’s related to the keywords that you give it. So you’d want to put something like “Head tennis rackets.” So then, when someone is viewing an article about Head tennis rackets, your ads will come up. Now I’m going to show you later how to add more keywords to this but just enter one and click on “add keywords.” And then when that looks all good, click on “save and continue.” And now it’s time to build your first ad.

Now for an image ad, this is where you upload an image by clicking “upload an ad” and then uploading an image file. But we’re actually going to create a text ad. And this works the same way as a search network. So you create a headline, one description, a second line description, and the display URL and the actual URL that they go to. And once your ad is built, you’ll see a little preview here and you can either create another ad or click “done” if you just want to display the ad. That will take you back to the settings for the ad group. If you want to add more ads, click on the ads tab, scroll down, click on “new ad” and you can choose from the list.

So if you want to create another text ad like we did, you click on this. If you want to create a banner, you click on this. And there’s also something known as the “display ad builder.” So if you want to create a display ad from within AdWords without having to upload an image, you can do so by clicking this, choosing one of the templates and then adding the same details that you add to a text ad. So your headline, two description lines, a display URL, and a destination URL.

Now the big difference between this and a text ad is that, obviously, you can modify it a lot more. So you can modify the color by clicking this. You can modify the animation by clicking this. And you basically make a lot of changes. So once that looks good, click on “preview and save” and then you can add that to your ad group.

But what we’re going to do now is actually look for more keywords to add to our display campaign. So we’re going to click “cancel” and then click on “tools and analysis” and click on “display planner” which is basically the keyword planner for the display network. Next, click on “ideas and estimates” and add some keywords related to what you sell. So tennis rackets. Or you can include a landing page URL if you already have a landing page setup that you expect your AdWords traffic to go to.

Then once that’s all setup, click on “ad group ideas,” then click on “individual targeting ideas.” This will show you information about the keyword that you gave it. So you get an idea of the age groups that you will be targeting and the gender of the people that you will be targeting. And if you see a related keyword that looks like a good fit, you can click on it. And if all this information looks good about impressions, age group and gender, you can click on “add to ad group” and it will be added to your ad group.

Next I’m going to show you how to advertise on specific places within the display network. And to do that, click on the “placements” button. And as you can see there are 301 websites, 76 mobile apps and 52 videos within the AdWords database. Now obviously when you advertise in a display network, your ads are going to appear on a lot more than 301 different websites. But these are just sites that participate in a program where you can check them out before you can advertise on them. So to see these sites, just click on this button. And then you can check out the information on the websites that they have in their database.

In this case, you can tennisrackettrader.com. You can actually see the site before you advertise on it. You can check out some of the ad formats that they accept, how relevant it is to the keyword that you entered, the historic cost per click, the cookies per week. So how many visitors they have with cookies, so you can target people with specific interests with demographics and how many impressions per week you can expect for advertising on that site.

So if the site looks good, click on the little blue button and it will be added to your ad group. So that’s all there is to advertising on a Google AdWords display network. As you can see there’s some overlap between a display network and the search network, but there are a lot of important nuances to keep in mind to get the most from your display network campaigns.


Source Quick Sprout https://ift.tt/2VowyVM

These 5 Factors Are What Actually Matters When It Comes to Your Credit

Target hikes minimum wage to $13, with plans to ultimately pay $15 per hour

If you notice workers at your local Target store have a little more spring in their step, there's a good reason for it.The retailer announced Thursday that it will boost minimum wage for its employees to $13 per hour this year, with plans to ultimately pay team members at least $15 per hour by the end of 2020.Minimum wage at Target is currently $12, nearly double the U.S. minimum wage, which has been $7.25 for the past decade. Chief competitor Walmart has an $11 [...]

Source Business - poconorecord.com https://ift.tt/2CX6mut

Hitting a Wall: What to Do When It Feels Like You’re Not Making Financial Progress

Tell me if this sounds familiar.

You’re in reasonably good financial shape. You probably have an emergency fund of some kind. You’re almost definitely not carrying any high-interest debts – you might have a student loan or a mortgage, but nothing overwhelming. You’re probably contributing at least a little to retirement. Things are good.

Yet there’s still this overwhelming sense that you’re just running in place. Things might be on solid ground, but you’re not really building the foundation for the things you hope to have in life someday. You’re just running in place, one day after the next. Life is comfortable but… it’s not going anywhere.

You have some dreams, but they feel just as distant as they did years ago – they might be negligibly closer, but that’s all. Your life really doesn’t seem any better than it did a few years ago, except that you’re a few years older.

Is this it? Is the American dream just a treadmill with a pretty picture on the wall in front of it?

I want more out of life than that. Many of my friends do. I’m guessing you do, too. Yet that sense of running in place and never making real progress is a very common thing.

How does a person get out of that rut? For me, there are several techniques that I use to make sure I don’t feel like I’m just running in place with my financial progress. Here are six strategies that have worked really well for me over the years.

Strategy #1: Reassess Your Goals

If your life feels like you’re just running in place, what are you running for? What are you running from?

Often, that sense of just running in place or of hitting a wall comes when you’ve got a big goal you’ve been working towards and you’ve either achieved that goal in part or in full or else that goal is so far off in the future that it doesn’t seem to be a real part of your day to day life.

Let’s say that your big goal has been to repay some or all of your debts. You’ve managed to achieve it – you’re free from credit card debt. You have a lot of good financial habits that you’re continuing to follow but now the extra money feels rather purposeless. It’s tempting to just start splurging, but that feels wasteful, so you just kind of run in place and money builds up in your checking account. (I have a friend who is in this exact position at the moment and this post is in part written with him in mind.)

Maybe you do have a big goal, like retiring at age 50 or 55 with a healthy annual income from your retirement savings. The only catch is that you’re 32 and that goal seems like a lifetime away. You started when you were 28 and that seems almost forever in the past… and you have far more ground to cover ahead of you than you’ve already covered. That mountain in the distance looks just as far away as it ever has.

There are many variations on these stories and they all lead to that sense of plateauing, of no longer making meaningful progress toward any goal even though your tactics are still good and you haven’t really changed them.

Often, the problem isn’t your tactics, but your goal.

When you achieve a significant goal in life, there’s a sense of accomplishment, but then quickly thereafter there’s a sense of … nothing. You have a lot of good tactics in place for reaching the goal you just achieved, but now it feels aimless and empty.

If you’re in that situation, spend some time seriously thinking about what’s next in your life. What do you want to do in the future? Maybe you want to change careers. Maybe you want to start a business. Maybe you want to retire early. Maybe you want to get your kids through college with minimal or no student loans.

If you’re without a goal, set one.

The nice thing about big-long term financial goals is that, in the early stages, they’re usually really flexible. They center around either paying off debts or saving money somewhere. That means that you can decide, in a few years, to change your goal radically and you’re usually in good shape for whatever your new goal is. So don’t worry about the possibility of wanting a different goal in the future. Instead, worry about choosing a meaningful goal right now. What speaks to you? Make that your big goal and use that initial enthusiasm push you along for a while. Not only will it feel fresh and new, you’ll find that your initial progress feels quite big, too.

What if you’re in the other bucket and you do have a long-term goal but it seems incredibly far off in the future and your regular progress feels slow?

First of all, do a gut check and make sure that you still really want this goal. Visualize your life at the point where this goal will be achieved. Does that vision really excite you still? Or is it interesting, but not something that makes you feel a little tingly?

If you still find it exciting, indulge in visualizing that big goal regularly. This helps keep the goal feeling lively and meaningful.

For example, the exciting vision in my life is Sarah and I effectively retiring about the time our youngest son finishes his schooling. For the first couple of years, we are going to do a lot of touring around the United States, visiting tons of national parks and significant state parks and national monuments and weird roadside attractions and the like and simply seeing America, just the two of us, like we did when we were dating and in the early years of marriage before a flood of kids made that kind of thing much more difficult. Except, this time, we aren’t worried about a career or about jobs or anything and we still have our health and many years ahead of us. That, for me, is the dream. That’s the big vision.

If you don’t find it exciting, spend some time soul searching until you find that goal that seems exciting, then indulge in regular visualization of that goal. Again, it’s that regular visualization of something you deeply want that makes a huge difference in terms of making your forward progress seem meaningful.

In other words, if you really are on a treadmill, make sure that picture in front of you is as beautiful and engaging as possible so you don’t notice the treadmill as much.

Strategy #2: Change Your Focus

One reason why people start to feel like they’re stuck in a rut is that they’re looking at a particular way of measuring their forward progress that isn’t showing them the actual benefits of their effort.

A great example of this is when you focus on the standard of living of your day to day life when you’re aiming at a big financial goal. You might feel like you’ve been working hard forever, but nothing is changing and nothing is going to change for a long time. You’re still working at a demanding job. Your standard of living is roughly the same as it has been for a while. Nothing seems to be changing in your life, but you’re still working really hard.

In those situations, it can be really valuable to look frequently at a different metric, a different way of examining your life and charting your progress.

For example, rather than thinking about your day to day life, keep your eyes on a number like your net worth or your overall retirement balance. Keep track of those numbers over time and compare your current number to earlier ones.

In my own life, I look at both of those numbers fairly often when I’m feeling like I’m running in place, and then I don’t look at them much at all when I feel good about things. Seeing the growth in my net worth and in my retirement savings makes me feel really good about my financial progress, even if my day to day life feels unchanged.

In truth, my daily standard of living hasn’t changed much at all in the last decade, so if I looked at that, I would feel like I’m not headed in a great direction. However, when I look at my retirement accounts, Sarah’s retirement accounts, and our children’s 529 accounts, it’s pretty hard to miss the immense progress on all fronts. Things like helping our children with their education have gone from wistful dreams to mortal locks. Things like trying to retire in our early fifties (or so) isn’t a dream at all, it’s more like an inevitable conclusion (assuming that’s what we choose to do at that point).

My day to day life is a bad metric for what my future holds. I only feel disheartened when I look at my day to day life as the main metric for success. The thing I need to remember is that my big life goals involve being very busy and almost overwhelmed at this point in my life and having many parts of my life be simple and automatic is part of my biggest life ambitions. I want to raise three children to be solid citizens in the world (which I’m doing now) and then when they’re on their own, enjoy the rest of my life with Sarah in a very low stress environment (which I’m actively preparing for).

So, my metric for seeing whether or not I’m successful at those endeavors isn’t the quality of or change in my day to day life. If I’m looking at that, then I’m going to feel like I’m running in place. What I need to look at instead is the quality of my relationship with my children and my wife, how frequently I put aside time and energy to listen to them and genuinely try to understand them and guide my children in a positive way, and my savings progress toward the big events coming down the road. Those things are in good shape and they’re aiming in a very positive direction, even if my day to day life doesn’t seem to be radically impacted. The changes are there, but they’re subtle, and I have to know where to look.

Remember, when you look at a beautiful house, you usually don’t see the foundation right away. If you’re improving your foundation, then measure the foundation, not the house.

Strategy #3: Look for the Things That Don’t Matter

One common element of feeling like you’re hitting a wall and not making any progress is that you’re, in fact, not actually making any progress. If you take a peek at other indicators like account balances and net worth and find that it’s not growing very fast at all, then your money is going toward things that aren’t your goals and you’re making extremely slow progress (if any) toward your financial goals.

The Simple Dollar is loaded with advice on how to handle this situation, but there’s really one single piece of advice that stands above all else: What are you spending money on that’s unimportant to you? Whatever that is, cut it down to the bare minimum.

The common reaction that many people have is to reflexively say that everything they spend money on is important, but that’s very, very rarely true. Most of us spend at least some of our money on things that are really unimportant in the big scheme of our lives.

Instead, if you’re feeling like this, then it’s time to run through all of your expenditures with a fine toothed comb and ask yourself whether or not this item is really, really important to you and, if it’s not, look for ways to cut that spending to a bare minimum.

Is your car insurance vitally important to you? Well, you have to have it, but very few people are going to have deep personal feelings about their auto insurance policy. Shop around and get a cheaper rate, then start funneling that savings straight into your long term goals.

Is your cell phone plan vitally important to you? Many people may need or really want some form of cell phone plan, but many people are on a plan that’s overkill for what they actually use. Look at what you actually use, then shop around for a plan that matches that, and start funneling the savings straight into your long term goals.

Is the brand of ketchup you buy vitally important to you? Maybe if you’re a ketchup connoisseur, but for the vast majority of people, ketchup is ketchup. Start buying ketchup – and all of the other things that aren’t vitally important to you – in store brand form, and channel those savings straight toward your long term goals.

Do this with everything you spend money on. Stop spending your money – and thus the time and energy and effort that went into earning it – on things you don’t really care about and start channeling it toward stuff that you do care about. You’ll find that you start moving toward big goals far more rapidly.

Strategy #4: Automate Your Good Financial Moves in an Aggressive Way

A big part of strategy #3 is about channeling the “found money” in your life toward your big financial goals. This sounds good on paper, but when you have some cash in your checking account, it might not be on top of your mind to put that money toward retirement or college savings or whatever.

That’s where automation comes in. When you’ve cut your spending in some notable fashion, you should set up an automatic transfer of that exact amount you cut toward a big goal that you have.

Did you cut your monthly cell phone plan by $20? Add $20 per month to your automatic contribution to your Roth IRA.

Did you save $60 a year by changing auto insurance policies? Bump up your retirement savings at work by $5 a month.

Did you manage to trim $50 a month from your grocery and household supplies spending by switching to mostly store brands? Schedule an automatic extra payment on one of your debts for – you guessed it – $50 a month.

Did you find some other way to save $10 a week? Set up an automatic $10 weekly transfer from your checking to your savings to start building up an emergency fund, so the next car breakdown doesn’t catch you off guard.

Since you know how those cuts were made, doing something else with the savings shouldn’t affect your standard of living one iota outside of those specific changes. Meanwhile, you’re now making automatic progress toward whatever your goal might be.

That progress will become apparent over time if you’re looking at the right metrics (see Strategy #2). You’ll see your debts declining a little faster. You’ll see your retirement savings growing a little faster. You’ll stop plateauing and start heading toward your goals again.

Strategy #5: Focus on the Meaning: What Do Your Contributions Actually Represent?

Often, when we’re working toward a big financial goal, the little steps we take along the way can feel really insignificant and meaningful. What is a step when you’re running a marathon? It’s one of tens of thousands of other steps, right?

Yet each of those steps requires some effort. Each of those steps requires some sacrifice. If you’re putting $100 into retirement savings, that’s $100 that you’re not enjoying in one’s daily life. That’s a choice and a sacrifice, and it’s one that many people start to struggle with.

It’s an even more difficult choice when it’s hard to tangibly see what the $100 toward a big financial goal represents. $100 might be a great dinner with my wife and a movie together and maybe a stop at a bookstore where we each pick out a book. What is $100 toward retirement? It’s hard to see it.

For me, I find that there is a great deal of value in seeing what those individual steps represent. For me, what I have found a great deal of value in doing is breaking down my cost of living into how much that is per day and using that as a measuring stick – I call it a “day of freedom.”

Let’s say my annual living expenses are $36,500 per year. That’s just a convenient number to make this easy to understand. If I translate that into a day, that means that every $100 I have in retirement represents roughly a day of freedom from having to work. It’s a day I can sleep in. It’s a day I can rise and stretch and not have to think about work unless I want to keep working on a project. It’s a day I can fill with leisure if I choose. It’s a day where I can chase down whatever passion is on my mind. I can go on a long walk or whatever it is that I want to do. It’s just a day of complete freedom. It’s a complete day of freedom for Sarah, too; we might spend it together, or we might each do our own thing.

Every $100 I put into retirement savings represents a day of complete freedom like that. Even better, every time I put in $100, it’s an extra day on the front end of retirement, meaning a day when I’m as physically and mentally healthy as I’m going to be.

When I look at my $100 contribution to retirement that way, things start to reshape themselves. I could spend $100 on an exorbitant date with Sarah, or we could have a modest dinner at home, cuddle up and watch a Netflix movie, and go on a nighttime walk hand in hand, and then that $100 goes into retirement and buys us a day of freedom later.

Naturally, there are some things and some experiences where it’s pretty sweet to have them right now, but that threshold gets a lot higher when I see it gobbling up days of freedom from my life. Those are beautiful and valuable and precious.

You can do that kind of translation with almost any goal that you have. Retirement makes it really easy, but you can look at college savings as basically opening opportunities for your kids. You can look at debt freedom as lower bills and more opportunities for you. Just divide it up into pieces that are really meaningful for you – for me, the thought of a day of freedom is really powerful, so I use it a lot. $100 in retirement savings buys me a day of freedom, and each and every $100 contribution moves those days of freedom ever closer to today. Eventually, my life moving forward and those days building backward are going to meet up, and every single bit of savings shrinks that gap.

Strategy #6: Raise Your Income

This final strategy is a little different because it’s not just a switch that most of us can easily flip in our lives, or else we’d do it. Raising your income usually requires a lot of effort within your career or entrepreneurial path, a career switch, or a second job or side gig, and all of those are challenging and require effort and planning.

However, if you want a way to sustainably get out of your financial slog, jumpstarting your income (and directing that increase to your financial goals) is a guaranteed way to do it.

So, how is this relevant and actionable? Simply put, you can simply choose to make improving your income into a short-term or medium-term goal that’s part of your long-term financial goals. Your goal might be to retire early, but the thing you can really work on right now on the way to that goal is setting yourself up for more earnings.

For example, if you think that the best next step to earning more for you is to get a raise or a promotion at work, talk to your boss about a concrete plan with clear steps that you can follow to take you to that goal. That plan becomes your medium-term goal; the individual steps are short-term goals.

If you want to start a side business, write up a business plan (short-term goal) and execute that plan (medium-term goal) by following all of the steps (a bunch of short-term goals).

If you want to launch a new career, figure out what your path looks like from where you’re at to that new career path (short-term goal) and start following that path (medium-term goal) by getting the education you need (medium-term) a class at a time (short-term) and setting yourself up to dive into that new path with success.

If you want to jump to a new job in your career path, figure out what you need to have on your resume to make that leap (short-term task) and make building that resume your goal (medium-term goal). Each step in that process is a short-term goal that you can work on at your current job or in the evenings.

In short, you turn income growth into a medium-term goal, and the steps to getting there into short-term goals, as part of your long-term financial goals.

Those steps aren’t guarantees of more money – nothing ever is. However, those steps are all about you controlling the part of the process that you can actually control, which is your actions, thoughts, and behavior. You do your part and good things will typically follow.

Final Thoughts

When you feel like you’re stuck in place with your financial progress, there are many potential causes and you’ll often find that more than one of them apply to you. You might not have a compelling long term vision at all. You might be focused on the wrong measurement of success. You might be misusing your resources and wasting your efforts. You might not be appreciative of the usefulness of each step and what it really means. Or, you might just need some tangible short term and medium term goals.

Whatever the case may be, there are ways to break through this wall and either start making fresh financial progress or recognize that you’re actually making a lot more progress than you thought. In either case, your path forward becomes illuminated in a whole new way.

Good luck!

Read more by Trent Hamm

The post Hitting a Wall: What to Do When It Feels Like You’re Not Making Financial Progress appeared first on The Simple Dollar.


Source The Simple Dollar https://ift.tt/2YPjfA0